


We may receive a commission when you use our affiliate links. However, this does not impact our recommendations.
Good design is fundamental in woodworking. I’m devoting this last installment of “fundamentals week” to the idea that design is next – after knowing your material and how to use your tools well – in the progression of skills that all woodworkers go through all the time.
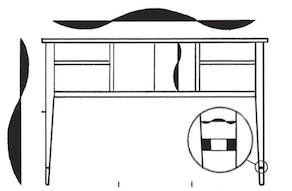
A George Walker woodworking design that shows furniture proportions.
We’ve talked a little about George Walker and his no-nonsense approach to design. You may already be experimenting with that free PDF from a couple weeks ago. But what if you’re someone who learns more with your hands, in the actual building process, rather than with pen and paper? Well, then it’s time for a quick-start plan!
In my opinion, a Shaker project is the way to go. Some would argue Arts & Crafts, but to me Shaker is the style that best embodies overall simplicity, clean lines and classic proportions. Shaker blends well with many other styles, including contemporary furniture.
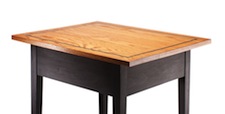
Glen’s Shaker Table is clean and simple.
I found a fantastic project from Glen Huey that really nails the key elements of good proportion and design. Just like any of my quick-start projects, the idea is that you should be able to use this blog post alone to complete the work. You’ll have to write your own cut list and use some problem-solving here and there, but the rest of the information is in the following steps!
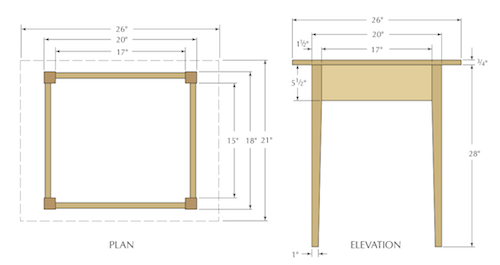
- Unless you have a single board wide enough for the tabletop, glue panels together to form the top. Use your own judgment on size and use your preferred method for edge-joining. (Glen used pocket screws.)
- Cut an apron for each side of the tabletop. The apron length is pretty easy to figure out – just subtract the right amount from the width of the tabletop. See the above diagram for guidance. The apron width is more important than the length, from a design perspective. Rip the boards to a width that is ¼ the width of the tabletop.
- Set the length for your legs at 5 times your apron width. This will give you a nice overall proportion. Cut the four legs to length.
- Cut the tapers on two sides of each leg, leaving enough untapered length at the top for your aprons. Do this by drawing a pleasing angle from the bottom to where the apron will meet on one face of one leg. (Glen suggests ½” as the bottom depth of the angle.) Cut close to that line with a jigsaw, and smooth the angled face with a block plane. Now draw the same angle along the tapered face and repeat the cutting process. Finally, repeat for the other three legs.
- Assemble two pairs of legs and aprons with, as Glen recommends, pocket-screw joinery. Attach the tabletop to these two side pairs, allowing for seasonal wood movement by slightly oversizing the pocket-screw holes in the aprons.
- Now attach the remaining two aprons to the legs. Paint, finish and enjoy!
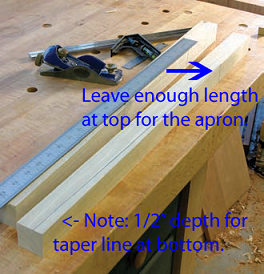
Details on cutting the tapered legs.
Here are some supplies and tools we find essential in our everyday work around the shop. We may receive a commission from sales referred by our links; however, we have carefully selected these products for their usefulness and quality.


