We may receive a commission when you use our affiliate links. However, this does not impact our recommendations.

Furniture design is not all about starting from scratch. Furniture plans can be adaptations of shop projects.
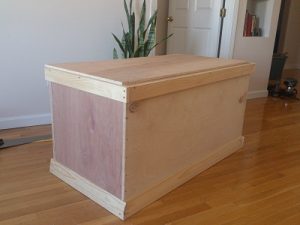
When I built my traditional-looking tool chest, I was focused on the challenges of building furniture in a small apartment space. It came out great, but let me tell you – it was a bear to move down from the third-floor walk-up after I acquired access to a new, larger shop space last month. The thing must have weighed 300 pounds.
I try to consider the overall fit and finish of a piece when I am in the design stage. Even if the work is purely functional and destined for the shop, I like it to look good. But I don’t always take something that is designed to live in the shop – such as a tool chest – and turn it into a piece of furniture. Right now I have the opportunity to do that with my second traditional-looking tool chest, a piece I’m building for a friend’s apartment. The idea is to create more of an entry bench – a place to sit and take off boots after a walk home in New England winter weather, and a place to store said boots.
It occurred to me when the entry bench idea first came up that the traditional tool chest is perfect for this, since the bottom is specifically designed to be replaced when it gets wet and damaged.
You see a lot of blogs on “how to make shabby chic furniture,” but usually these furniture building plans start with exactly that – furniture designs. Why not take a more adaptive approach? Surely a lot of traditional furniture forms arose from what craftsmen had learned in building shop appliances. Workbench joinery becomes table joinery. Tool chests become blanket chests. It would be really interesting to study the way workshop projects and furniture projects have been intertwined over the long history of woodworking.
The furniture design process for this entry bench has been, as you might imagine, very easy. I simply cut down the dimensions of the tool chest I’d made, so that the height would be a comfortable sitting height and the width and depth would retain good proportion. I also redesigned the interior so that the storage zones are useful for boots, clothing and umbrellas, instead of handplanes, saws and pneumatic nailers.
Another thing I have taken into account on this second design is weight, because – in case you were wondering – my friend’s apartment is a third-floor walk-up. I have trimmed material wherever possible!
–Dan Farnbach
p.s. – Interested in exploring adaptive design more? Check out “The Versatile Shed” in our store.
Here are some supplies and tools we find essential in our everyday work around the shop. We may receive a commission from sales referred by our links; however, we have carefully selected these products for their usefulness and quality.


Interesting bit of thoughts here. I have had much the same thoughts as I contemplate building a ‘real’ tool box. Weight is a real concern – the reality of the life is that I can NOT pickup as much weight as I used to (age and the like – ok, just not a stud!). I like the ‘Dutch’ form of the tool chest but, even there, with a liberal sprinkling of thinner (and lighter) woods such as 1/4 plywood, etc. With a bit of thinking and doodling with a pencil on paper, I think I can design a tool chest that puts the strength where you need it – the objective being strength, good looks, utility AND lower weight overall. One way is to build the tool chest as a stacking arrangement. That way at least the individual parts weigh less.
In any event, keep the good ideas coming.
That’s awesome Dan! That’s a hard thing to convey to folks sometimes, overcoming the fear of changing the “recipe”. Too often a lot of folks new to the craft do more of the cut to precise dimensions rather than cutting to fit the wood they have to work with or the space the item will be placed. Maybe you can take an article from a build of one of the other editors and go through the process of approximating a replica 🙂 Something like Robert’s tool cabinet, but in plywood and pine and fit for your workspace.