


We may receive a commission when you use our affiliate links. However, this does not impact our recommendations.
 Sooner or later into every woodworker’s life stiles and rails must fall. And, unless you leave them square, you’re going to have to deal with sticking. You know what sticking is, right? It’s that little bit of decorative moulding that makes the transition from the frame face to the panel surface.
For the upcoming April issue of Popular Woodworking Magazine (which should be mailing to subscribers on, or about, February 20…yeah, I know I’m a little early but I’m excited), I’ve built a William & Mary chest. While the style may not be to everyone’s taste, the techniques used to make it can certainly add to any woodworker’s arsenal. I wanted to further illustrate one particular technique that relates to the paragraph above: frame-and-panel construction.
If you started out like me, you’ve probably made as many simple boxes and mortise-and-tenon based tables as you can stand. One reasonably easy way to kick up the complexity of your projects is to add something with a frame and panel. The William & Mary chest I built employs this method of construction for the case sides but the techniques translate to door construction and lots of other structural and decorative elements.
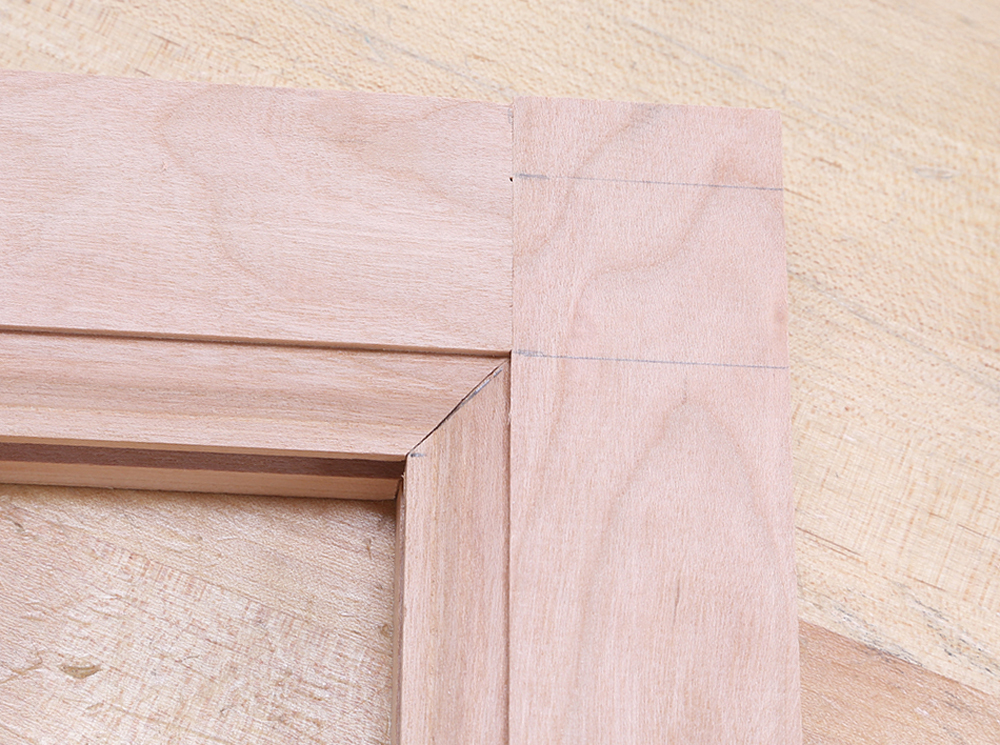 And while frame-and-panel construction isn’t anything new (it’s been in use for centuries – from Pilgrim furniture through Danish modern and even in contemporary work), it may not be something you’ve yet tried. Making the mortise-and-tenon frame isn’t too terribly different from the multitude of Shaker stands you’ve built. The only real difference is, all the frame parts are oriented in the same plane (sure, there’s also that panel in the middle but I was hoping you would just read on.)
So, I won’t go on about how to make the mortises and tenons, or how you shouldn’t glue the panel into the frame because that defeats the purpose. The chest frames have an ogee moulding around the inside edge. There are a couple of ways to handle how these moulded edges come together when the frames are assembled. You can cope them or you can miter them, as I’ve done in the article. Either way you’re going to need an easy, accurate way to remove the sticking waste from the stiles. The fun part is, this technique works regardless of whether the stiles are part of the sides of a William & Mary chest or the door to a simple cupboard.
I’ve put together a quick video that shows the technique in use. The video deals solely with removing the sticking waste. I’ve dealt with other aspects of frame and panel construction in the article and will do more here on the editor’s blog in the future (either way, you’ll just have to wait.) For now, enjoy the short video; I hope it helps you make better frames.
Here are some supplies and tools we find essential in our everyday work around the shop. We may receive a commission from sales referred by our links; however, we have carefully selected these products for their usefulness and quality.


Yay for using Kevin McLeoud’s music in videos! He’s a great resource and I use him for lots of things, including background music.
Hope you’ve included an equally slick way of removing sticking waste for those of us who don’t have electric jointers.