We may receive a commission when you use our affiliate links. However, this does not impact our recommendations.
In order to know, and understand, how things were made in the 17th, 18th and 19th centuries you’ve got to spend a lot of time on the floor (no Bender jokes, please). Looking at pieces from the top down, or outside in, only gives you a small part of the picture. And that’s why you can only learn so much by looking at books and magazines.
Sure, you can read some scholarly text (and more often than not some not-so-scholarly text) and try to relate that to the pictures or illustrations in a book, but there is no substitute for getting a little dirty. I’ve spent 30 years crawling around on some of the best floors in the country.
In a not-so-long-ago-former life, antique dealers and collectors, on occasion, paid me to “vet” pieces for sale privately and at auction. If you’re unfamiliar with the term vet, it basically means I evaluated a piece (or pieces) of furniture and told them everything I found that was wrong. Sometimes that meant I got to examine the pieces in a closed room, and other times it was on the floor of the auction preview room(s). The time to do so was almost always shorter than I would have liked.
What all of that (plus decades of repairing old furniture) has taught me is to look at things with a critical eye. You need to play detective when vetting something and it can hardly ever be done by looking at photographs.
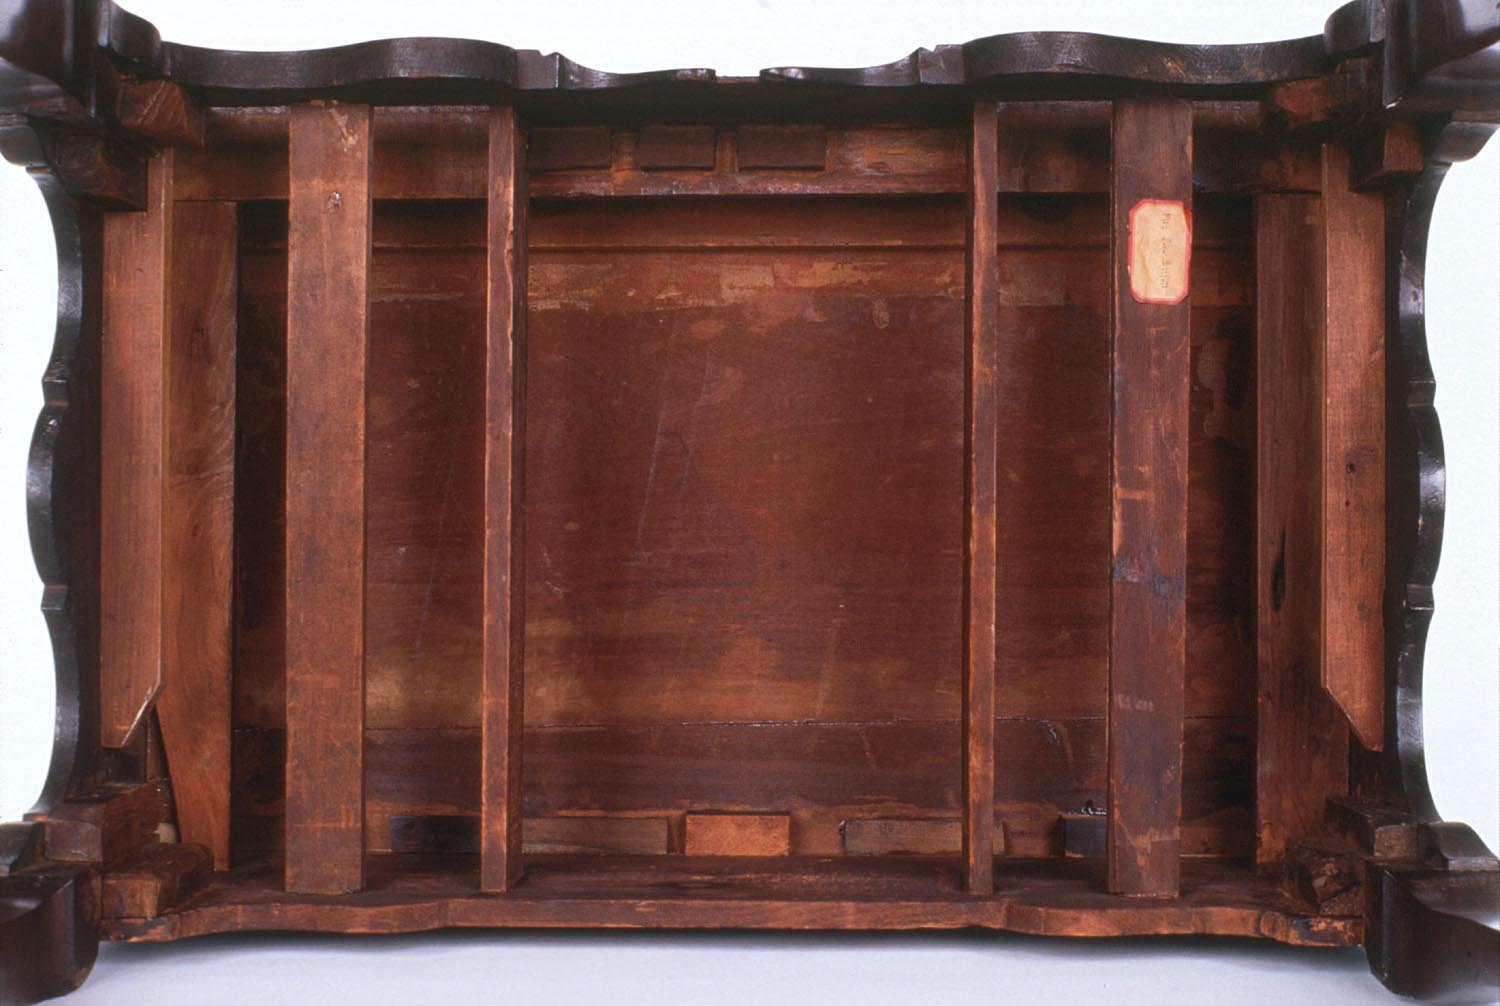
What I’m going to ask you to do is exactly what I said is very difficult to do – look at the photo and tell me what’s new. There are parts of the Newport dressing table pictured that just aren’t correct – they’ve been replaced or repaired. The person who gets the most right in a posted comment below (or you can email me by clicking on my name below) will get a yet-to-be-named prize…okay, I’ll name the prize…the winner gets one autographed copy of each (yes, I know that makes them worth less…) of my “Cabriole Legs Simplified”, “Carve a Ball & Claw Foot” and “Building a Furniture Maker’s Tool Cabinet” DVDs . The two carving DVDs are no longer available and, in a million years or so, could be considered collector’s items. In the event of a tie, I reserve the right to decide who gets the prize (most likely the person who gets them right first according to the timestamp). And, you need to do it by 8am (EDT) Monday morning because that’s when I’ll make the decision. Of course, I’ll post the answers here for your perusal, too. Good luck.
For 7-Thumbs –
Here are some supplies and tools we find essential in our everyday work around the shop. We may receive a commission from sales referred by our links; however, we have carefully selected these products for their usefulness and quality.


The different glue block on the back is a red herring since it is likely to have been part of the repair of the bottom board which shows a cracked repaired with a hide glue rubbed joint. The piece running front to back on the left that is different from the right piece but is show loss and not completely under the back glue blocks on the back legs is also likely from the same time of the other repairs. The missing glue block at the front is also an expected loss.
The two side pieces that are attached (somehow) to the inside of the side skirting are the problems. All the other elements are mortised into the front and back members. These two pieces don’t even attach to the back of the carcass. The piece on the left shows evidence rotary head chatter, which is not an indictment itself, but they both show signs of being stained to artificially oxide their surfaces and thereby hide their true age.
It’s hard to tell from this angle but for some reason this frame has been altered. I suspect that by looking at the drawers, the answer will be clearer.
Pretty much guessing, but here it goes. Looking at the eight interior vertical boards, numbering them from left to right, I would assume that boards 1, 2 and 8 are new. Board 6 (with the sticker) is old, but not original.
At the bottom of the photo, are five horizontal blocks at the back of the piece. The center one (3) is new, the one to the farthest right (5) is not original. Fun challenge, looking forward to the official answers.
Is hard to tell what each piece is with only one view. The pieces against the sides with chamfered ends have planer marks on them. Above those pieces are two other pieces; the on on the left is chamfered, exposing a small light colored area by the left rear leg. The corner blocks in that corner possibly have nails in them. The lower right hand corner block looks like it has a slotted screw in it. The glue block in back center is lighter and possibly shaped differently. The glue block partially hidden by the piece with the paper tag looks like it has some nails or something shiny along its edge and maybe even a hole going into the top. The piece with the tag, and its mate,(drawer glides?) look slightly pulled away from the back, possibly exposing a mortise/tenon. The mate has a recessed hole; a screw appears to be driven into the edge of the recess and into the front rail. One of the glue blocks at the front is missing. Has the back rail been broken by the right leg?
The drawer runner on the left side of the picture is a totally different color than the rest of lower drawers runners. Also both supports for the left and right aprons behind the front legs look like a mich different color than the rest of the cases secondary wood, I think the pieces actually have planer machine marks on them also..
It looks like the support blocks have been replaced, as well as a repair made at the corners at the bottom of the photo. And the two larger cross braces look like they were added later.
My guess would be the two drawer guides (name?) all the way to each side, they end with a diagonal cut on each of the lower corners (low as down in the picture). This is based on that they look like they have been flattened on a jointer with a rotating cutter (straight knives).
The front (upper) left corner support block for the front piece is also newer than the furniture itself. It lacks the chamfer that can be seen on most of the other corner support blocks. plus there is not the same amount of grime on it.
The rear (lower) right corner support block for the aft piece looks like it has been attached with a straight slotted screw. The crosscutting of that block looks like it was made with a coarser saw than the rest of the blocks, also the dimensions aren’t quite right.
Pretty much the whole underside. Both drawers, supports and guides. The entire back rail, All but maybe one if the corner support blocks that meet where the rails join the legs and that little lighter colored rectangle in the middle by the bottom rail. (Which makes me think the entire dust shelf (sorry, don’t know the terms) might also have replaced.)
How about posting a higher resolution picture that is clearer when blown up to look for details.