


We may receive a commission when you use our affiliate links. However, this does not impact our recommendations.
 On the William & Mary chest in the April 2014 issue of Popular Woodworking Magazine (which mails to subscribers next week), the case sides are frame-and-panel construction (read about how I handle sticking here) with drawbored mortise-and-tenon joints. As my article made its way around the office for editorial review, Megan Fitzpatrick noticed that I used two offset pins in each tenon and asked, “Why, the offset?”
Then it occurred to me you might also wonder, why two pins instead of one?
The short answer to “why two?” is that the rails are a bit wider and two is better than one. The short answer to “why offset” is that I’ve seen too many period pieces with split stiles.
But here’s a more thorough explanation.
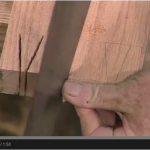
Let’s just assume that we all know that drawboring is when we drill a hole through a mortise-and-tenon joint where the hole through the mortise is offset slightly from the hole that is drilled through the tenon and, when a peg is inserted, the peg pulls the joint tighter as it moves through the offset holes…let’s just assume that. So, why would we want, or need, more than one peg through the joint?

Even after re-assembly, a single pinned wide mortise-and-tenon joint has gaps from racking over the centuries.
To me, the answer is twofold. When using pegs (often called pins, which are not to be confused with dovetail pins…) to draw a wide mortise-and-tenon joint closed, having only a single peg means you have a pivot point on which to leverage the joint over time.
I’ve seen it hundreds of times in period pieces that I’ve repaired: If the joint is prone to racking stress (as part of a chair for instance), the end-grain shoulders of the rail begin to crush the long-grain fibers of the stile. This loosens the joint and allows further racking. With two pegs, you lock the joint solidly in place and take away the fulcrum.
Another reason you want to use two pegs on a wide mortise-and-tenon joint is for the same reason you’d want to use two clamps: to equalize the pressure bringing the joint together. If you are making a mortise-and-tenon joint that is 7″ wide, you’d most likely use two clamps to pull it together so the shoulders mate tightly across the entire joint. If you put a single clamp at the top or bottom of the joint, the opposite portion may have gaps. Even if you put a single clamp in the middle of the joint, depending on the type of frame you are making, you may still end up with gaps. Two clamps ensures the shoulders are tight across the entire joint; two pegs does the same thing.

The double pinned mortise-and-tenon from this early 18th-century table is still fairly tight even after about 300 years.
Let’s face it, pegs are the 17th and 18th centuries’ answer to clamps. Much like nails, the idea was to pull a joint together and hold it tight until the glue dries. Again, having repaired hundreds of 17th and 18th century mortise-and-tenon joints (almost all of which were glued) the wider ones with two pegs have generally held up better.
And does a drawbore lock a joint in place forever? Not a chance. I’ve repaired plenty of pieces with drawbored mortise-and-tenon joints that were loose. After a couple of centuries of drying out, being sat on, knocked over, dragged around the home by toddlers, hauled from place to place and generally being used (and abused), you’d be a little loose, too.
So, why bother with drawboring? The answer is simple: It pulls the joint together and cuts down on the need for clamps (or at least, reduces the number you need for a project). For me, it’s also a matter of historical correctness. Most of the mortise-and-tenon joints I’ve seen in period chairs and case pieces are pinned (or pegged if you prefer). With a track record in the hundreds of years, why wouldn’t you take an extra few minutes to drawbore your mortise-and-tenon joints?
Something I’ve also seen with regularity is a double-pinned joint, where the pins are set at the same distance from the shoulders, with a split stile. Occasionally, I’ve come across period pieces that had long or through mortise-and-tenon joints where the pins were offset. On these pieces the stiles tended not to be split between the two pins.

Because the pins are in line with one another, the stiles split over time.
The key is to have long enough tenons so that when you offset the pins, there’s still enough tenon beyond the outer pin to hold. Getting too close to the end of the tenon means little or no holding power for the pin. If your joints are wide enough, and your tenons long enough, offsetting the pins might just save your stiles from splitting too.
p.s. You can see the cover project and the online extras for the April issue at popularwoodworking.com/apr14.
Here are some supplies and tools we find essential in our everyday work around the shop. We may receive a commission from sales referred by our links; however, we have carefully selected these products for their usefulness and quality.


Thanks for this blog and the replies as well. It contains really logical thinking based on experience with older pieces. Very useful to me in thinking about stresses in joints.
I love the idea of a furniture repair/restoration blog series. Most of us aren’t going to be building highboys in our spare time, but I would think that a good majority of the readers have some old furniture (myself included) that could use a little repair and refinish work. Now I’m sure there are dozens of books dedicated to this type of work, but I want to hear it from Chuck.
Any direction (literally) on pinning bridles? I recently was going to double pin a bridle corner but couldn’t determine which diagonal was most logical for that joint (I punted and put in one peg)
Chuck You mention having experience doing lots of furniture repair in your past experience. I sure wouldn’t mind seeing an article or two on that in the magazine. One area I struggle with if a friend asks me to repair something is how to go about doing the least amount of damage to the piece while getting it apart, when to try to match stain and finish and when to punt by stripping, sanding or some other method and refinish (not my favorite option just because of the increase in workload to strip and refinish). For matching existing finishes hints such as how to and determine what type of clear coat finish (shellac, lacquer, or polyurethane) was used versus straight oil finishes and in the even tit is some sort of film finish over oil or stain how you would proceed getting any repair work to match up.
Chuck, does all of this mean that you recommend drawboring all of your M&T joints for tables and chairs of the type that you have shown here? It makes a lot of sense to me and it certainly is not a whole lot of extra work. Also, if the tenon is long enough, couldn’t you move the pegs farther away from the shoulder? This would add more “meat” to the stile here and possibly eliminate the need for offsetting.