


We may receive a commission when you use our affiliate links. However, this does not impact our recommendations.
I don’t think much about the joinery for a piece until I have the form and details all settled. I do this because I want the joinery and the style of the piece to match.
What do I mean by this? We have an excellent cabinetmaker in our area who builds gorgeous Shaker reproductions. But when you open the drawers, they are running on Blum metal slides. Open the doors and you’ll see European cup hinges. I don’t have a problem with drawer slides or cup hinges, but they look odd on a Shaker reproduction.
So if my piece had taken a design detour and become more early Campaign, or mid-Danish then I would want to adjust the joinery to suit. If it turned out to be a pure Campaign piece, I’d have used rabbeted full-blind dovetails. If it had been more Danish, I’d have considered finger joints or dovetails. Or dowels.
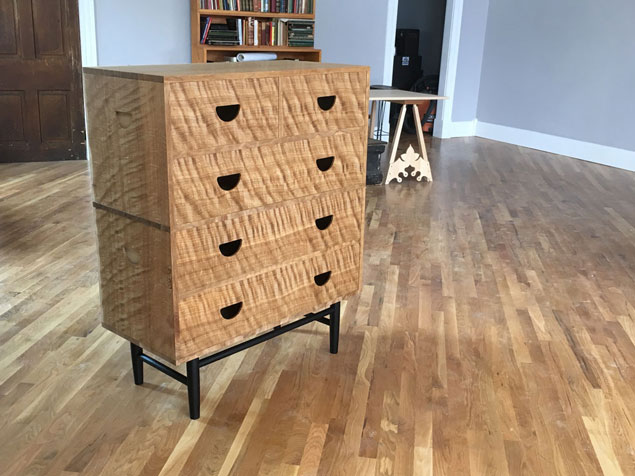
In the end, this piece turned out contemporary. So I could use whatever joinery I liked.
When faced with this equation, I almost always default to dovetails. But I’ve been playing around a lot with the Festool Domino (I have one of the first ones imported to this country), and decided to see if I could push that joinery method a littler further.

Building the case with Dominos is easy. But I decided to use through-Dominos to make the drawers. This might seem like a tough layout to do. It’s not. I simply built rabbeted drawers, glued them together and then applied 5 mm x 30 mm Dominos into the assembled joints.
Other joinery details: The backs of the cases are captured in grooves and nailed to the horizontal and vertical dividers that separate the drawers (this adds immense strength to this frameless construction).
It would have been silly to make the base with Dominos. The right joint for joining round components to round components is to use round tenons that are wedged.

The last little bit about the joinery was how to join the three separate components – the top unit, the bottom unit and the plinth. I wanted all three pieces to come apart without tools to make the piece easy to transport. So the legs of the plinth have short 1/2” x 1-1/4”-diameter tenons on the ends that are friction-fit into holes in the lower unit.
The top case rests on the lower case and there are two 1”-diameter dowels keeping the top case from sliding off the bottom. The dowels are glued into the top of the lower case and sit in hole on the bottom of the top case.
Once I settled on the joinery, then I could make a cutting list, a final drawing and start the easy part – building it.
— Christopher Schwarz
Read part 1 of this design series here.
Part 2 is here.
Part 3 is here.
Part 4 on pulls is here.
Part 5 on the plinth is here.
Here are some supplies and tools we find essential in our everyday work around the shop. We may receive a commission from sales referred by our links; however, we have carefully selected these products for their usefulness and quality.


I’ve been using Miller Dowels for some of my drawers. Similar to Dominos but they do add a bit more holding power in the axial direction due to their stepped design. https://www.facebook.com/44932699584/photos/?tab=album&album_id=10152815082909585
That figure is bananas!
Awesome looking piece, the black base really sets it off. I offer exposed dominoes as a midline option for cabinetry drawers and have found lots of people prefer the look over dovetails, simply because they’re “different”, even when price isn’t a concern.