We may receive a commission when you use our affiliate links. However, this does not impact our recommendations.
Miter joints can be a real source of frustration. The pieces need to be the exact length and the cut surfaces need to be as close to perfect as you can get them. If they don’t look great right off the saw, use a shooting board and a plane, or rub the surfaces on a piece of sandpaper glued to a flat piece of scrap. It doesn’t matter which you use, but your friends won’t be as impressed with your sanding block as they will be with your shooting board. Shavings trump dust every time.
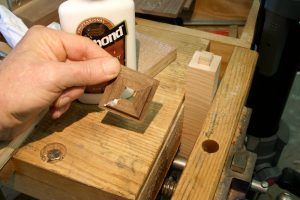
One way to get better joints is to use a glue that is “grabby”. Hot hide glue is grabby, but liquid hide glue isn’t. Good old yellow glue is kind of grabby, but white glue is really grabby. The first step is to put a spot of glue on one side of the joint. You don’t need a special brush and you don’t need to spread it around. Rub the two parts of the joint together.
Open up the joint and you’ll see an even coat of glue on both parts of the joint. But don’t put the joint together yet.
Leave the joint open for a couple of minutes. You might be surprised at what you see as time elapses. The photo below shows what happens to the glue. It wicks up into the pores of the wood, away from the actual joint surface. That’s bad news if you want the joint to hold, but good news if you apply another dab of glue.
The glue from the first round partially dries, and forms a barrier that sticks to the wood and sticks to the second dab of glue.
 Put another dab of glue on one side of the joint, put the two pieces together and rub them back and forth. You will feel resistance as the glue grabs. Make sure the two parts are lined up, and set the assembly aside for the glue to dry.
The joint will hold together as long as you don’t mess with it. Glue dries in stages, and just because you can pick up a piece and have it stay together doesn’t mean you can stress the joint. Chemical reactions are taking place, and the moisture in the glue needs to evaporate, and that takes about 24 hours or so.
Looking for great information and a great deal? Visit our store where “Hand Tool Essentials” is on sale at a crazy price.
Here are some supplies and tools we find essential in our everyday work around the shop. We may receive a commission from sales referred by our links; however, we have carefully selected these products for their usefulness and quality.


One neat little trick if the pce’s are small is to glue them on a piece paper grocery bag. The paper holds the miter tight and because the paper is a little wet, as the paper dries it actually pulls the joint tighter.
The paper is easily sanded off once the joint dries.
Have you tried Gorilla’s PVA wood glue. That stuff literally reaches out and grabs ya. The work time seems to be about 30 seconds.
Can’t remember if it’s been on popwood or not, but it works really well to “unfold” the pieces to be mitered, lay them out flat, then put tape across what will be the outside of the joint (stranded packing tape works well), and then apply your glue and “fold up” the joints, taping the last one shut.
This minimizes the need for clamps, lets you use any glue you want, and also makes it more likely to get a good match at the corners, which is critical for a miter joint.
I make up my own liquid hide glue because the commercial one I can buy in England does not grab and is no good for rubbed joints. I use urea to lower the melting point and cook the glue for a couple of days before I use it. When it is cold here I heat it up by standing in warm water. OK it smell a bit but its by far the best glue I have ever used. It will even glue aluminum to wood.
It gives almost instant grab.
Hide glue is one of the few that will stick to itself and can be undone so much the best for me.
Bob,
If my two or three remaining brain cells are correct, I seem to remember an article in Fine Wood Working several years ago that tested various glues for strength. Yellow glue came out on top, again, if memory serves. You, Jeff Headley and Steve Hamilton of Woodworking Workshops of the Shenandoah Valley (http://www.wwotsv.com) recommend white glue. Does it really matter? What are the pros and cons of white vs. yellow? Are there some instances where one is better than the other? And finally, why do we drive on the parkway and park on the driveway?
My professor at The University of Cincinnati called it glue sizing. It was the first time I ever heard of it but works really well.
Another great tip from a great craftsman.
Thanks Bob.
So, are you saying that if you do this method and don’t use clamps the glue will go into the wood pores and form as strong a bond as if the work was clamped?