We may receive a commission when you use our affiliate links. However, this does not impact our recommendations.
Wooden Storm Door
Versatile design keeps winter winds out and lets summer breezes in.
by Tim Johnson
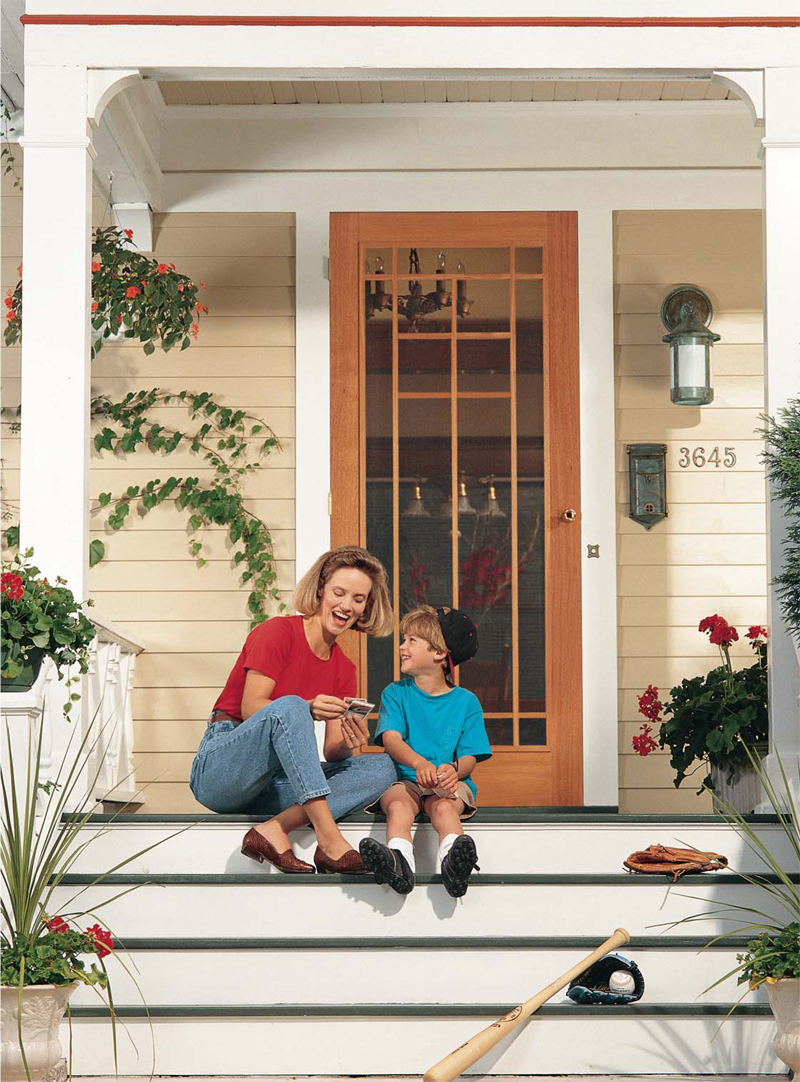
A storm door doesn’t just keep out the wind and rain. It’s the focal point of your home’s entryway; the first thing guests see when they come to visit. An attractive and durable storm door is a woodworking project each member of your family will use every day. To guarantee a long service life,our storm door is made from weatherhardy wood, with mortise-and-tenon joinery and weatherproof, water-resistant glue. It’s easy to remove the tempered-glass storm panel and replace it with a screen panel, for year-round comfort.This door isn’t hard to make, it’s just big; 36 by 80 inches, a standard size for an entry door.Although you’ll need a large, level surface for gluing it together, this project is manageable, even in a small shop. You’ll need a tablesaw, a benchtop mortiser or a drill press with a mortising attachment, a router and three 4-ft.pipe clamps. A bandsaw is convenient, but not essential. If you don’t have a jointer and planer,have your lumber surfaced at the lumberyard.
Choosing Materials
This exterior door will be subjected to the toughest conditions: hot days, cold nights, sunlight, wind, rain and substantial swings in humidity.Two critical factors, durability and stability, should determine the lumber you select. First, use a wood that won’t rot, such as Honduras mahogany, teak or white oak. Of these, white oak is the most affordable. If you plan to paint your door, you can substitute furniture grades of ponderosa pine or fir. Second, look for rift- or quarter-sawn boards, indicated by straight grain running end-to-end. They’re the most stable. Reject any board that’s cupped or twisted. Insist on flat, straight stock.The basic “full view”door requires 15 bd. ft. of 6/4 rough stock.
Mahogany for the door shown in the photo at left, including the full-length internal grid,which requires an additional 7 bd. ft. of 6/4 stock,will cost about $160.
Waterproof glue isn’t essential, unless you have a submerged entryway! Besides, it’s expensive and nasty to work with.Type II water-resistant polyurethane or PVA (polyvinyl acetate) glues are a more sensible choice. They’re weatherproof (made for exterior use), easy to work with, widely available and reasonably priced.
Don’t scrimp on your finishing products. Exteriorgrade enamel paint will last the longest. If you want to show off the wood, make sure to choose a finish that contains both UV absorbers and pigments. These finishes are translucent, rather than clear, and add a honey-amber color to the wood (see Sources,page 64). Before applying any finish, clean the door by wiping it with a cloth dampened with acetone. Then brush a couple coats of thinned-down weatherproof glue on the exposed end grain, especially at the bottom of the door.
Storm and Screen Panels
Storm and screen panels can be purchased cheaply enough that it’s not worth your time to make them yourself. You’ll find local manufacturers in the Yellow Pages, under “Screens” or “Storm Windows and Doors.”Plan to pay about $50 for the screen panel.The storm panel costs more, about $120,because building codes require that it be made from tempered or safety glass. Have the panels in hand before you build the door, so you can make sure they’ll fit.
Fiberglass and aluminum are the most common screening materials. Fiberglass is more flexible, but aluminum is stronger. For increased durability,“pet-” or “paw-proof ” fiberglass screen has a heavy vinyl coating. Fine mesh or sun-blocking fiberglass weaves are also available.Copper and stainless steel screen are the toughest, but they’re also the most expensive.We chose charcoal-colored aluminum.
Make sure the aluminum frames for both the screen and storm panels are the same thickness.We chose 5/16-in.-thick, 1-in.-wide, rolled-aluminum frames. Architectural-grade extrusions are stronger, but they’re more expensive and not as widely available.
Door Frame Joinery
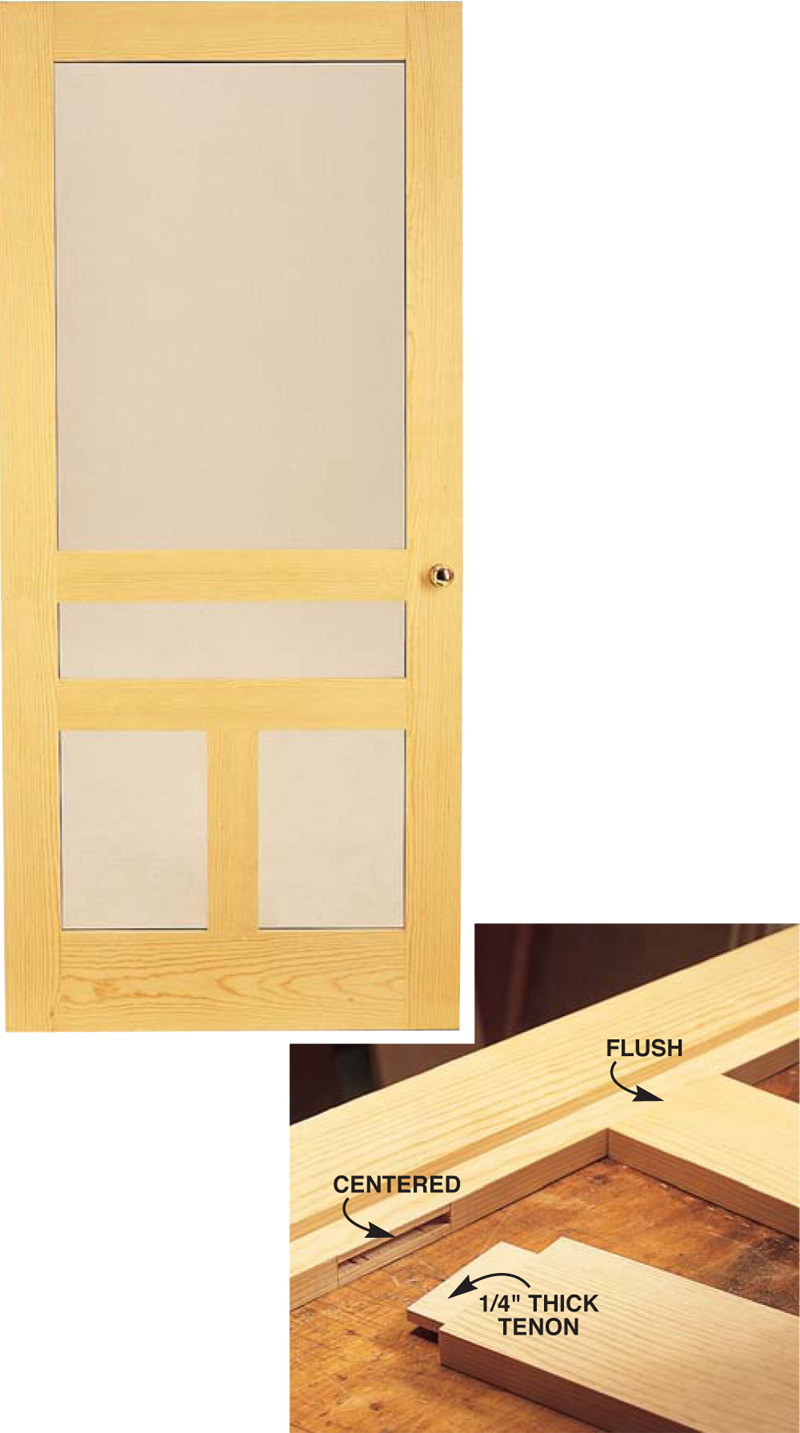
Haunched mortise-and-tenon joints are very strong. Long tenons stiffen the structure. The mortises are located inward, so they don’t have weak, short grain at the end of the stile. The rails feature haunched tenons, for secure joints across the entire width of the rails (Fig.B, Details 1 and 2.
Good-fitting mortises and tenons require precision from both your machines and your stock. Make mortising easier by using centered dadoes to set up and guide the mortise chisel (Photos 1 through 3). A shop-made tenoning jig, outfitted with the outside blades from an 8-in. dado set, accurately cuts both tenon cheeks in one pass (Photo 4).The only trick is to get the blades spaced correctly so the tenon fits the mortise.Finish the joints by trimming the tenon shoulders (Photo 5) and cutting the haunches (Photo 6).
The rabbets for the screen and storm panels are too wide for a rabbeting bit, so they have to be routed before the door is glued together.Most of the waste on the rails can be cut away on the tablesaw, because the rabbets in the rails run full length (see Fig. B, Detail 2).The stiles require stopped rabbets (Photo 7).
You’ll need three 4-ft. clamps for gluing; one for the top joints and two for the longer joints at the bottom. Cover the pipes with tape or plastic to keep the bottom side of the door from getting stained black wherever squeezed-out glue contacts the steel. Minimize squeeze-out by coating only the mortise walls and tenon cheeks with glue.Enough will spread during assembly to cover the face of the stile and the tenon shoulders (Photo 8).Clamp the door together and check to see that the glue-up is flat and square. Remove the squeezed-out glue before it hardens.
Installing a Screen Door
Think of a screen door as a very large cabinet door that’s going to be inset-mounted. Build the door to the dimensions of the opening.You may have to adjust the overall dimensions given in the Cutting List. For example, an 8-ft. tall door requires wider stiles and rails, for appearance and stability.
When fitting the door, allow 3/16 in. clearance in width and 1/4 in. in height. Cut the bottom at a 12-degree angle, to match the threshold. Then shim the door from underneath until it barely touches the top of the opening. Snug the hinge-side stile against the jamb and mark the three hinge locations on both pieces. Use four hinges for taller or heavier doors. Cut the hinge mortises, install loose-pin hinges and remount the door. Even out the gaps at the top and on the latch side with a block plane. Finally, install the latch, striker plate and door closer.
Oops!

Sources
(Note: This information may have changed since the story’s original publication date.)
A&M Wood Specialty, Inc., forloversofwood.com, 519-653-9322, lumber.
Sikkens North America, sikkens.com, 800-833-7288, translucent exterior finishes.
Highland Hardware, highlandhardware.com, 800-241-6748, Titebond II Extend, #16.50.21, 1 pint, $5.Gorilla Glue, #16.50.14, 18 oz., $20, 1/4-in. Slot cutter #10.14.50, $13; Slot cutter arbor, 1/2-in. shaft #10.12.41, $4; Bearing for 3/8-in.-deep slot #47728F, $9.
Woodcraft Supply, 800-225-1153, 1/4-20 Brass threaded inserts #12K50, bag of 10, $3; T-wrench #12K55, $5.
The Wood Factory, 936-825-7233, Victorian doors and parts.
Cutting List

Fig. A: Screen Door Exploded View
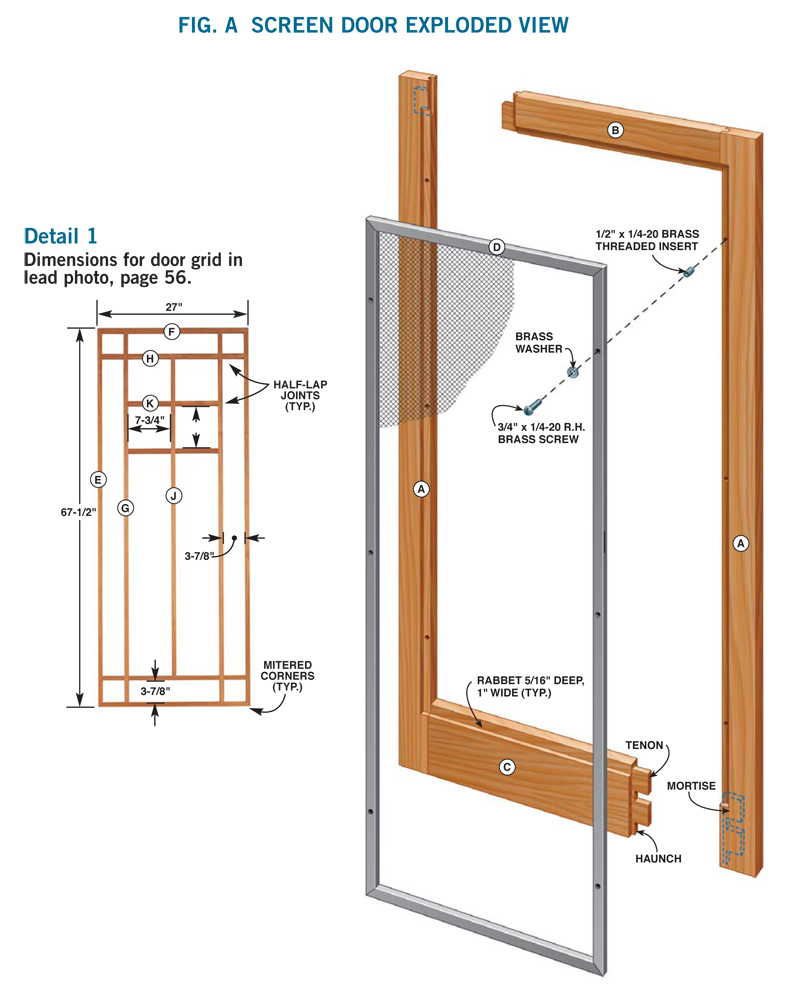
Haunched tenons, doubled at the bottom, make the door strong enough to withstand decades of slamming.
Fig. B: Mortise and Tenon Dimensions

This story originally appeared in American Woodworker August 2001, issue #88.
 Click on any image to view a larger version.
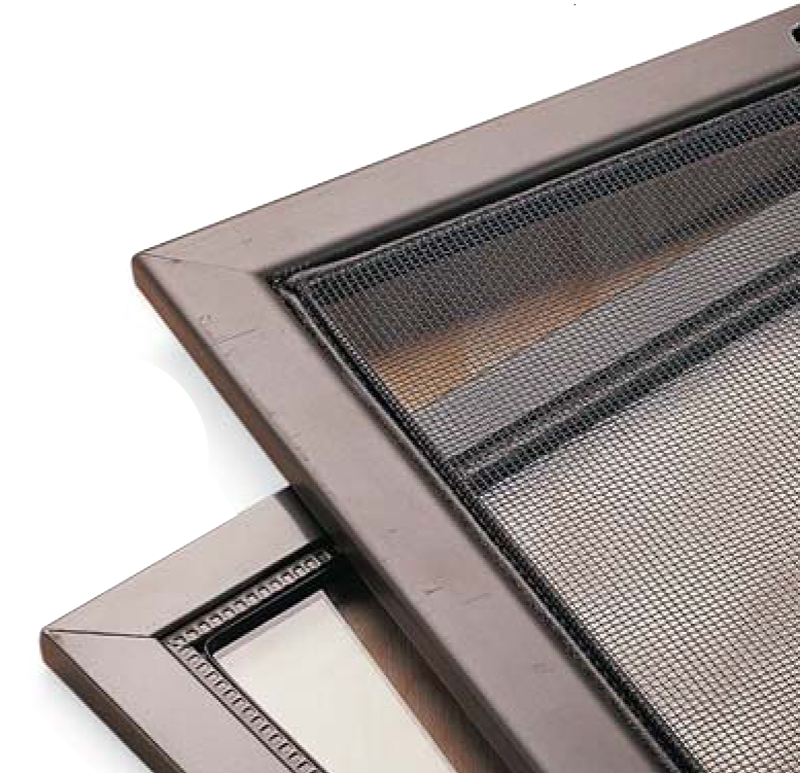 Interchangeable storm and screen panels have identical outside dimensions and frame thicknesses. The screen panel requires a wide frame to hold its shape. Tempered or safety glass is required for the storm panel.

1. Mark the throat plate of your saw to indicate where the dado blade begins cutting.This will allow you to stop the dadoes accurately.Then, carefully set the fence, using offcuts from the stiles or rails to center the dado.

2. Cut stopped dadoes in the stiles. First, mark the end of the mortise on the stile.Then make the cut, advancing until the lines on the stile and throat insert meet. Stop the saw, remove the stile, turn it around and dado the other end.

3. Mortise the styles, using the dado to center and guide the chisel. It’s easy to modify your benchtop mortiser to accommodate the long,wide stiles. Increase capacity with a riser block. Add outboard support to keep the stile level. Fabricate a special hold-down, using scraps for arms and a riser that’s the same width as the stile. Center the chisel and set the fence. Then snug the riser up against the stile, add the arms and clamp them to the base.

4. Cut both tenon cheeks in one pass with a slow and steady feed rate. First, set the fence to center the tenon. Then raise the blade to the height of the tenon shoulder. Butt the rail against the stop and clamp it to the jig. For alignment, keep the face side oriented the same way while cutting each end of the rail.

5. Cut the tenon shoulders with the miter gauge, using the fence and a starting block to set the length. Clamp the rail to the miter gauge while holding it against the block. Make sure the rail clears the block before it reaches the blade.The starting block creates extra space between the blade and fence to allow room for the offcut.

6. Bandsaw the tenons to width and remove the waste with freehand cuts, leaving the haunches. Pare the short shoulder flush with a chisel.

7. Rout rabbets for the screen (before the door is glued together), in several passes, with a straightcutting bit and an edge guide. Rout the rails first, full length.Then dry-fit the door and mark the stop points on the stiles so you can rout them.
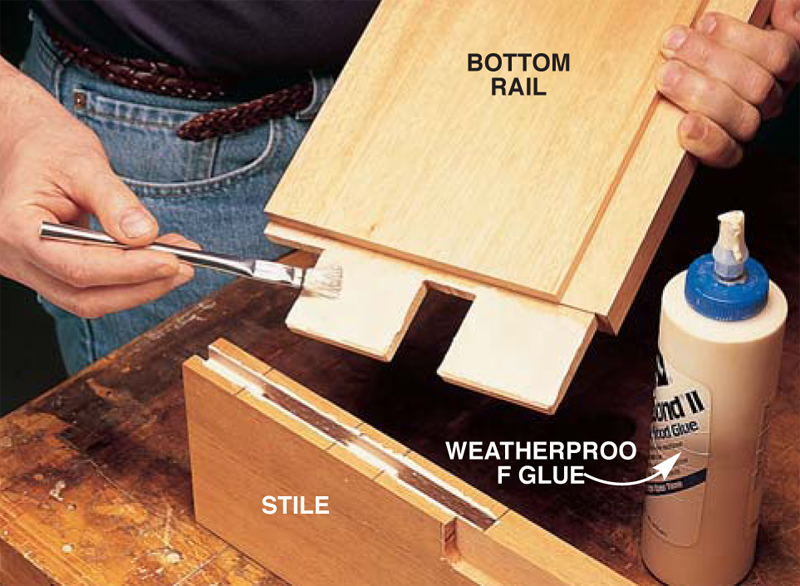
8. Strong joinery makes this door sturdy. Weatherproof glue makes it last. Haunched mortises and tenons, doubled on the wide bottom rail, secure all four corners. New, extended-open-time, water-resistant glues allow enough time to glue and clamp this large assembly without rushing.

9. Install threaded inserts in the door rabbet with a T-wrench. First, glue the door together and square the corners of the rabbet. Install the screen panel and drill pilot holes for the inserts. Remove the screen panel and use it as a template for drilling the storm panel. Fasten the panels with brass machine screws and washers.
Four Ways to Customize Your Door
Additional Stiles and Rails: Plane internal frame pieces thinner, flush with the rabbet, so you can still use single screen and storm panels. Center the mortises and use thinner tenons. If you’d rather have separate upper and lower storm and screen panels, leave the top middle rail full thickness, and rabbet both edges.

Solid Panels: Cut slots for the panels with a 1/4-in. slot-cutting bit. Limit the depth of the slot to 3/8-in. by using an oversized bearing.

Brackets and Spindles: Saw decorative brackets. Victorian brackets and spindles are available readymade through the mail. Accommodate wood movement by orienting the grain diagonally. When you fasten the brackets, glue only the inside corners and use brass screws in slotted holes at the ends.

An Ornamental Grid: Assemble grids inside a shop-made frame that’s exactly the same size as the opening in the door. When you glue the grid together, remove one side of the frame at a time to attach the outer pieces. Fasten the completed grid to the door, flush with the rabbet.
Here are some supplies and tools we find essential in our everyday work around the shop. We may receive a commission from sales referred by our links; however, we have carefully selected these products for their usefulness and quality.