We may receive a commission when you use our affiliate links. However, this does not impact our recommendations.
Dovetailer’s Dream Vise
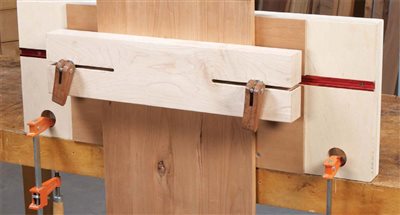
Treat yourself to the secure, even grip that’s essential for precision work.
By Brad Holden
Cutting dovetails by hand is satisfying and rewarding work, but securing the boards for sawing and chopping is anything but. Face vises typically don’t grip boards firmly enough for sawing, because they rack. The solution—adding a spacer of equal thickness to the workpiece on the jaw’s other side—prevents racking, but it’s a hassle.
Securing boards for chopping—wide boards especially—is also awkward, because it usually calls for two clamps and three hands. This two-position vise solves both of these problems, and it’ll hold boards up to 18" wide.
Glue up three layers of plywood to make the platform (A, Fig. A and Cutting List, below). When the glue is dry, cut the platform to final dimensions. Saw or rout a groove for the T-track and install it (see Sources, below). Then drill holes near each corner to allow clamping the vise in the vertical position. Make sure to size the holes to fit your clamps.
The chopping plate (B) and support spacer (C) function as the vise’s rear jaw. Cut both parts from a single piece of plywood to assure they’re exactly the same thickness. Attach the chopping plate in front of the T-track and the support spacer behind it (Photo 1). Use screws to fasten these parts, so that when the chopping plate gets too nicked up, you can easily replace them.
Find a suitable block of hardwood for the jaw (D); hard maple is a good choice. When you’re using the vise for chopping, the jaw’s front edge guides the chisel, so the jaw must be square and its front edge must be perpendicular to the platform (Photo 2).
Lay out the jaw’s slots and drill a 5/16" hole at the point where each slot will end. Create the slots by sawing in to each hole (Photo 3). Ease all of the jaw’s sharp edges except for the front edge of the face that contacts your workpiece. You’ll want that crisp and sharp for lining up with your workpiece’s layout line.
Next, make the cam clamps (E). You could buy them, but they’re easy to make and a great way to use up some nice off cuts. Lay out the clamps’ holes, slots and profiles on two blanks (Figs. B and C). Drill holes for the cross dowels and cut the slots using the same method as for the jaw (Photo 4).
Cut out the cam clamps and sand them to the profile lines (Photo 5). For each clamp to function properly, its break-over points must be slightly in front of the cross dowel’s center diameter. So when sanding the cam’s large end, be careful not to change these points.
To assemble the cam clamps, slip the hardware onto each bolt in this order: first a washer, then a conical compression spring (available at any hardware store), then two more washers. Insert a cross dowel into each clamp and then thread in the bolts (Photo 6).
Conical compression springs are really handy for sliding boards in and out and adjusting their position. They compress to about 3/16" and provide lift up to 1". That’s plenty of adjustment for most of the stock you’ll be dovetailing.
Slide the bolts’ heads into the T-track, and then slide each bolt into the jaw’s slots. Th e jaw fits between the top two washers.
Cutting List
Fig. A: Exploded View
Fig. B: Cam Clamp Dimensions
Fig. C: Cam Clamp Pattern
Click any image to view a larger version.
Saw comfortably. When the vise is clamped vertically, it raises the workpiece to a comfortable height for sawing pins and tails.
Chop accurately. When the vise is clamped flat, the jaw acts as a support fence to assure precise, perpendicular cuts.
Clamp quickly. The jaw’s spring-loaded cam clamps provide fast, secure clamping of stock from 3/16" to 1" thick.
1. Fasten the vise’s sacrificial chopping plate and support spacer after assembling the platform and installing the T-track.
2. Mill the jaw dead-on square to assure perpendicular chisel cuts when removing the waste between your saw cuts.
3. Bandsaw the jaw’s slots after drilling stop holes to define the ends.
4. Cut a slot in each cam clamp after laying out a blank and drilling the holes.
5. Finish-sand each cam clamp after rough-sawing the profile. Be careful not to change the clamp’s break-over points.
6. Thread each bolt into the clamp’s cross dowel after installing the washers and springs. Then slide the bolts into the T-track and install the jaw.
Sources
Note: Product availability and prices are subject to change.
Rockler, rockler.com, 800-279-4441, 3' Universal T-track, #26420; 1/4-20 Cam Clamp, #58244.
Woodpeckers, woodpeck.com, 800-752-0725, Steel Cross Dowel 1/4-20 x 1-3/16" length, #13-CD030.
This story originally appeared in American Woodworker June/July 2014, issue #172.
Here are some supplies and tools we find essential in our everyday work around the shop. We may receive a commission from sales referred by our links; however, we have carefully selected these products for their usefulness and quality.


