We may receive a commission when you use our affiliate links. However, this does not impact our recommendations.
Making Lipped Drawers With A Dovetail Jig
By Tom Caspar
| You can do more with your half-blind dovetail jig than meets the eye. You’ve probably used it to make drawers with plain, inset fronts, but it’s really quite simple to make lipped drawer fronts, too. Even though most dovetail jigs are basically the same, some of their manuals don’t go into much detail about how to make this variation of the basic drawer (they often call it a rabbeted drawer, which is confusing). Whatever kind of jig you have, here’s a foolproof process for making lipped drawers from beginning to end. Ideal drawer widthsIf this is your first time out with a dovetail jig, try making I think drawer sides look best when there’s a half-pin at the Location of drawer-bottom
|
Click any image to view a larger version.
1. Cut a groove for the drawer bottom in all the drawer parts. If you’re using plywood or hardboard for drawer bottoms, the groove must be slightly less than 1/4-in. wide for a good fit. Fine-tune the width of the groove by making two cuts with a standard saw blade. Cut a single saw-kerf groove in all the drawer parts first, then move the saw fence over a bit and groove all the parts a second time.
2. Cut rabbets to form lips on the top and ends of the drawer front (usually there’s no lip on the bottom). The precise width of the rabbets affects the fit of the drawer front in its opening. Fine-tune the fence setting so there is 1/16 in. or less total side play between the inside of the drawer front and the sides of the case.
3. Check the fit of sample dovetails made with your jig. Use the same species of wood as your drawer parts for test pieces. Wood that’s too soft gives a false reading. Adjust the router bit up or down until you make two parts that fit together with hand pressure alone. Adjust the jig’s template in and out until you make two parts that fit flush. The position of the template affects the depth of the sockets.
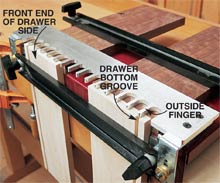
4. Place both drawer sides in the dovetail jig, inside out and front side up. Use the groove in the drawer bottom as a reference guide. It faces toward you and lines up with an outside finger of the dovetail template. The bottom edge of every drawer part butts up against the stops on the jig.
5. Rout dovetails in the drawer sides. Move the router from left to right for best results.
6. Place the drawer front in the jig. One end of the board is cut on the right side of the jig. The other end is cut on the left side. Again, use the groove as a reference guide. This time it lines up with the outside slot of the template.
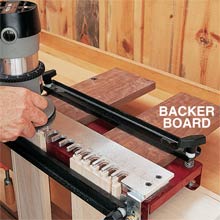
7. Align the drawer front using a shop-made spacer board (Fig. A). The end grain of the rabbet must be exactly in line with the front edge of the jig so the dovetail is cut to the correct depth. Cut dovetails in both ends of the drawer front.
8. Rout a profile on all four sides of the drawer front. A 1/4-in. round-over is typical. Raising the bit up a little to create a fillet adds an attractive shadow line. You really can’t rout this profile before cutting the dovetails because you need square edges (not round ones!) on the sides of the drawer front. These sides bump up against thin indexing stops on most dovetail jigs (see Photo 7).
9. Dovetail one drawer side and back as a pair, making a standard half-blind joint. As in Photo 4, one pair is placed in the left-hand side of the jig and the other pair in the right-hand side. You won’t get parts mixed up if you remember that the grooves always go nearest the stops of the jig. Sand all the inside faces of the drawer before gluing.
10. Glue up the drawer with care. The drawer side and rabbet should end up flush. The lip of the drawer prevents you from easily evening up the joint with a plane or belt sander, so the time it took to set up a perfect joint in the beginning pays off now!
|
Here are some supplies and tools we find essential in our everyday work around the shop. We may receive a commission from sales referred by our links; however, we have carefully selected these products for their usefulness and quality.


