We may receive a commission when you use our affiliate links. However, this does not impact our recommendations.
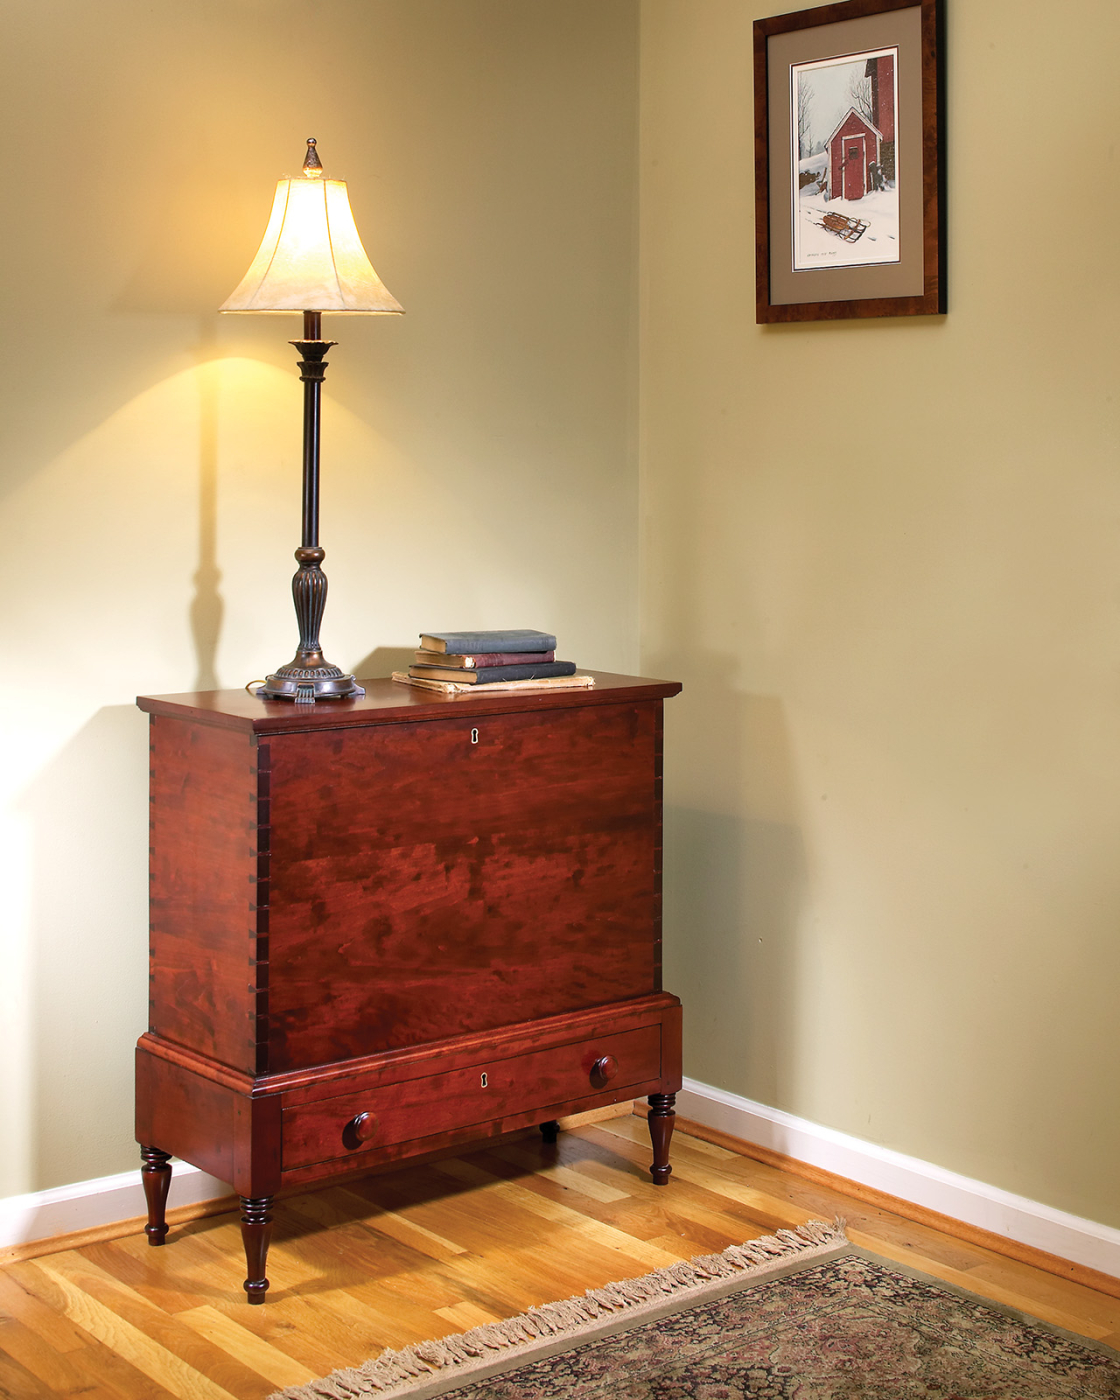
 This 19th-century piece was designed to safeguard a then-precious commodity.
 This 19th-century piece was designed to safeguard a then-precious commodity.
Not so long ago, obtaining sugar wasn’t easy. It’s difficult to believe that the commodity we have in almost everything today was scarce and highly valued in the early part of the 19th century.
During those days well-to-do patrons required somewhere to store this sweet under lock and key. Why did sugar have to be locked away? It was so valuable that the hired help could be tempted to pinch a bit here and there.
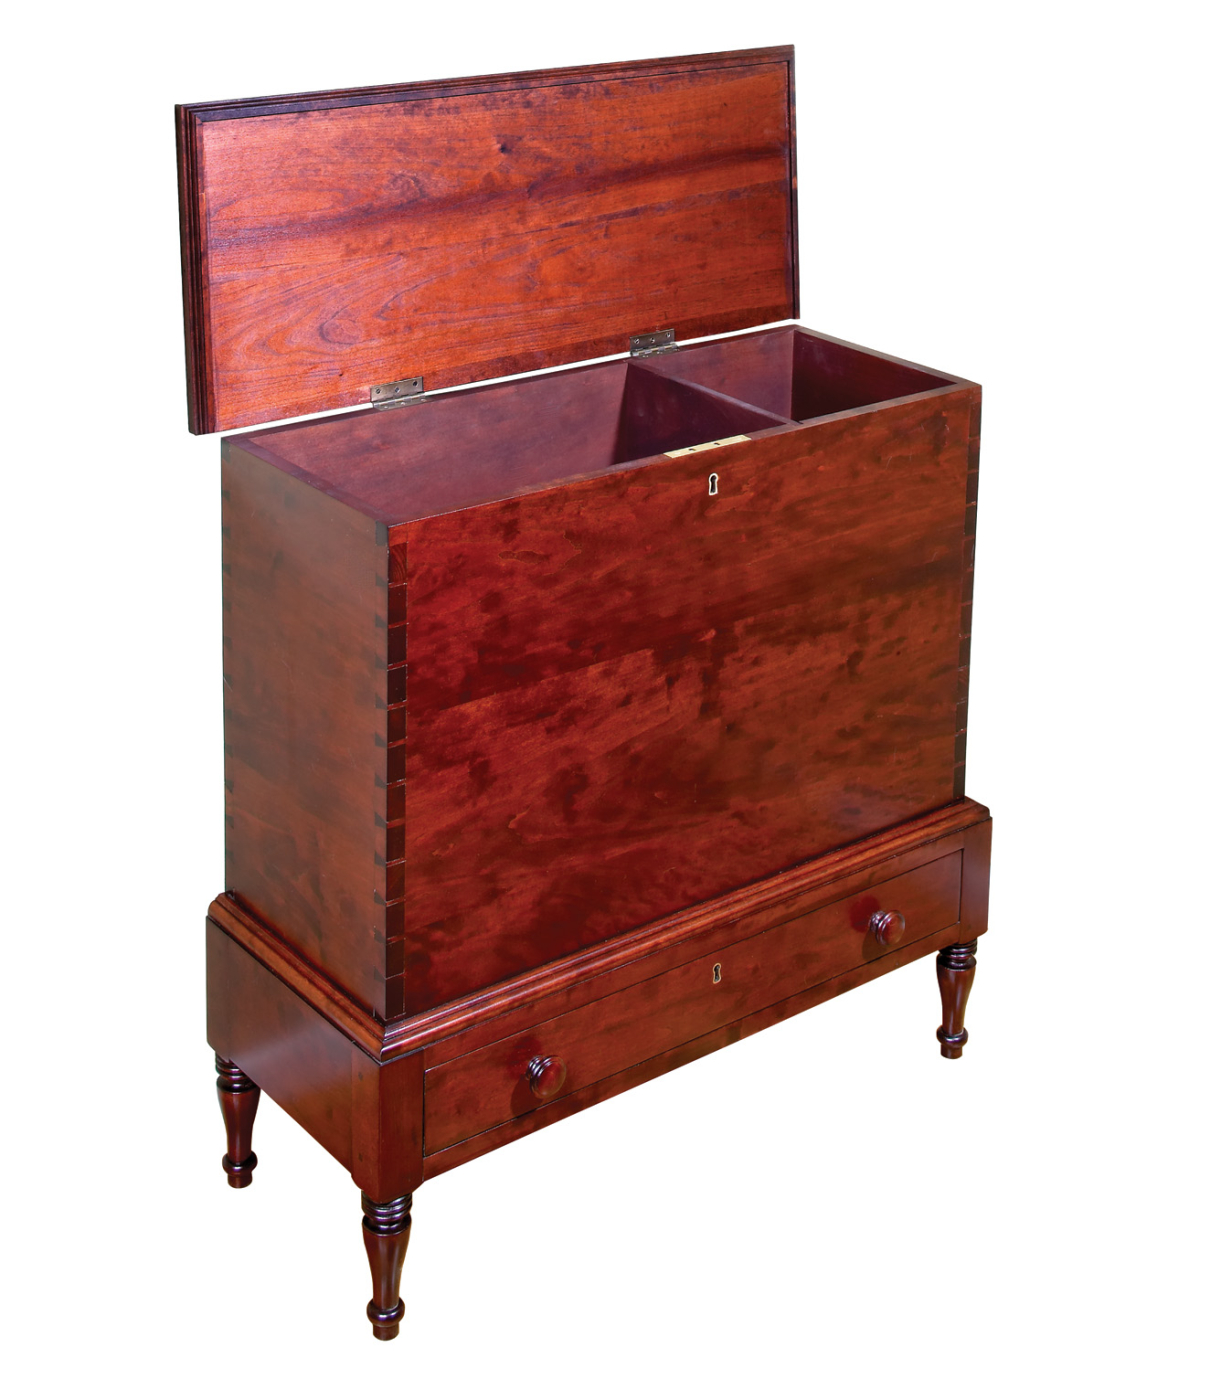
The open lid provides a great look at the divider. Sugar on one side and coffee on the other? The drawer held sugar nippers, used to pinch off a supply for the day’s baking, along with other accoutrement.
So local cabinetmakers rose to the occasion and the result was a specialized piece of furniture – the sugar chest. This type of chest was built throughout the South – most notably in central Kentucky and middle Tennessee.
 An increased availability of sugar, along with a decline in price, reduced the need to safeguard the commodity. The demise of the distinctive design was imminent. By the late 1840s these chests were no longer regularly built.
Although the sugar chest’s prominence was short-lived, the lessons encountered in constructing this form will go a long way toward increasing your skills – and besides, it’s a great little chest for storing blankets and whatnot.
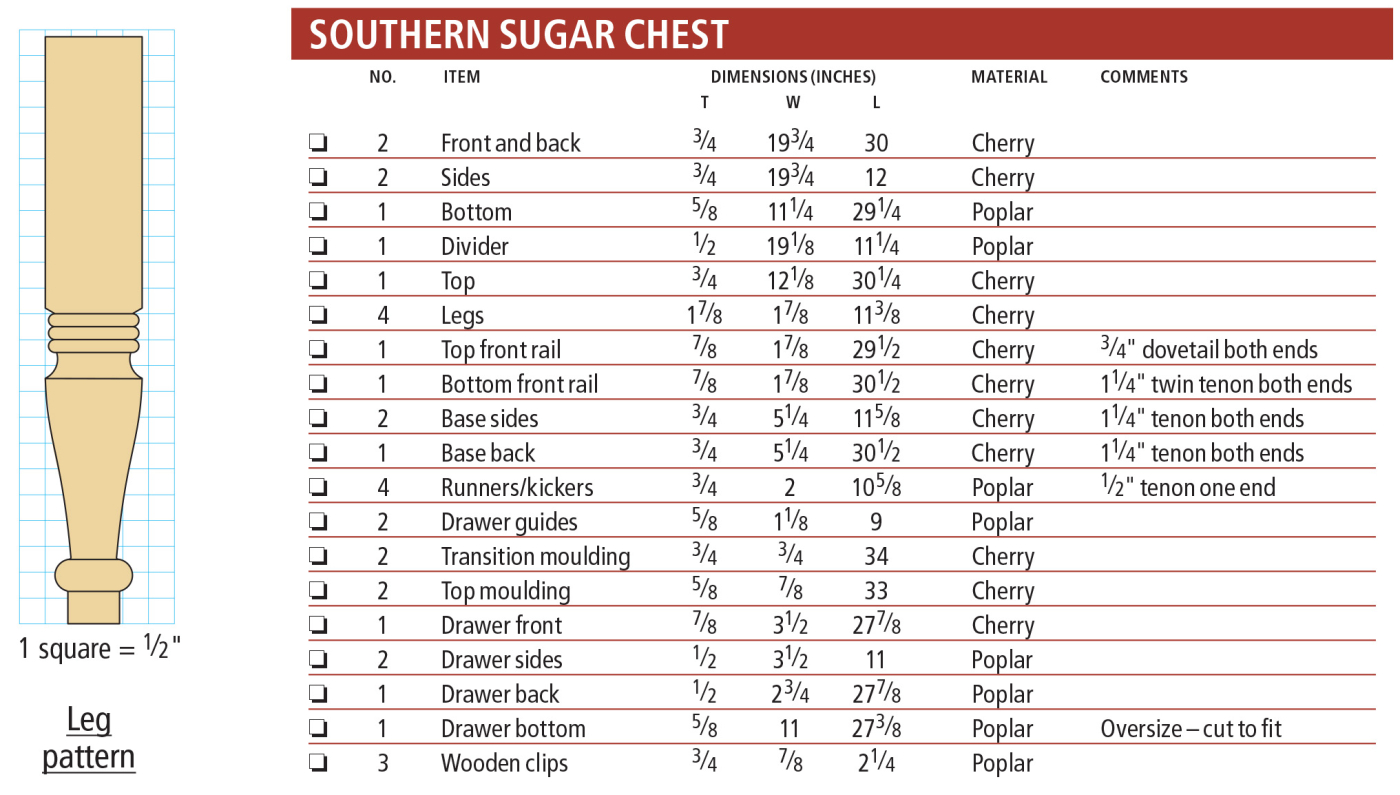
Southern Sugar Chest Cut List & Diagrams

 Start at the Top
 Start at the Top
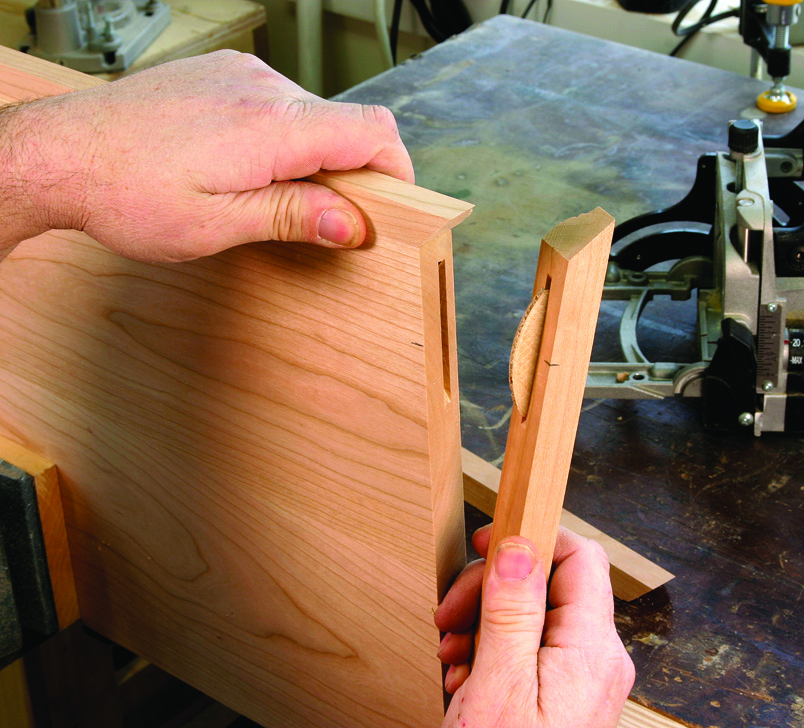
The wider tail area makes it much easier to transfer the layout of the pins onto the tail board. Also, to straighten any bowed panels attach a straightedge. It holds the panel in place as you transfer the layout.
When building a piece on legs, you usually begin with the base. But with this project, it’s best to build the box portion first because it’s the more challenging portion. Once that’s finished, you can build the base to fit.
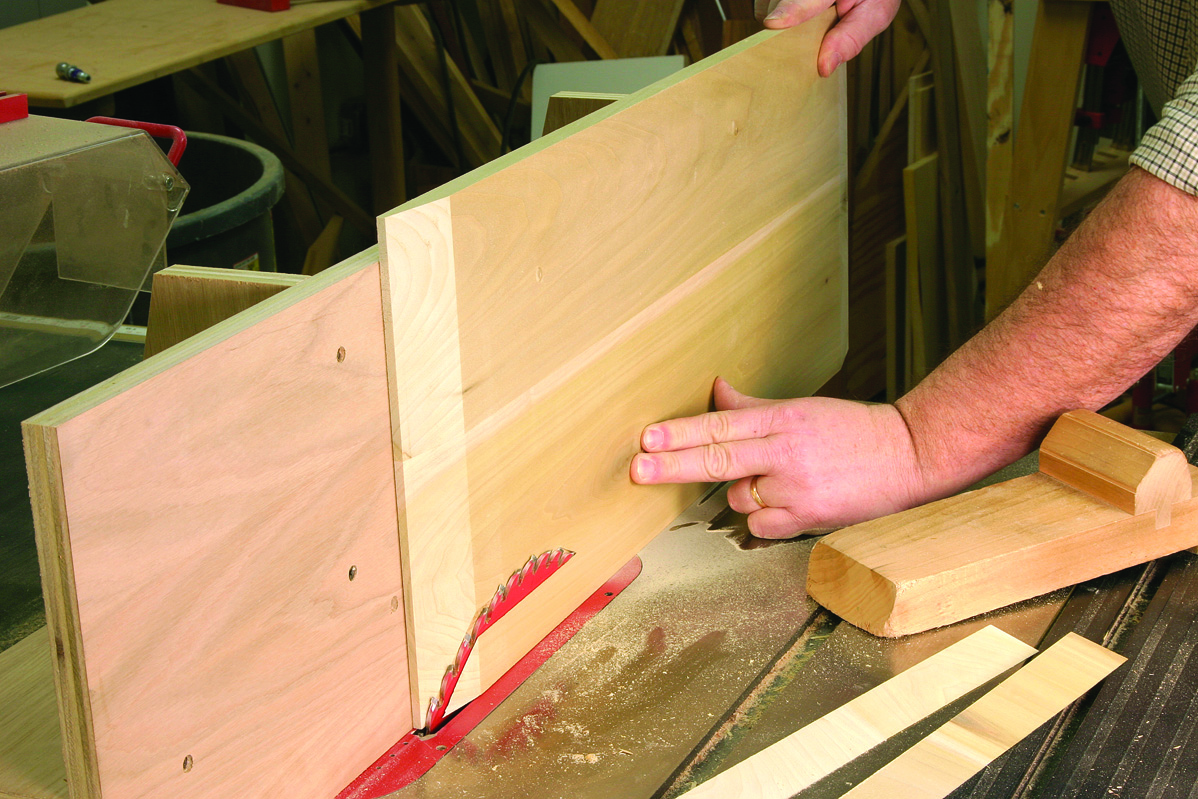
Mill and cut to size the panels for the front, back and sides of the box. The four pieces are assembled with dovetails. Schedule some practice time before beginning on the actual piece, because these visible joints are the main focus of the chest.
Any dovetail is a work of art, and while this project can be built with a dovetail jig, hand-cutting the joint will boost your skills.
Take the majority of the waste material from the wide side of the layout to reduce the potential for damaging the sharp corners of the pins. Finish the pins from the opposite side paying attention to those corners.
Orienting the pins and tails invites discussion among woodworkers. To determine which goes where, look at how the piece will be used and then make the call.
Under normal use, the front and back of the sugar chest will receive the majority of the pressure when loaded. Therefore, cut the pins on the front and back with the tails on the side pieces.
As the pressure increases on the front and back, so will the holding power of the dovetail joint. That’s the functional design of the joint.
Pin Down the Process

Because of the width of the box panels you’ll have to cut some of the tails by hand. The extra cut at the center of the pin waste collapses as you chisel the material allowing the waste to easily be removed.
When one decides to hand-cut the joint, another discussion that raises the ire of most woodworkers is whether to cut the pins first or the tails first.
I’m a “pins first” subscriber. For every reason that I give to start with the pins, a “tails first” woodworker can state a nearly identical reason to begin with the tails. Except for one!
When you move to the second step in dovetailing, that of transferring the layout from one panel to the adjoining panel, it becomes obvious why “pins first” is the correct call.
Rout the rabbet by using one of the panels as a straightedge guide for the other – plus a pattern-cutting bit.
If the joint is designed in a historical manner, meaning that the pins are narrow and the tails are wider, you’ll find that getting into the tail socket to transfer the layout is much easier than trying to mark through the narrow gap between the pins.
So give in and create the pins on the front and back. Make sure to start and end the layout with a wide pin area. Leaving a wide area makes it easier to cut the rabbet for the bottom panel and, with the transition moulding in place, the dovetails will look balanced. Also, the wider pin area at the top edge helps to balance the look as the moulding around the top hides part of the pin.
Don’t fret too much about the exact shape of the pins. While they influence the look of the joint they will not affect the fit because they become the template used to mark the tails portion of the panels.
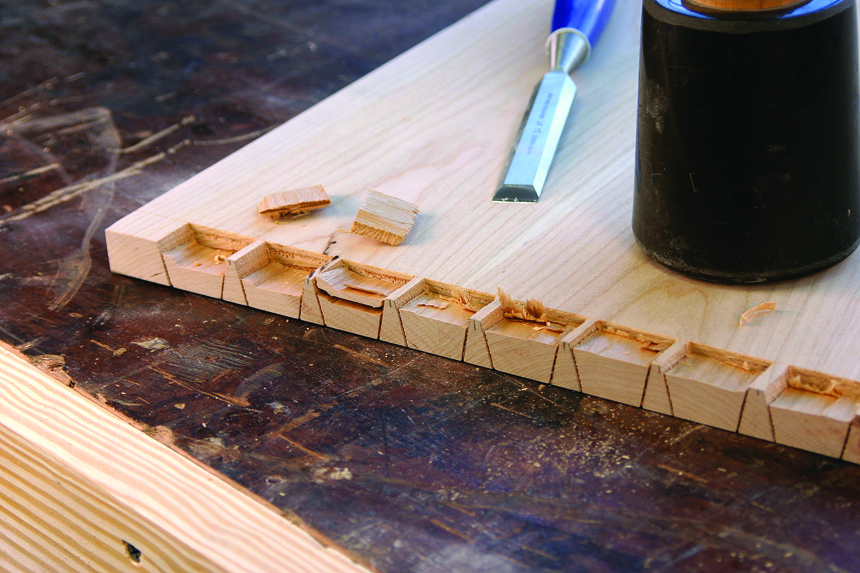
Once you define the pin area with a saw cut you need to remove the waste between them.
Begin the process by working on the face side of the panels where the wide portion of the waste is up. Sharp chisels make this quick work. Angle the cut of your chisel by a couple degrees to undercut the joint and make sure that no material is left to interfere with the fit of the dovetail.
Remove the waste to just past halfway through the thickness of the panel. Then, flip the board and complete the pins by removing the waste from the opposing face. Work carefully on this side; the area is narrow so it’s easy to knock off a corner of the pins when removing waste.
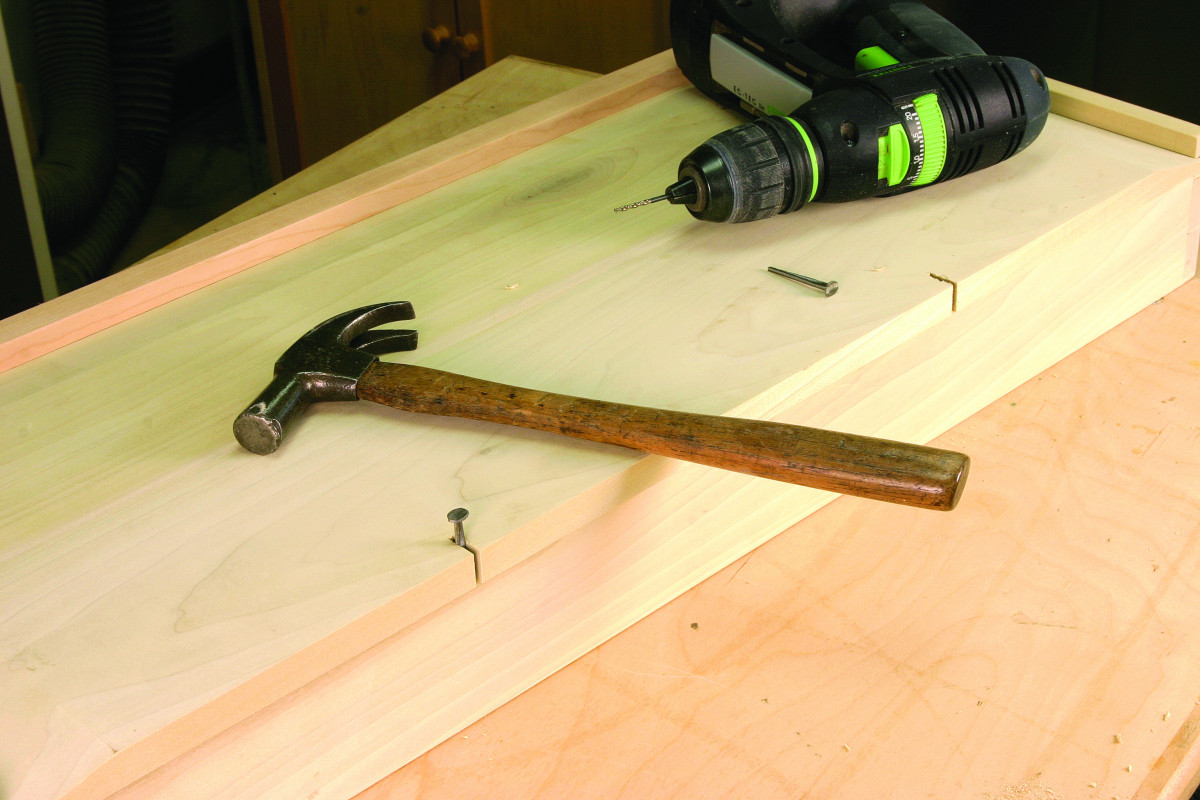
Nails added to the front and back of the bottom panel hold the panel in place, as well as allow for seasonal expansion and contraction.
Next transfer the layout of the pins to the sides and cut the tails at the band saw. These cuts are 90º to the table. You’ll need to finish the cuts with your handsaw unless you have a large, deep-throated band saw.
One important step when cutting the tails is to make an additional cut down the middle of the waste area. This extra cut allows the waste to move away from the panel by collapsing as the chisel does its job.
A rule of thumb when handcutting dovetails is that the more pins and tails you have for the joint, the closer to the lines you need to cut. Remove the waste and test your fit. Make any necessary adjustments.
It’s best to cut and fit each corner of the box then move to the next corner, making adjustments as you go. If you cut the entire box, only to find a problem with the fit, it’s much harder to correct. Any problems found during the work on the first corner can be adjusted in subsequent corners.
Four Pieces Become One
Joining the side moulding to the top with biscuits will keep things tight at the front while forcing any movement of the top panel toward the back of the chest.
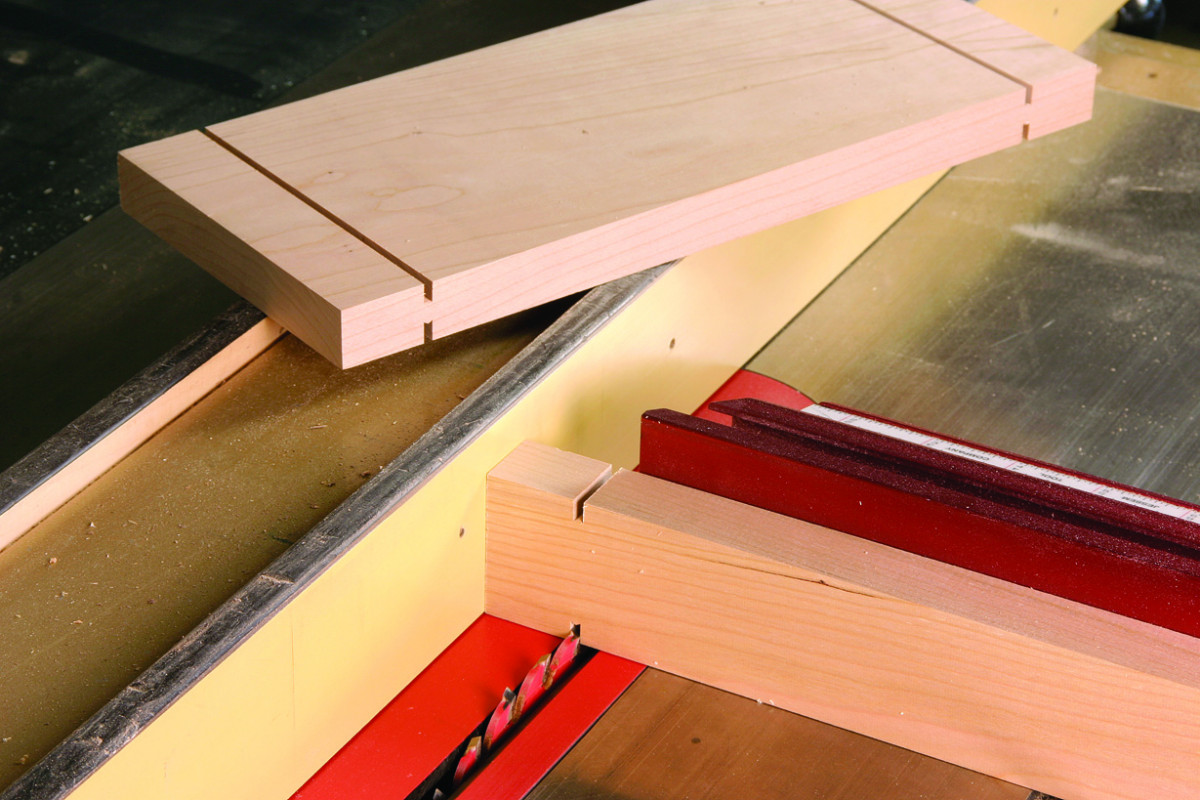
Before you can glue up the box, you need to cut the rabbet for the bottom and the dado for the divider: two operations; two tools.
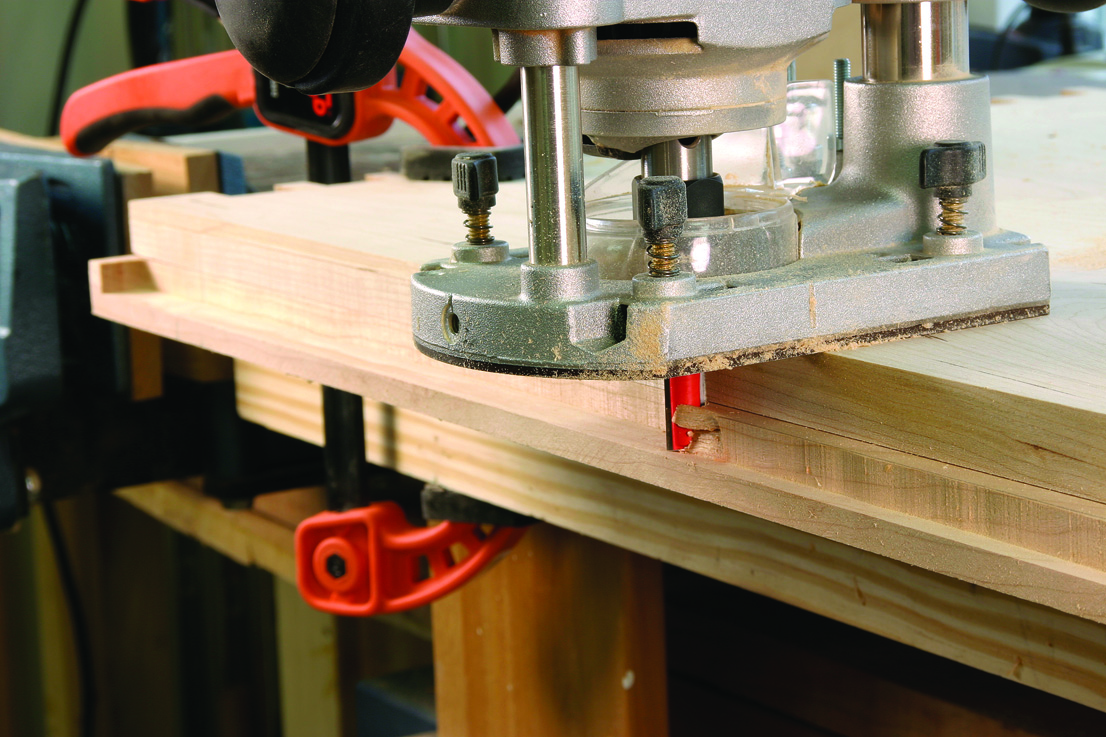
The rabbet is a router operation. Cut the rabbet at the bottom edge of each panel. If you started with a wide pin area as suggested, you have to make stop cuts along the front and back panels; on the sides you rout completely across.
You can use a rabbeting bit, but a top-mount pattern bit works wonders. And, the smaller radius will leave less to clean by hand at the stop cuts. I use one panel as a guide to rout the other.
Put the back panel on top of the front panel and position its edge to cut a 5⁄8“-wide rabbet that is 3⁄8” deep. Use the pattern bit to rout the rabbet. Remember to stop 1⁄4“ from both ends. This is a fragile area so be careful – but if you happen to knock off the piece, don’t panic. The transition moulding between the base and box covers the area.
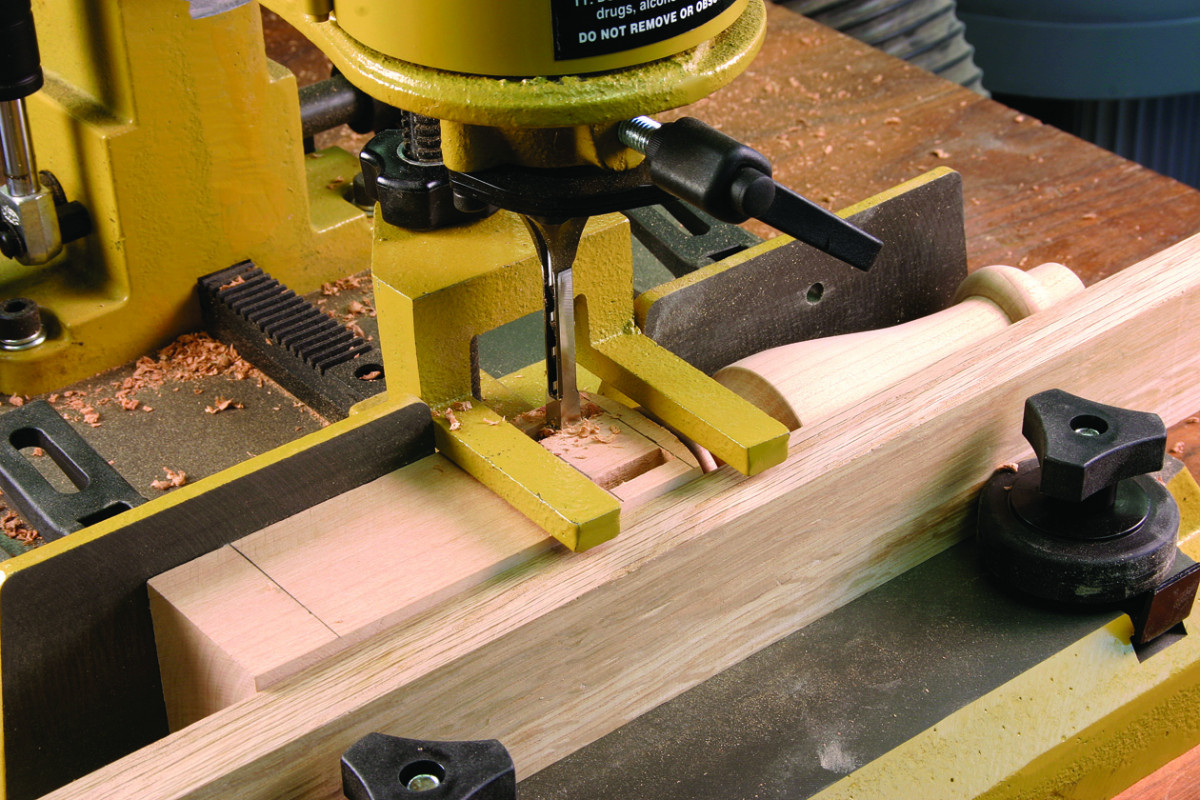
The lower front rail connection is a twin mortise and tenon. The mortiser setup is identical to that for the sides. Simply reverse the leg to cut the second slot of the mortise.
Reverse the panels and cut the back as you did the front, then move to the side panels. The set-up is the same but the cut doesn’t stop short of the ends.
Sugar chests were usually divided into compartments of two or three sections – I chose two for this chest. These compartments would divide different types of sugar or possibly coffee beans from the sugar.
The divider fits into the front and back panels in dados cut at the table saw with a stacked dado cutter. Set the stack to cut a 1⁄2“-wide dado, raise the blade to 3⁄8“ and set the table saw’s fence at 103⁄4“.
Make sure to match the panels for this process. You’ll find it best to orient your front and back panels just as the box fits together, then open the pair as a book to mark the dado location on the inside of both panels. It’s easy to get things turned around.
With the milling operations finished, assemble the outside of the box. If you have tight-fitting dovetails you need only apply glue to the pins. As the parts of the joint slide together, the glue will transfer to the tails.
Properly fit, the dovetails bring the box to square when assembled. Add clamps and confirm that the box is square by measuring from corner to corner. Equal measurements mean the box is square.
Fit the Bottom, Make the Top
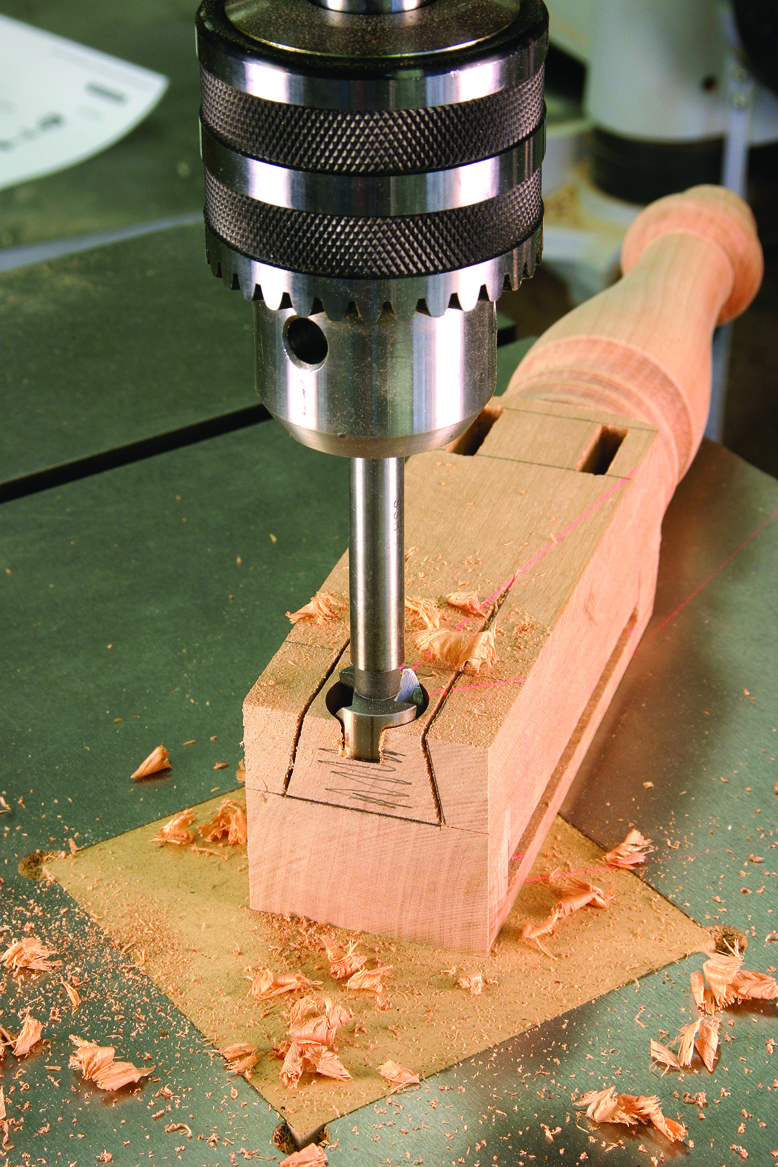
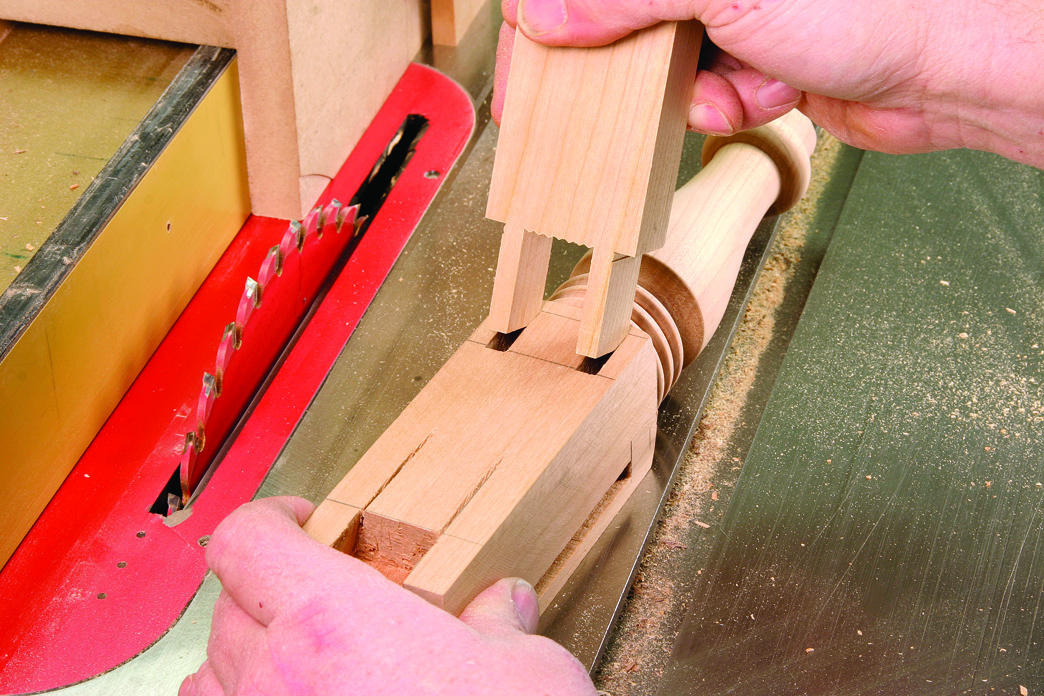
Define the dovetail socket with your handsaw, then “hog out” much of the waste material with a Forstner bit at the drill press. Finish with your chisels.
Once the glue is dry you can cut and fit the bottom and divider into the chest. The bottom is attached with both screws and nails.
Drive two #8 x 11⁄2“ screws through the bottom and into the side panels. Space the screws so each is 2″ away from the centerline of the bottom. Placing the screws this way reduces the overall movement at the front and rear of the completed chest.
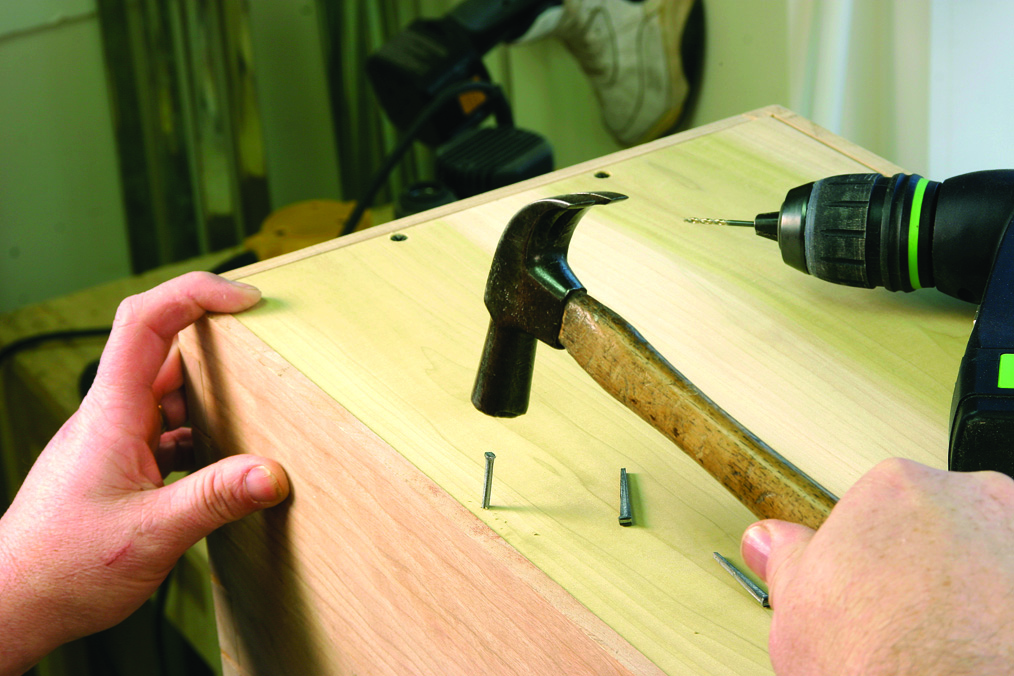
Now drive a couple period reproduction nails through the bottom into the front and back.
Why use two types of fasteners? Because the screws hold tight and restrict wood movement while nails will bend with seasonal expansion and contraction. Note that you need to pay attention to the fit of your bottom in its rabbet. You might need to leave a sliver of space at the front and back if you’re building during the months when the wood has shrunk.
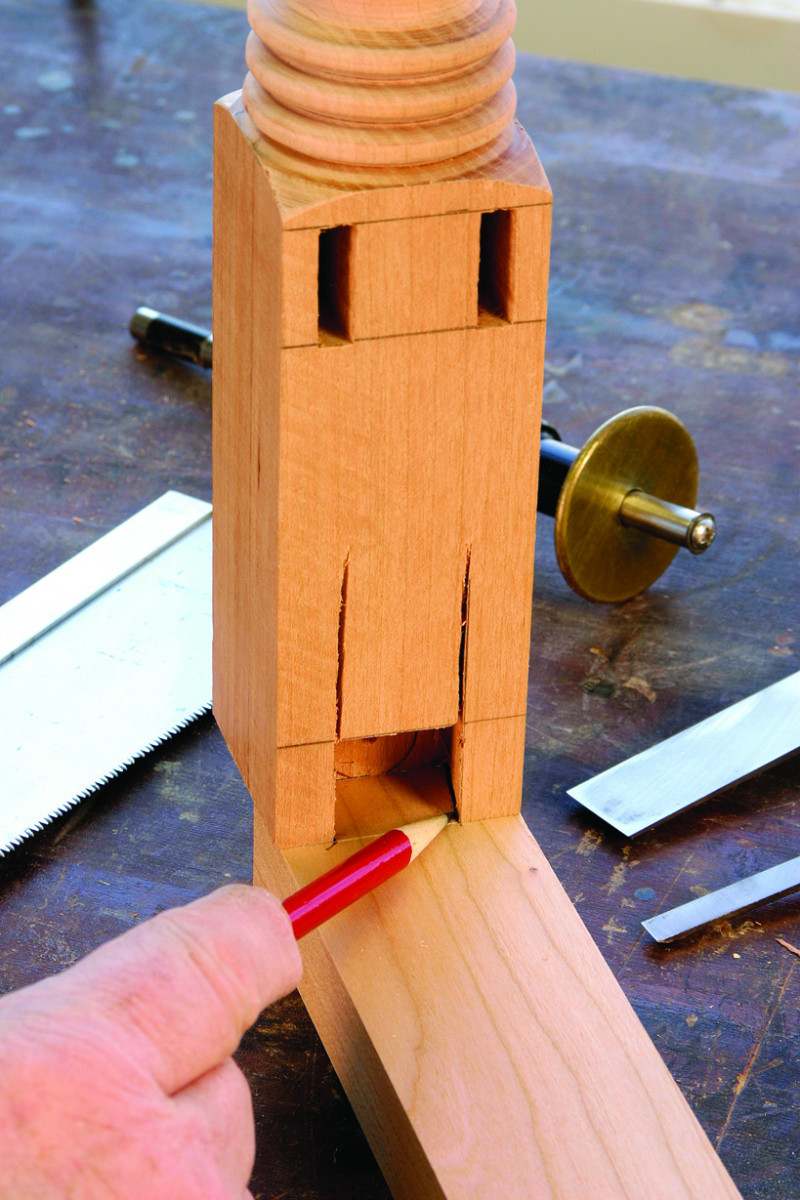
For the upper front rail, transfer the dovetail socket onto the rail, then it’s quick work at the band saw to complete the tail.
Next, mill and cut the divider to size then slide it into the box to check the fit. Leave the panel loose enough to be removed without problems. We’ll need it out of the way in order to install the half-mortise lock that secures the lid.
The lid for the chest is created with the addition of moulding around three sides of the top panel. Choose your favorite profile for the moulding then cut the moulding to wrap the panel. The front piece of moulding attaches with glue alone – it’s a long-grain-to-long-grain connection. Add strength to the side mouldings by gluing a biscuit at the front end while nailing the balance of the side pieces. The glued biscuit holds the side mouldings tight at the front while any expansion or contraction of the top will be absorbed by the nails bending at the rear of the lid.
Building the Base
The tenons on the sides and back rails are cut in a two-step method, the first of which is with the material flat on the tabletop. The same setup is used for the twin tenons on the lower front rail, but you cut the material on its edge.
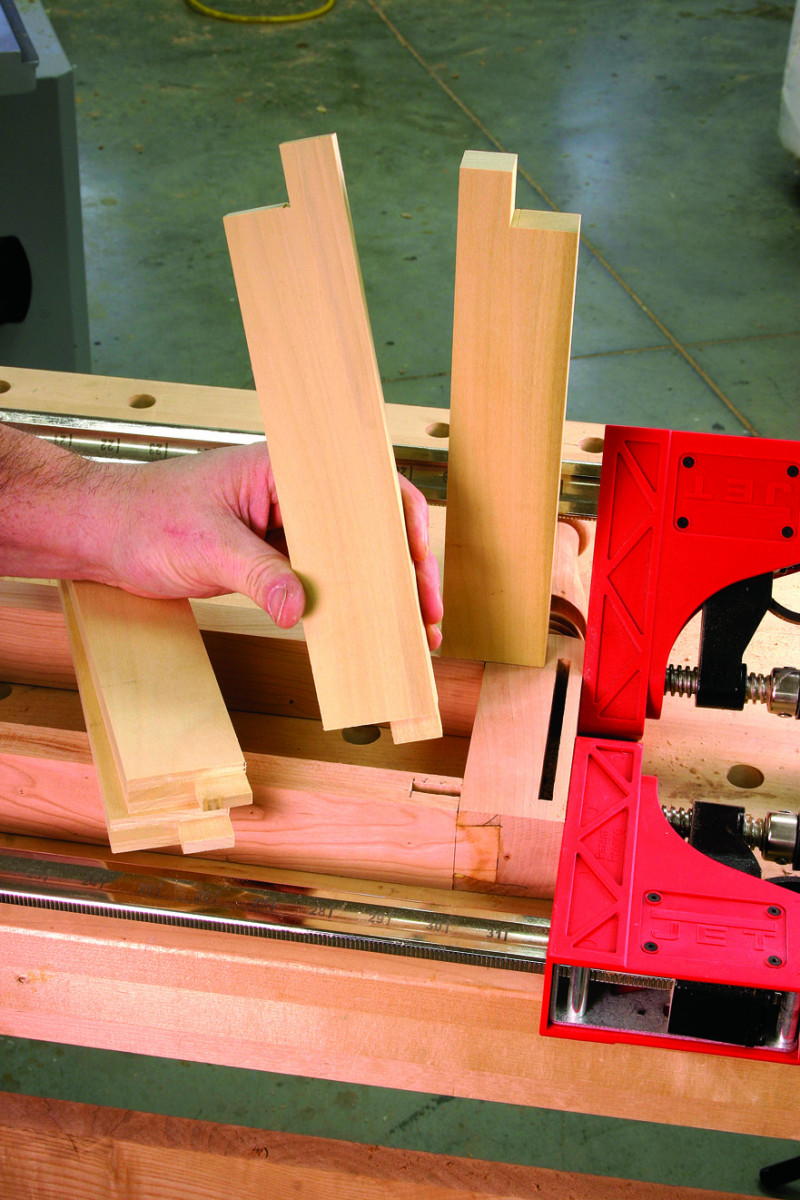
The base construction starts with turning the legs. Shape the stock according to the plan, add the details then sand to #180 grit.
Each front leg gets a dovetail socket to house the top divider and a twin mortise for the bottom divider. The rest of the mortises are 1⁄4“ in width and 1-1⁄4” deep.
All mortises are cut on a dedicated machine. The mortises for the sides and back are 4-1⁄4” long with 1⁄2” shoulders. The twin mortises for the front bottom rail are cut with the mortiser set the same as for the sides for the first mortise. The second mortise is cut by reversing the leg in the mortiser. Each mortise is 7⁄8” in length.
Once the insides of the twin tenon are nibbled away you can test fit the joint. Make it snug but not tight.
Start the single dovetail socket for the top front rail with a handsaw to define the socket edges. Once the area is defined remove the waste to form the socket. First use a Forstner bit in a drill press to hog out as much waste as possible, leaving only chisel work to complete the first half of the joint.
Now that the work on the legs is finished, the matching work on the rails remains. Creating the tenons is straightforward. The setup for the side rail tenons is the same setup used for the twin tenons. The only difference is the position of the rails at the saw. The side rails will lay flat to the saw’s table while the bottom front rail is cut.
The drawer runner and kickers are all made the same. In order to work properly offset the mortises for these parts toward the interior of the drawer box.
The second step of the two-step tenon is to cut with the piece vertically set. If you examine the front rail you’ll see that the piece is symmetrical. Therefore, after you cut one side of the tenon, simply reverse the position of the rail to make next cut. First, remove the outer waste material then start the cuts on the inside. Each time you make a pass at the saw you’ll remove waste in the center until the tenons are all that’s left.
Then place the dovetail socket on the top rail and transfer the shape to the rail. Make the cuts at the band saw. Because this is a single dovetail there is no hand work to complete after the band sawing. The resulting tail fits into the socket.
Now cut the mortises for the drawer runners and drawer kickers into the front rails. The mortises need to be offset to work with the 7⁄8“-thick rails. Cut the mortises for the runners 1⁄4” from the top edge of the rail; those for the kickers are 1⁄4” from the lower edge of the top rail.
Add glue to the mortises and tenons for the front and back assemblies. Don’t glue the sides in at this time. Slide the base together and clamp it. Make sure the base is square by checking the cross measurements before the glue sets. This ensures that the front and back assemblies will be square as well.
The runners and kickers are secured at the front with the mortise and tenon; at the rear they are nailed to the rear leg posts. They are identical in design. Create a 1⁄4” x 1″ x 1⁄2“-long tenon on each piece, then cut the portion of the tenon away that fits to the leg posts. Cut the notch at the rear of the pieces at the table saw with a two-step cut.
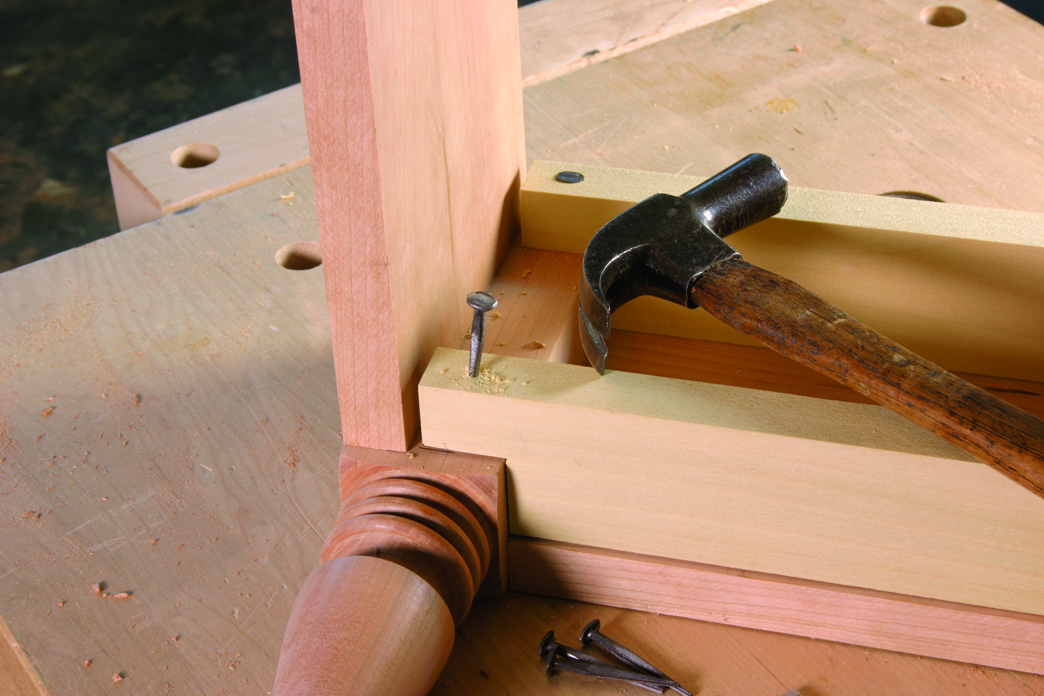
The runners and kickers can be set square off the front of the base and nailed to the rear leg posts. Drill a pilot hole through the pieces but not into the leg. Drive the nail at the pilot hole to gain a strong hold into the leg.
Glue the runners and kickers into the rails, add glue to the mortise and tenons of the sides and reassemble the base again, checking for square. After the glue is dry, nail the runner and kickers to the rear leg posts with a single nail. First square the pieces to the front of the chest and drive the nails to secure the two pieces.
Attaching the box to the base is next. The connection for the back of the chest is wooden clips. Cut 1⁄4“ slots for the clips in the back rail of the base. The inverted “L-shaped” clips sit on the bottom panel and are attached with screws while the tongue of the clip is held in the slot.
Invert the upper section of the chest then place the base in position. Keep it centered from side to side and flush to the back edge of the box. Drive three #8 x 1-5⁄8” screws through the front top rail and into the box front panel to make the connection. Use a tapered countersink bit before installing the screws. It’s a tight fit to hit the panel exactly.
The Drawer Mimics the Chest
Set the saw blade to 12º and leave a 3⁄16″ space between the blade and the fence. The resulting cut will fit perfectly in the 1⁄4″ x 1⁄4″ groove for the drawer bottom. Raise the blade to make a clean cut.
Building the drawer is a repeat of the dovetails we’ve created earlier in the project. The drawer back joins the sides with the same through dovetails as are on the box. The front attaches with half-blind dovetails, which are created in the same way as the dovetails for the front top rail. Complete the dovetails to build the drawer box.
Before assembling the drawer, cut the groove for the drawer bottom. The bottom slides in under the drawer back and into the groove on the sides and front. Cut the 1⁄4“-wide groove at the table saw. For a single drawer I would not take the time to set up a dado blade. Instead, make two passes at the saw cutting 1⁄8” each pass. The depth of cut is 1⁄4“. Sand the inside of the drawer parts and assemble the drawer.
Mill the drawer bottom to thickness and cut the panel to fit the drawer box. To cut the bevel to fit the groove you’ll need a pass over the table saw (see the caption under the photo above for accurate settings). That cut, rising through the panel, results in a bevel that fits tight to the sides of the groove, and touches the bottom of the groove at the same time. Cut the ends of the panel first then cut the edge that will be toward the front of the drawer.
Before installing the drawer bottom you need to create two slots for the nails that hold the bottom to the back of the drawer box. Slide the bottom into the box then mark where the bottom and the inside of the drawer back meet. Remove the panel from the box and cut a slot with the table saw blade set to the line. Then drive a reproduction nail through the slot and into the drawer back. A bit of glue in the groove in the drawer front holds the bottom tight to the front when the bottom moves. The nails will allow it to slide. Add a drawer stop inside the case to keep the drawer flush to the front.
Now install the two half-mortise locks – one in the box of the chest and the second in the drawer. Hold off on the lock receptacle until later. Also install the hinges for the top and prepare the wooden knobs for staining. (For expert tips on lock installation visit popularwoodworking.com/blog and search on “half-mortise.”) Remove all the hardware before finishing.
A Favorite Finish
Two slots cut in the drawer bottom just to the inside of the drawer back is where the nails are set to hold the solid drawer bottom. The slots allow for seasonal adjustments.
Finish sand the project to #180 grit and you’re ready to stain. Use a water-based aniline dye (Moser’s Dark Wine Cherry) making sure to coat the piece completely. Add stain until it runs off of the chest. Once dry, sand any raised grain with #400-grit sandpaper. Apply two coats of shellac, either sprayed at a 11⁄2 # cut or brushed at a 3# cut, then sand smooth when dry.
To add age and diminish the effect of blotching in the cherry, add a coat of heavy-bodied glaze (I use a glaze from Mohawk, mohawk-finishing.com). The glaze is sprayed or brushed onto the chest, allowed to flash-off (begin to dry), then wiped completely from the chest. Residual glaze will remain on the piece in the tight corners and within the shellac finish. Give the glaze time to dry (about 48 hours) then add two additional coats of shellac. To complete the topcoat add one coat of dull rubbed effect lacquer (I get mine from Sherwin Williams, sherwin-williams.com).
Then reinstall the hardware and it’s ready to move into the house. Here’s a trick for installing the lock’s receptacle. Once the lock is installed add the receptacle to the lock, add a few dollops of glue from a hot glue gun then lower the lid. The lid will contact the receptacle and the glue will hold it in position until you can make the final connection. You may find that you need to recess that receptacle to get the box to close properly. Be careful with the screws – this is not the time to puncture the top with a screw that is too long.
Everyone who sees this sugar chest falls for it, big time. It will look great in any number of places in your home. I’ve already got a waiting list of takers. I’m sure you’ll have the same results. It’s a sweet little piece.
This article originally appeared in the June 2007 issue of Popular Woodworking Magazine.
Here are some supplies and tools we find essential in our everyday work around the shop. We may receive a commission from sales referred by our links; however, we have carefully selected these products for their usefulness and quality.