We may receive a commission when you use our affiliate links. However, this does not impact our recommendations.
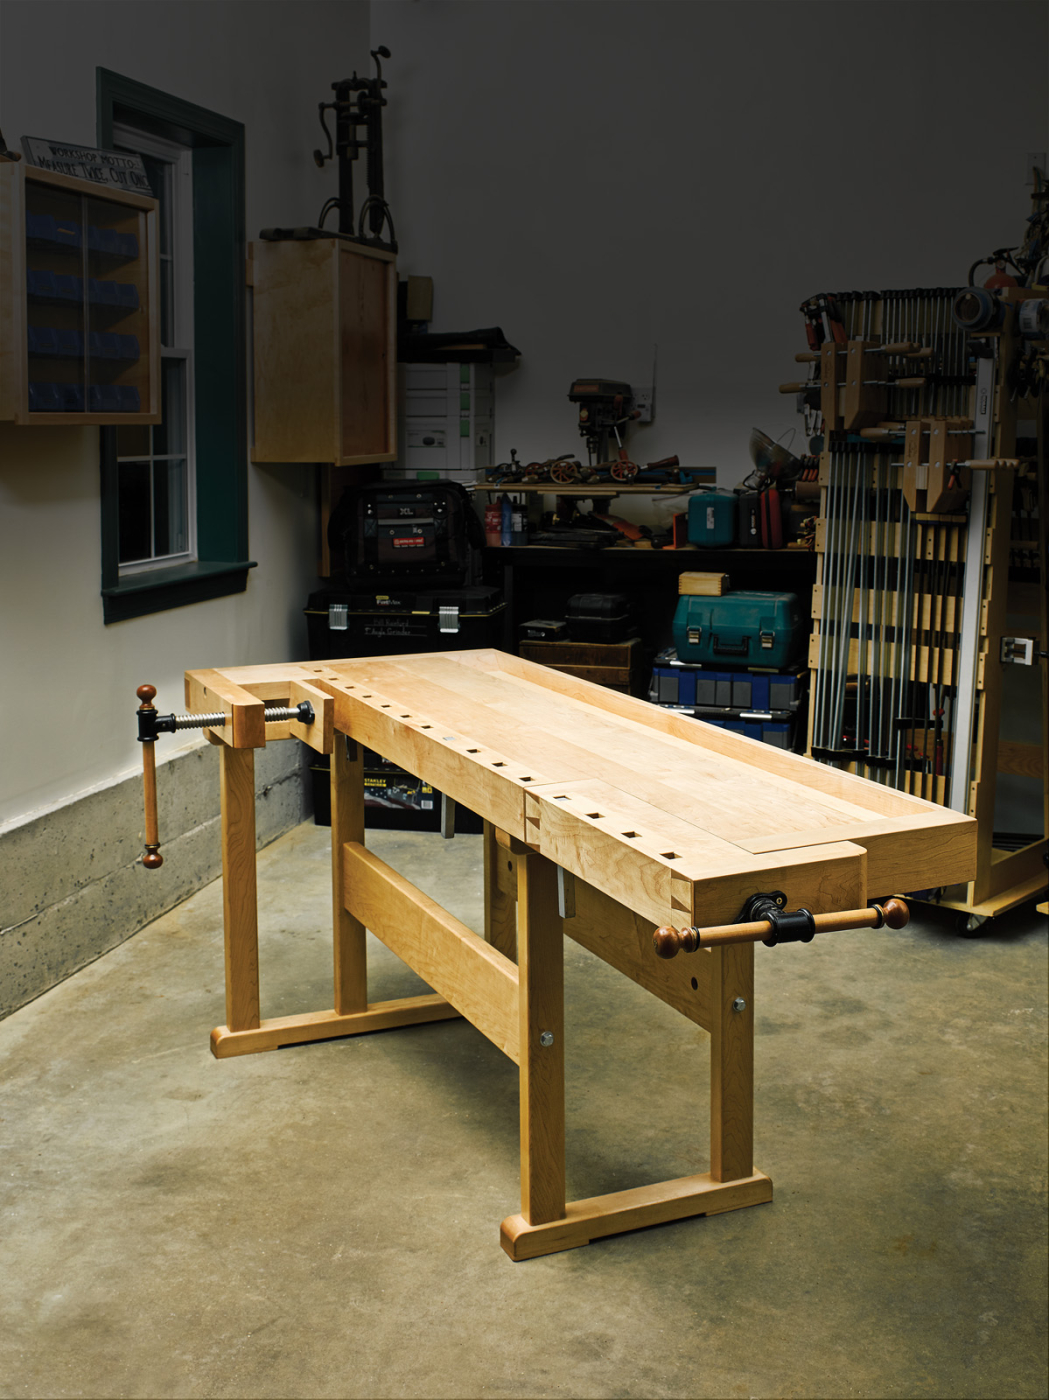
Modern hardware and techniques update this Tage Frid-inspired bench.
Scandinavian- or Continental-style workbenches are the vinyl LP records of the woodworking world. These iconic benches have never left the scene. A few are classics and others are the flavor of the month. Some benches in this style are masterworks and some are poor approximations of an archetypical form. The trick is finding the workbench that hits all the right notes for how you work so you can go on to create your own opus.
What’s Old is New Again
Much as how Roubo and Nicholson benches have re-surfaced in recent years and have their merits – they were products of their times, the needs of the craftsman and the availability of wood and hardware – so too has the Scandinavian style of workbench, most popular in the late 19th and 20th centuries. This newer style of bench made use of a changing tool landscape and scarcity of wood, and often required a higher level of skill and/or mechanization to produce. All of those forces are still present in our modern world, where we want to conserve natural resources, mix old and new techniques and tooling and build something that is both functional and aesthetically pleasing.
When Tage Frid wrote about workbenches in the third volume of his iconic “Tage Frid Teaches Woodworking” (Taunton) he described a state of time (1948) wherein a good workbench could not be obtained in this country. His solution was to design and build a bench similar to the one he was trained on. Almost 70 years later, things are not much better on the retail front, with the majority of mass-produced benches lacking in heft, design and quality. Thankfully we’ve had a resurgence in traditional woodworking and have a much wider variety of tools, hardware and literature, making today one of the best times to be a woodworker since World War II.
Design Considerations
My formal training at the North Bennet Street School was on a German workbench in a classroom setting, so when it came time to build my own workbench, I was inspired by Frid’s bench – but I also listened to the criticisms. Some folks complained about the relatively short length, which was designed for a modest cabinetmaker in a classroom setting, and the fact that larger folks aggressively planing could potentially move the middle-weight bench around if it wasn’t bolted to the floor. Others suggested that the joinery for the tail vise was too complex, and some noted that the hardware Frid used is no longer available.
To address some of those issues, I made several design modifications and incorporated some new hardware to build a bench that I am very happy with. I have, however, used the same or similar part names, listed in the same order, as Frid did in his book (in case you wish to view them side by side).
Here are the highlights of my revised bench:
■ It is almost 2′ longer than the original, coming in at about 7′ long.
■ It is a few inches wider (making it perfect for my armspan).
■ I incorporated modern hardware – a Dieter Schmid shoulder and tail vise (Lie-Nielsen Toolworks has simlar vises), square metal bench dogs, the Veritas Bench Bolt Kit, slotted washers and more.
■ The traditional joinery – dovetailed vises and skirt board, wedged tenons, etc – cut by hand.
■ I beefed up the stretchers to add additional weight, and decided on larger shoulders to further stiffen the trestle legs to resist racking. (The thicker stretchers also allow me to conceal the bench bolts for a cleaner look.)
Supplies & Raw Materials
I took my time to select nice, dense, clear and straight-grained hard maple; it’s well-suited for workbench building and relatively plentiful in New England, where I live. Buy your wood well in advance so that you can bring it into your shop, sticker it and allow it to acclimate to your shop for at least a week.
While the wood acclimates, gather all your hardware and vises, and note any changes you need to make to your joinery or design to fit your hardware. Once the wood is acclimated, plane, rip and buck the pieces close to their final sizes – but leave them a bit oversized and again sticker them for a couple of days. (If you have a moisture meter, you can monitor the wood as it reaches equilibrium.)
I built the bench in three major assemblies: the benchtop, the trestle legs and the vises.
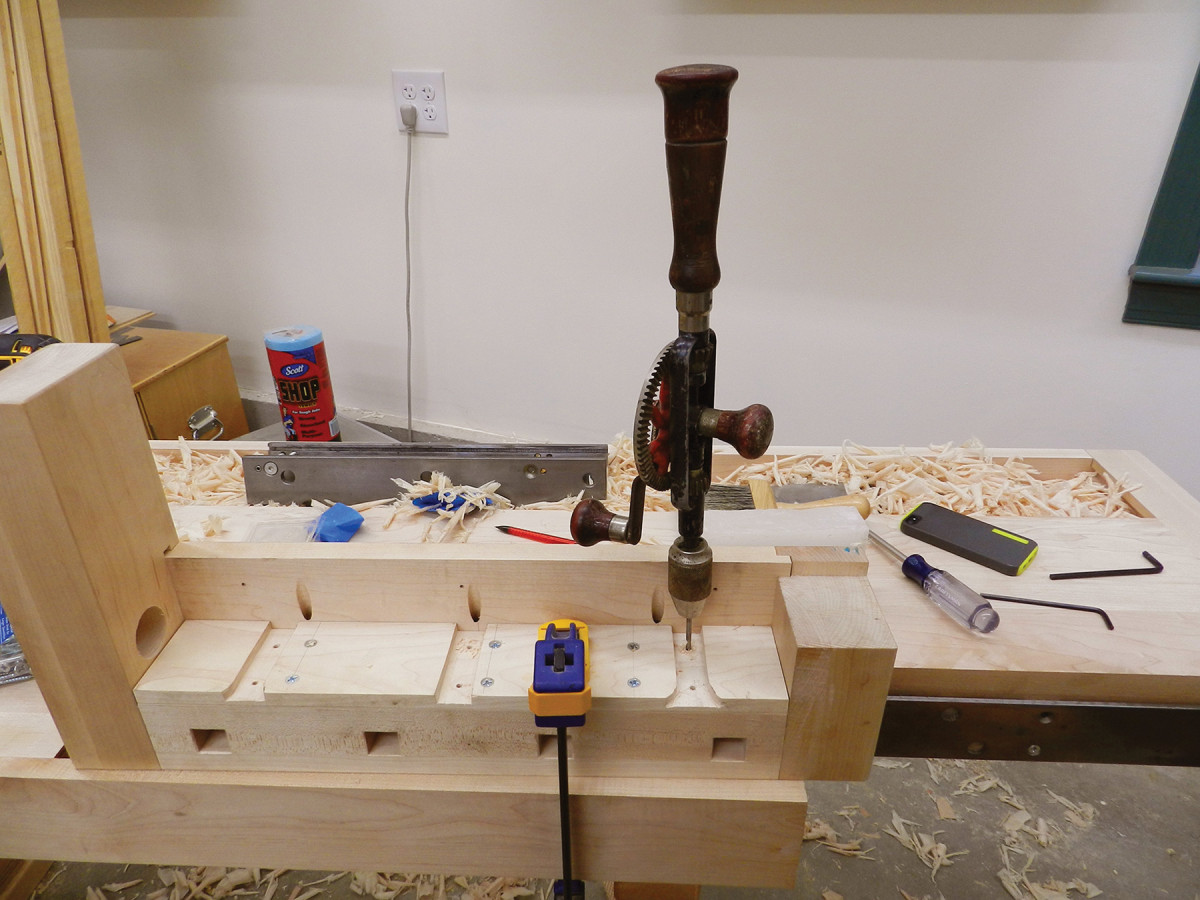
Benchtop & Square Dogs

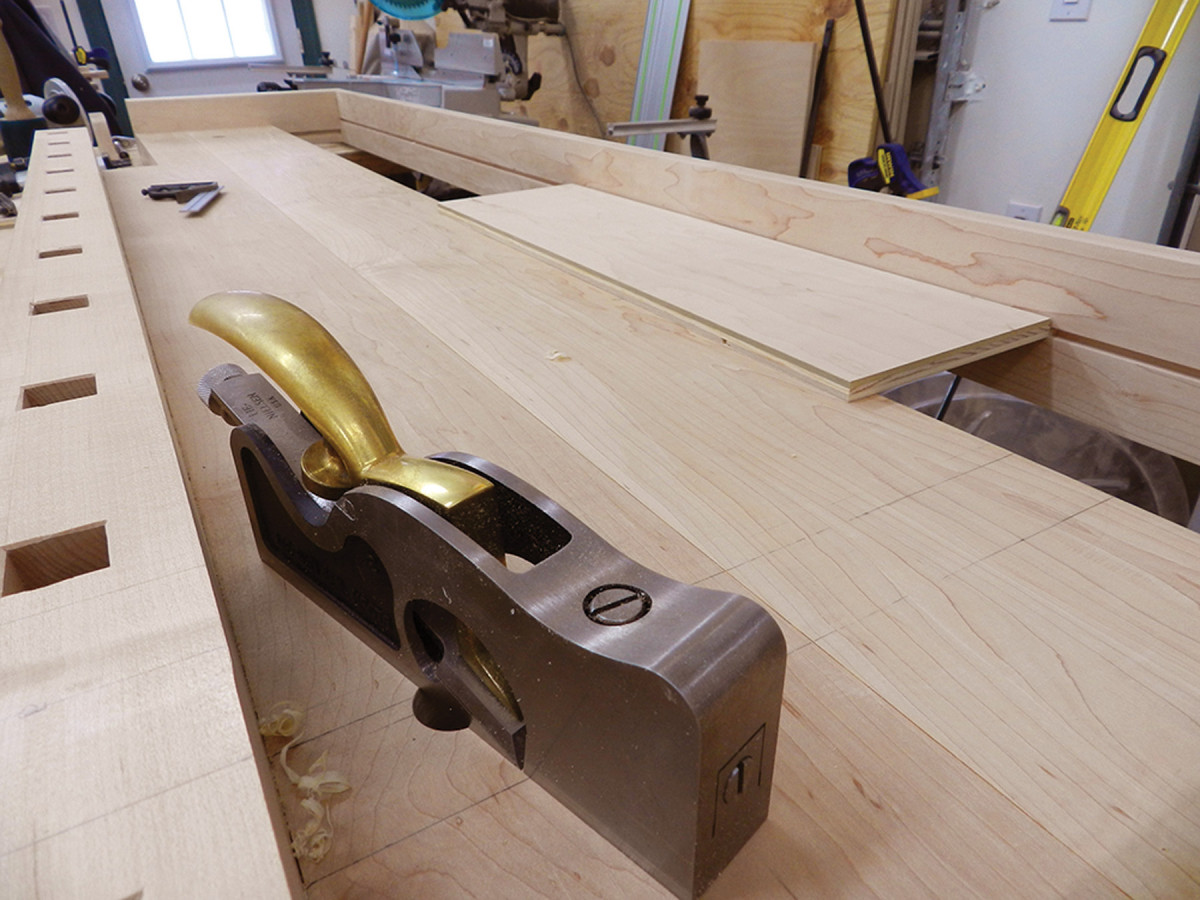
Slightly off. With a simple jig, you can rout then repeat for a matching row of dog holes angled at 4°, then square the corners with a chisel. My holes are 13⁄16″ from side to side at the top, and 7⁄8″ front to back – but measure yours off your dogs.
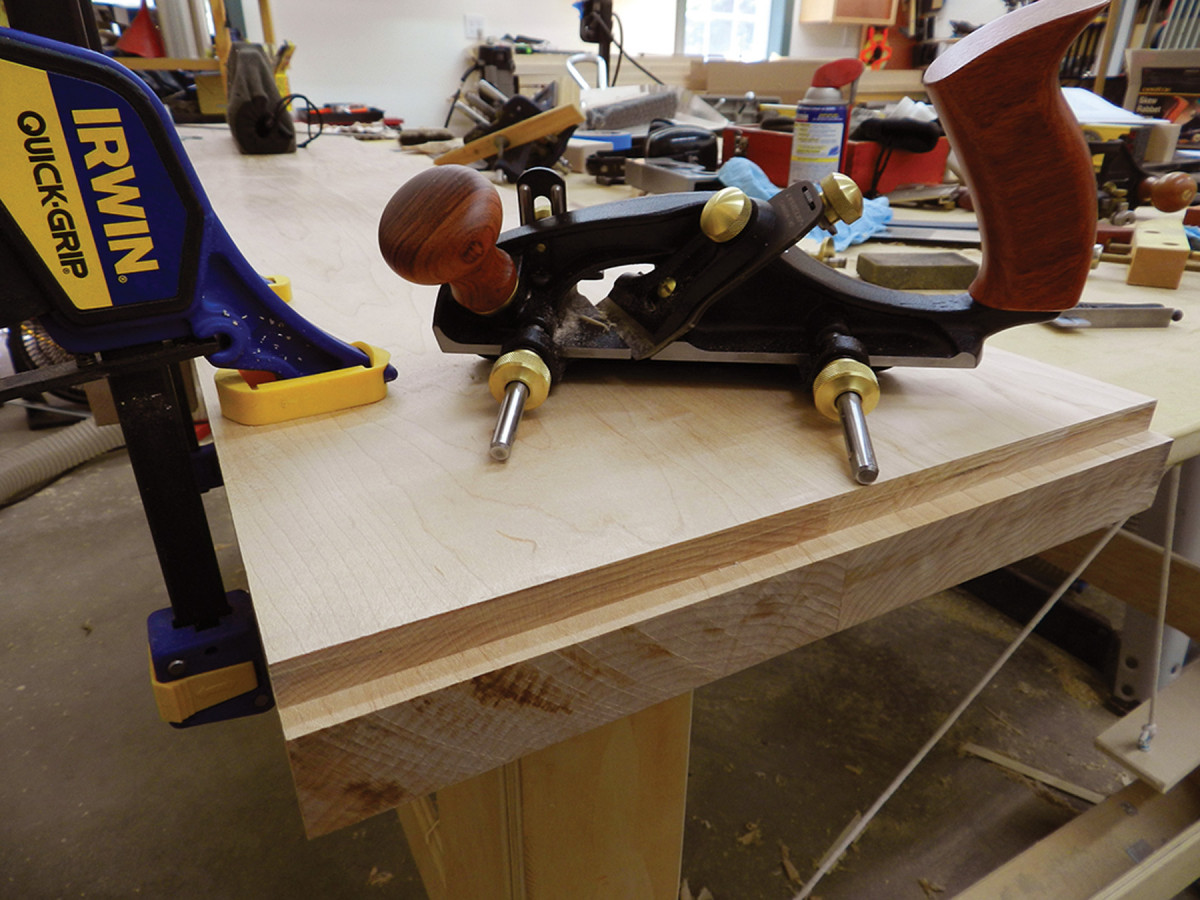
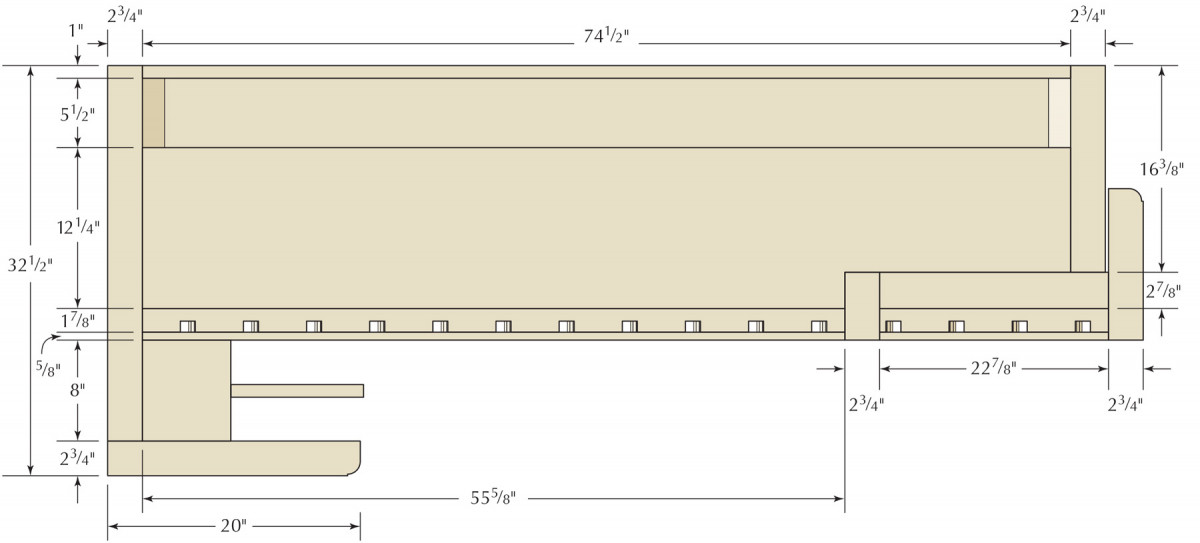
I started with the large slab that makes up the majority of the top surface (it finishes at 13⁄4” x 121⁄4” x 741⁄2“). You’ll want at least two 8/4 boards for this. If you can’t find wide clear stock, you can use three narrower boards to make up the blank. Make sure that the grain is oriented in the same direction for handplaning during the final flattening.
Joint the boards, thickness plane them to 1⁄32” heavy, then rip a little wider than needed. I used my jointer plane to further true up the edge(s) that will be glued up. At almost 2″ thick, the edges provide plenty of glue surface, but I used some biscuits to aid in lining up the pieces and reinforce the joint.
Once the glue dries, cut the slab to its final length, making sure to leave sufficient length for the tenons for the end caps.
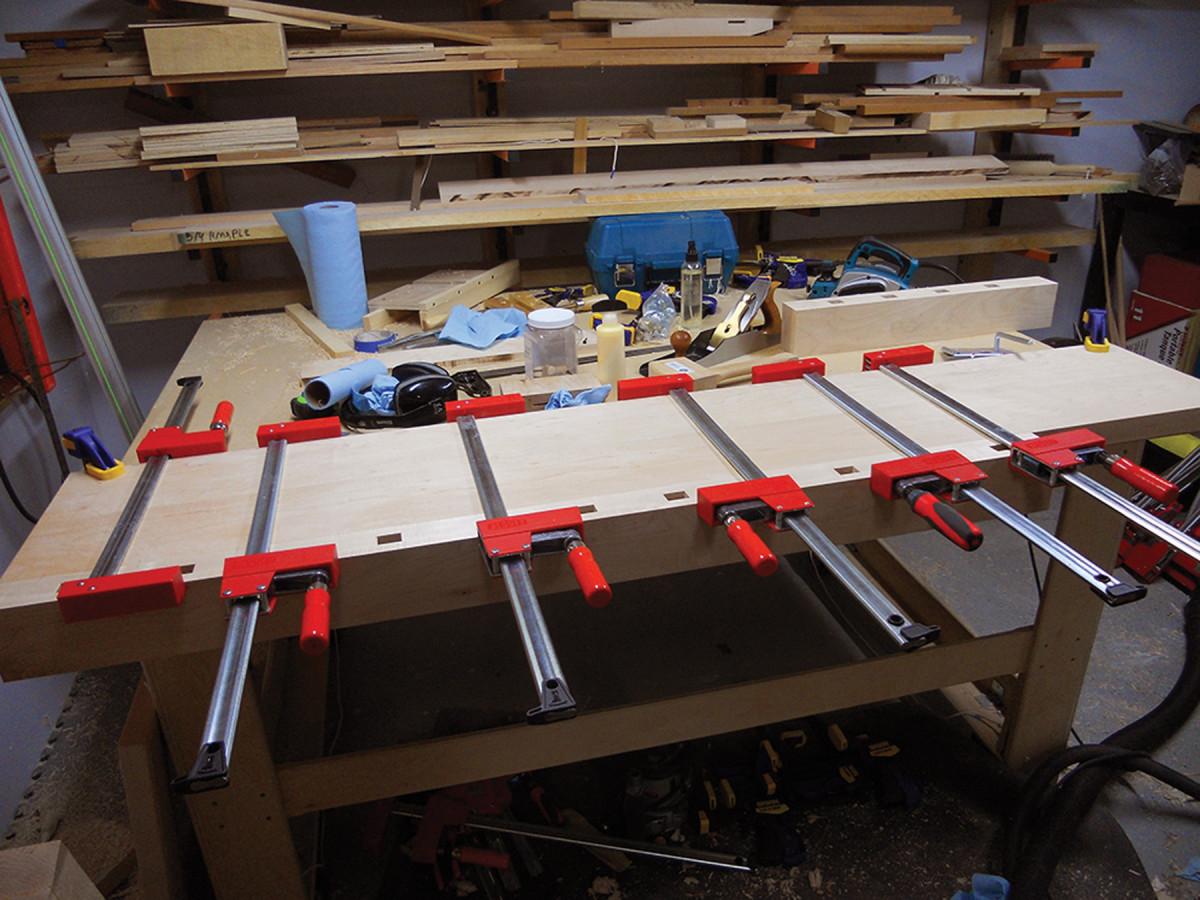
Keep it square. As you glue on the dog-hole assembly, be sure to attach it square and level to the benchtop.
For the end caps and left vise (the stationary block through which the vise screw rides), I laminated an 8/4 and a 5/4 board to get the required thickness. The 8/4 piece is oriented so it will be in the inside of the joint and receive the groove; the 5/4 piece makes up the exposed face of the piece. Make sure the grain is going in the same direction for ease of planing and try to pick clean, clear grain – this will show in the finished bench.
Slice it clean. Make sure to engage the nicker on your rabbet plane when starting this joint and retract it before the joint reaches its full depth (so as not to cut the fibers in the tenon and weaken the joint).
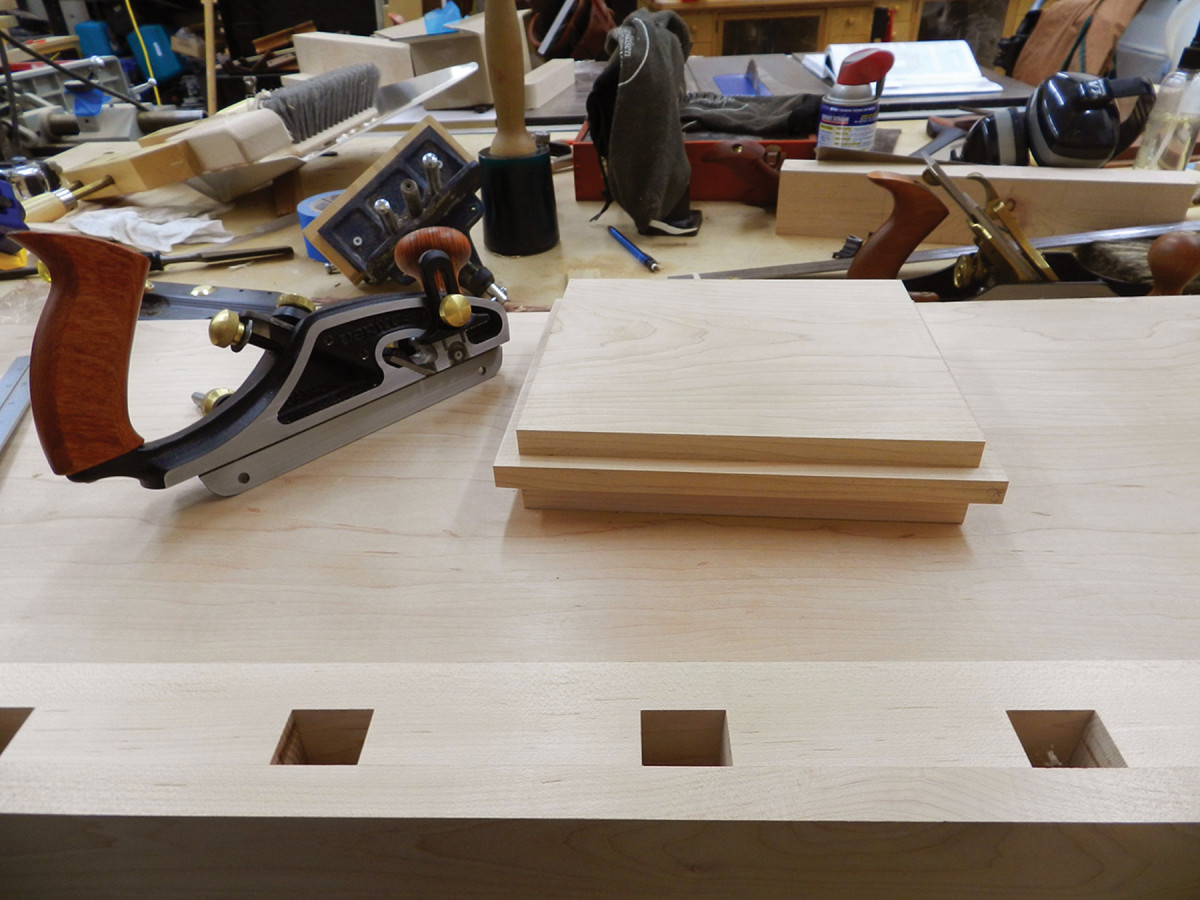
I’ve worked on benches with square dogs, round dogs or a mixture of both. I prefer square bench dogs because they’re in my opinion stronger, taller, have more surface area on the face to engage the wood you’re holding and less finicky than round ones. (If you prefer round dogs, you can always add a few well-placed 3⁄4” round holes to your bench for them and for holdfasts.)
Knife then cut. Use a cutting gauge and knife to lay out the stopped dado for the left vise filler, then chop it out.
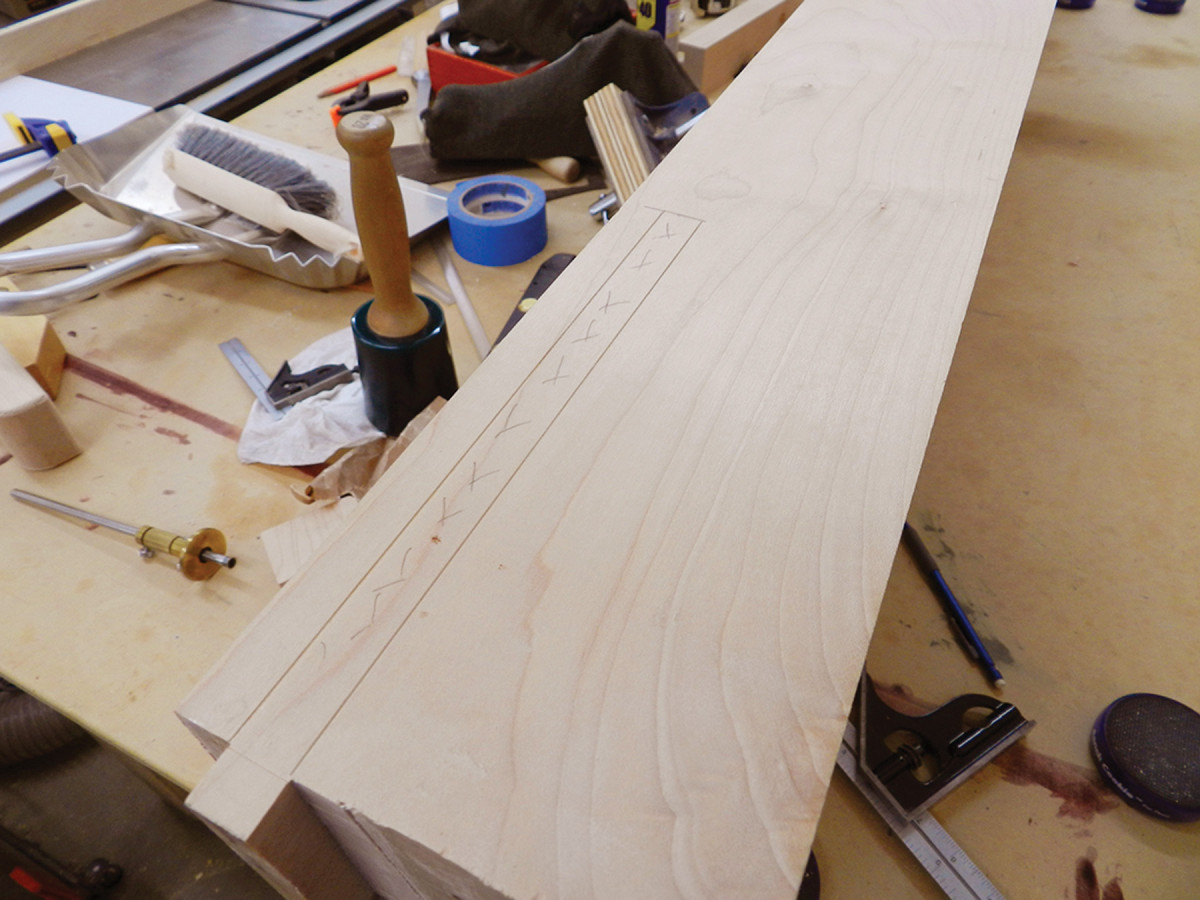
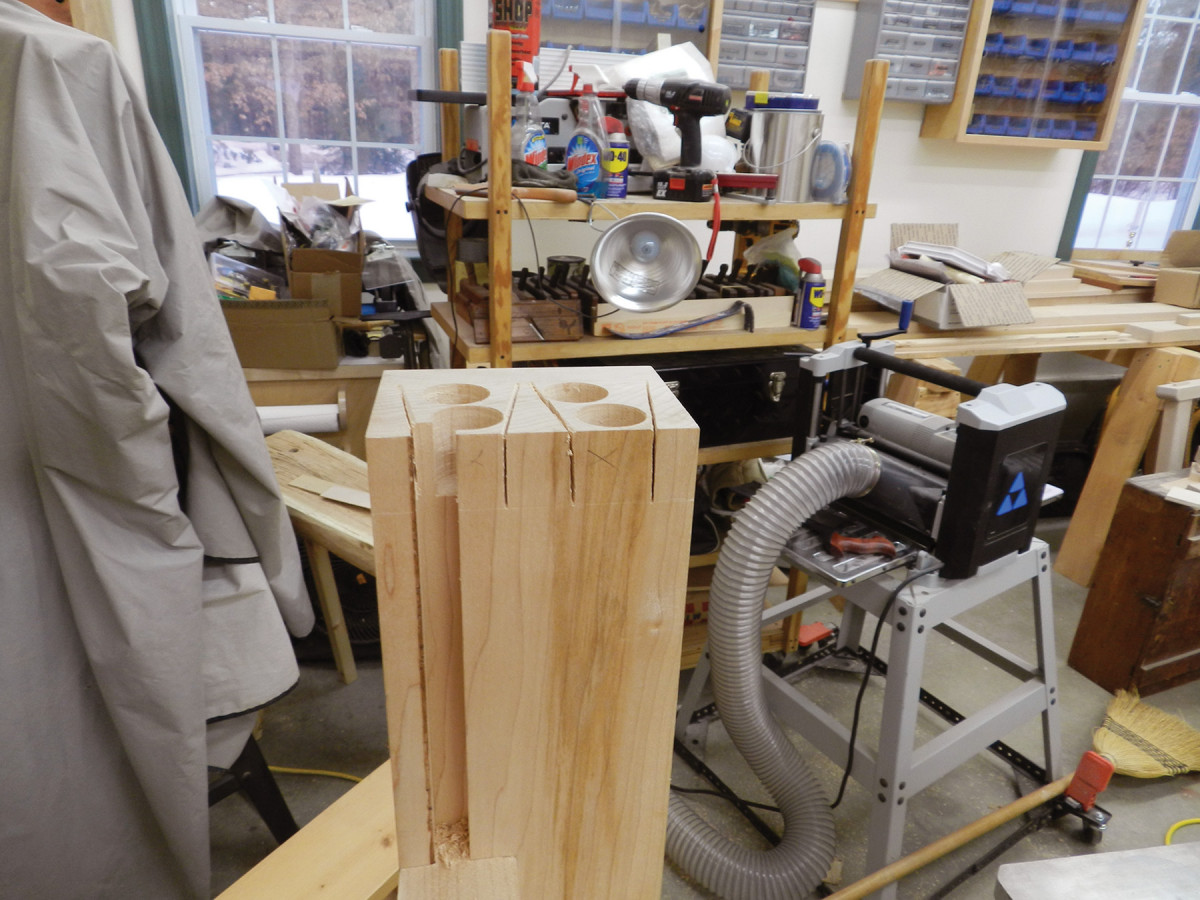
 I chose 8/4 stock and used a shop-made template and plunge router to rout the square holes, which are angled 4° to the right off vertical. Note: The slots in the tail vise lean 4° to the left – the opposite direction to those on the benchtop. Cut these two runs from the same board (with plenty of waste between) and simply flip the jig for the tail-vise portion.
For the 5/4 cap piece that is glued on over the dog holes, choose a clean piece and be careful during your glue-up to avoid getting glue into the slots. I used a pneumatic nailer to shoot a couple of nails into the waste on each of these blanks to help ensure things did not move around during clamping.
Hip to be square. There will be a lot of pressure on this left vise filler block, so you want clean tenons on both ends and the left edge.
Once the glue is dry, cut the waste off the end of the blank that will be affixed to the benchtop and glue and clamp it to the benchtop. (Here again I used biscuits to help line everything up.) Make sure to remove any mill marks from the cap.
Once the glue is dry, rip the assembly, at the back edge, to final width (15 1⁄4” for me) and clean up that edge with a handplane.
Scandinavian Bench Cut List

Plan
Elevation
 Benchtop Joinery
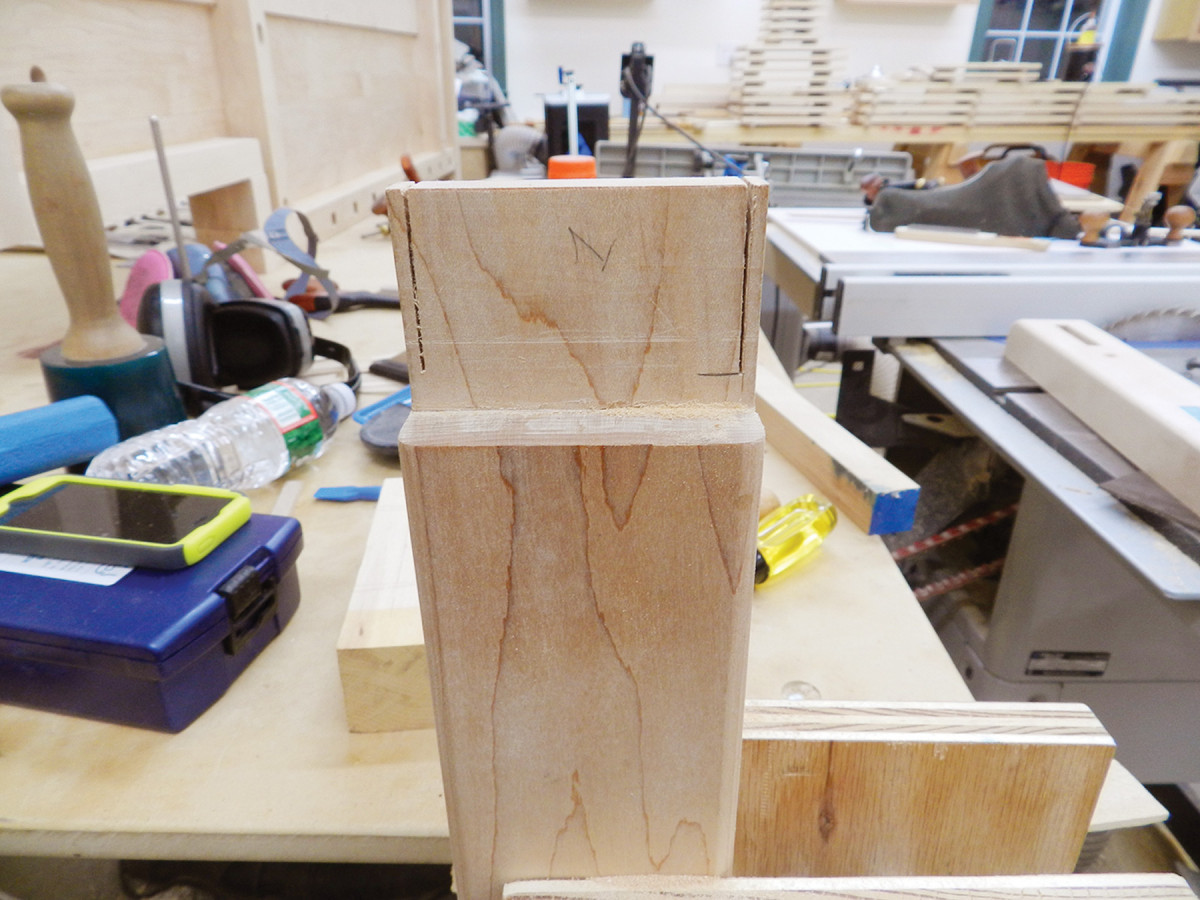
Know your depth. Test the hole depth with a bolt taped off at the max depth you expect it to reach, given the depth it will be into the end cap.
I used a router bit in a router table to cut the grooves on the end caps. But I turned to my skew rabbet plane to cut the rabbets that form the tenons on the ends of the benchtop blank; that was easier than trying to muscle this large assembly onto machinery. The result was a nice crisp joint with no tear-out.
Work carefully and test-fit as you go to make sure the end caps fit nicely.
At the front of the bench is a spacer block – what Frid called the “left vise filler” – that supports the shoulder vise. To cut the groove for it in the front of the benchtop, after laying out the location with a cutting gauge and knife, I removed the material with a mortising chisel, then cleaned up the stopped dado sides with a wide chisel and the bottom with a router plane.
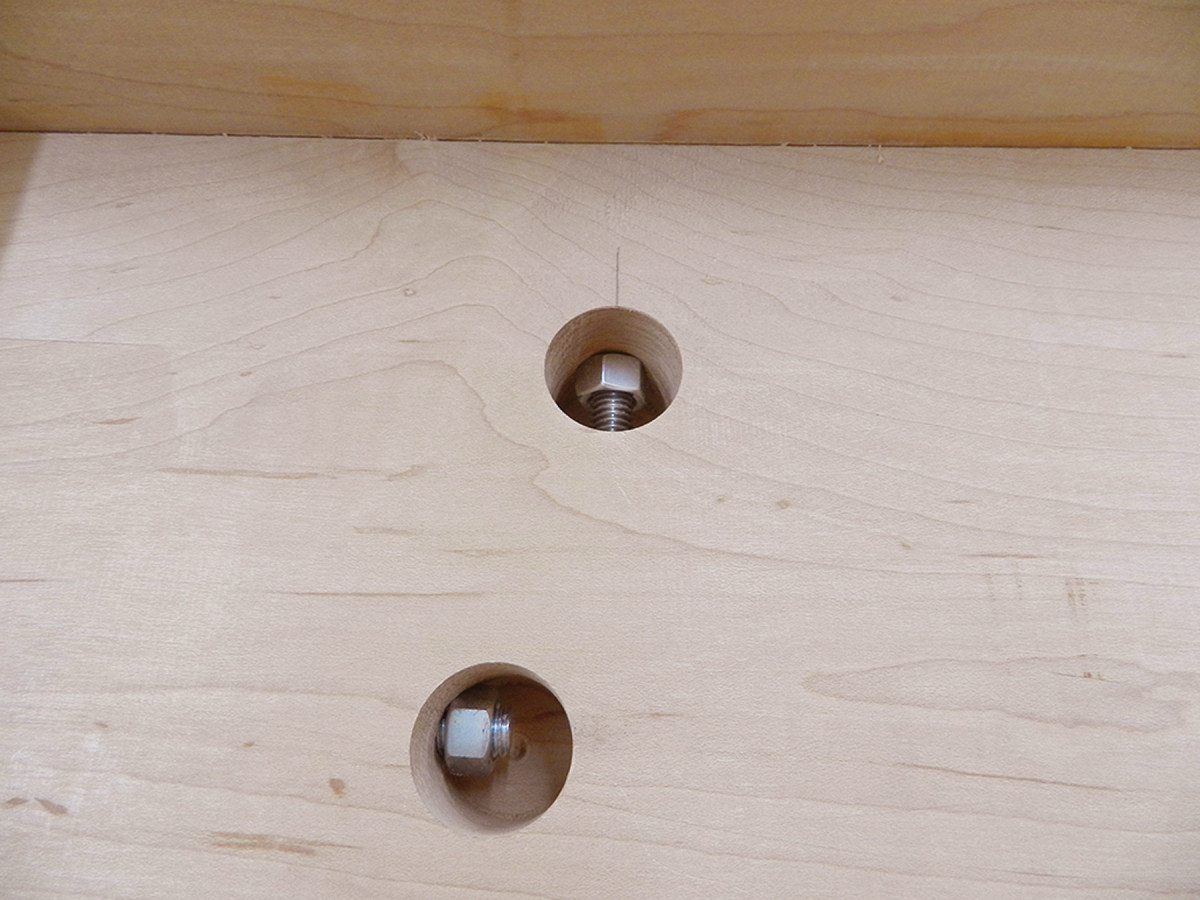
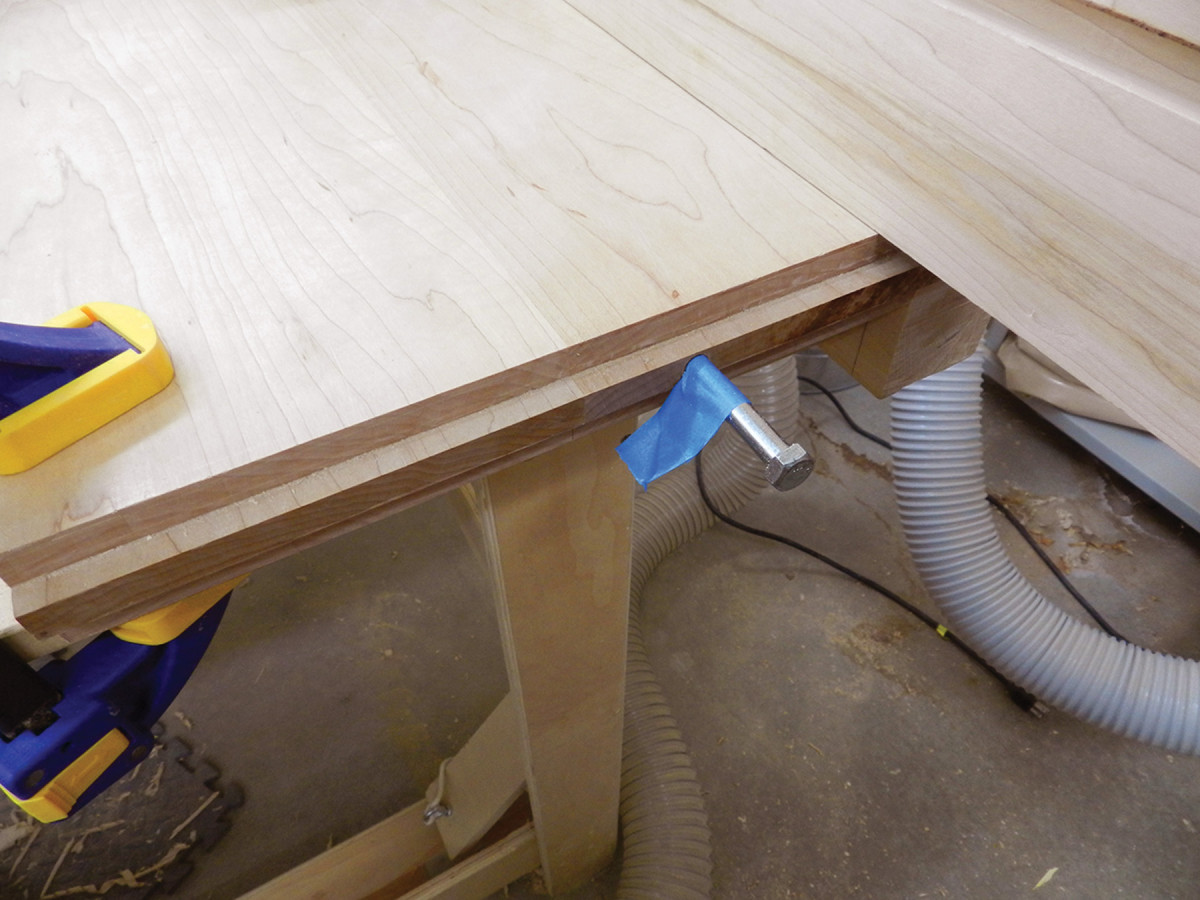
Access holes. The size of the holes on the underside of the bench doesn’t really matter – they just need to be large enough to accommodate attaching and securing nuts and washers on the ends of the bolts.
Next, cut rabbets to form 3⁄8“-long tenons on both ends and the left side of the filler block. Orient the grain front to back so that when this piece expands and contracts, it does so from left to right, thus expanding into open space rather than into the joint.
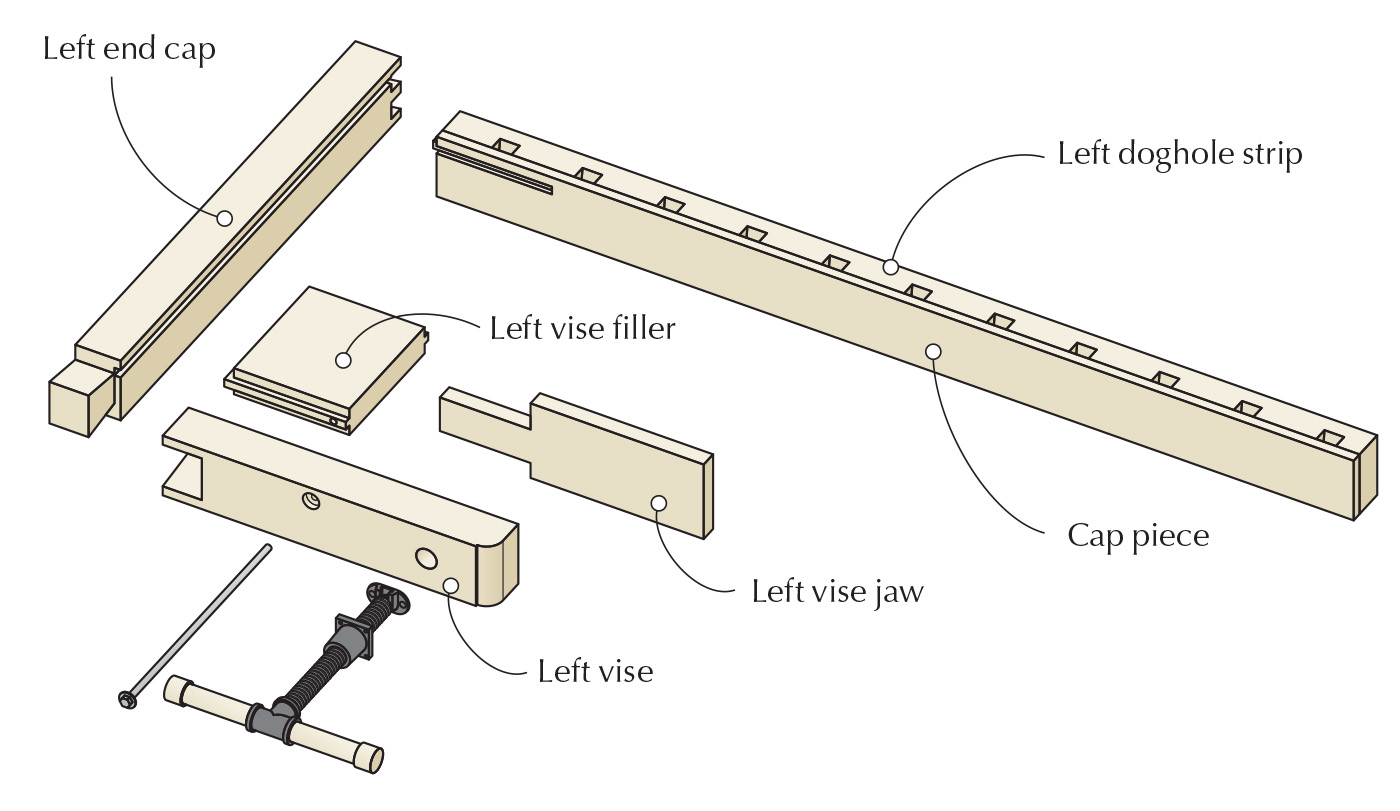
The front of the shoulder vise – a 2 3⁄4“-thick x 4″-wide x 20”-long block, which Frid calls simply the “left vise” – is connected to the left end cap via one massive dovetail (pin on the cap, socket on the vise). I laid that out with a 1:7 ratio and cut it by hand.
After dry-fitting the dovetail, cut a stopped dado in the back of the left vise for the spacer block, then fine-tune the fit (shape the profile on the right end later, after fitting the vise hardware).
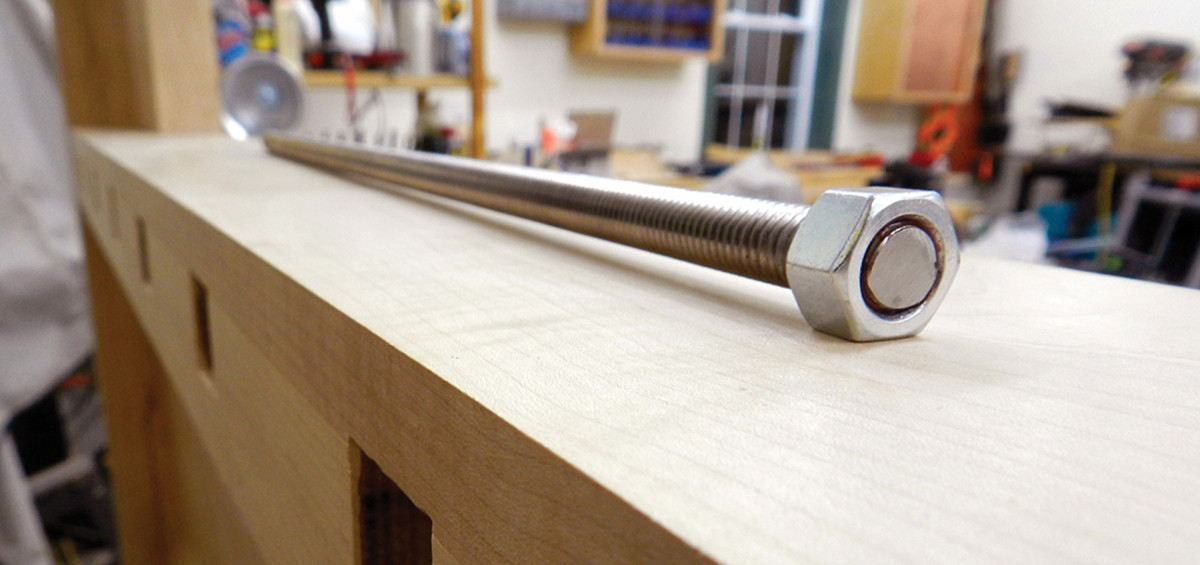
Bolt stretcher. I used LocTite Threadlocker Red 271 to permanently (I hope!) affix a nut to the end of my threaded rod. The break point for the thread locker was sufficiently high that I could really cinch things down. Use a torque wrench set lower than the break point of the ThreadLocker and you’ll be fine.
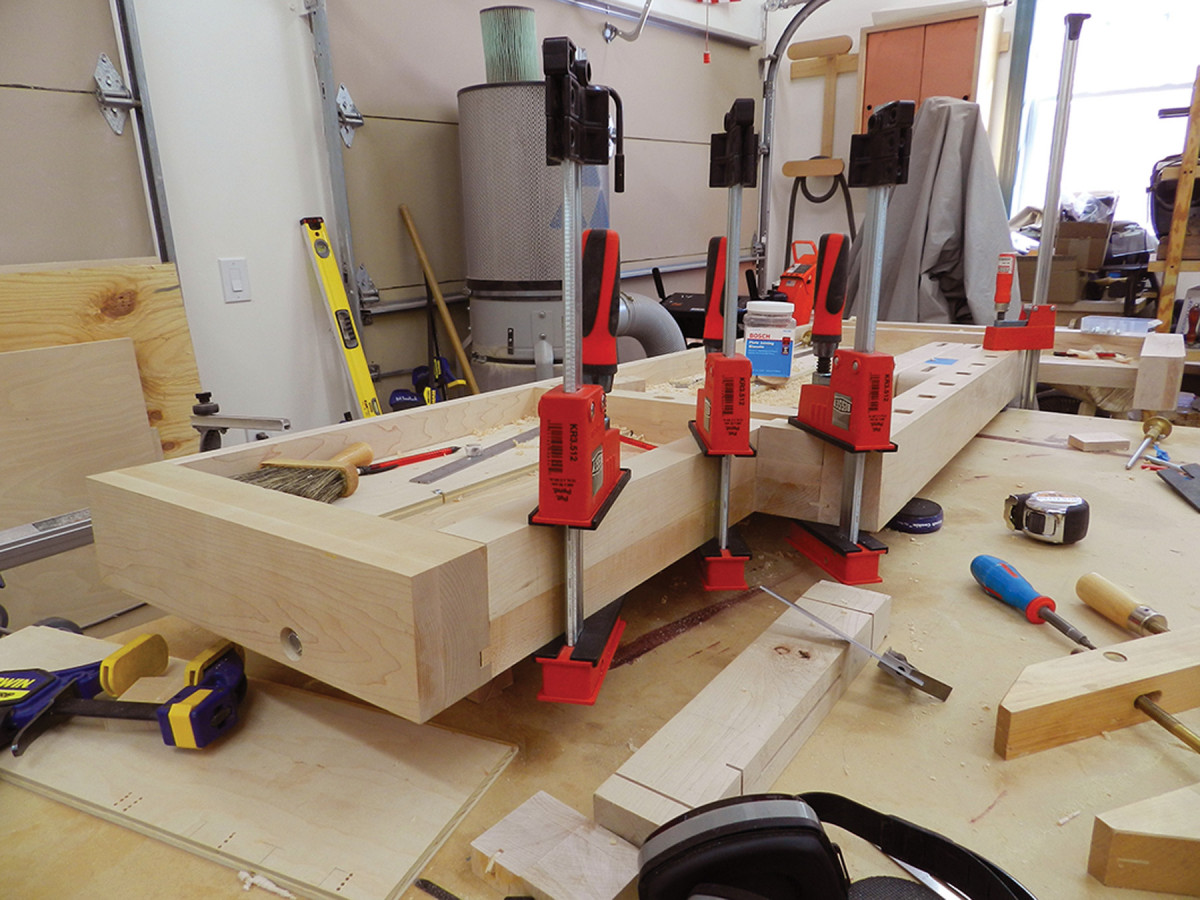
Now clamp up all the pieces you’ve cut for the benchtop so far: shoulder vise arm, filler block, main benchtop slab and both end caps.
Lay out the three bolt holes – one on either end and one through the shoulder vise filler block – that will eventually secure these parts to the benchtop (see the illustrations earlier in this article).
Take the end caps and shoulder vise arm to the drill press and use a brad-point bit to drill the through- bolt holes, then drill shallow counterbored holes with a Forstner bit to accommodate the bolt heads and washers. Make sure these holes go through the center of the dados on each of these pieces. Then re-assemble and re-clamp the pieces.
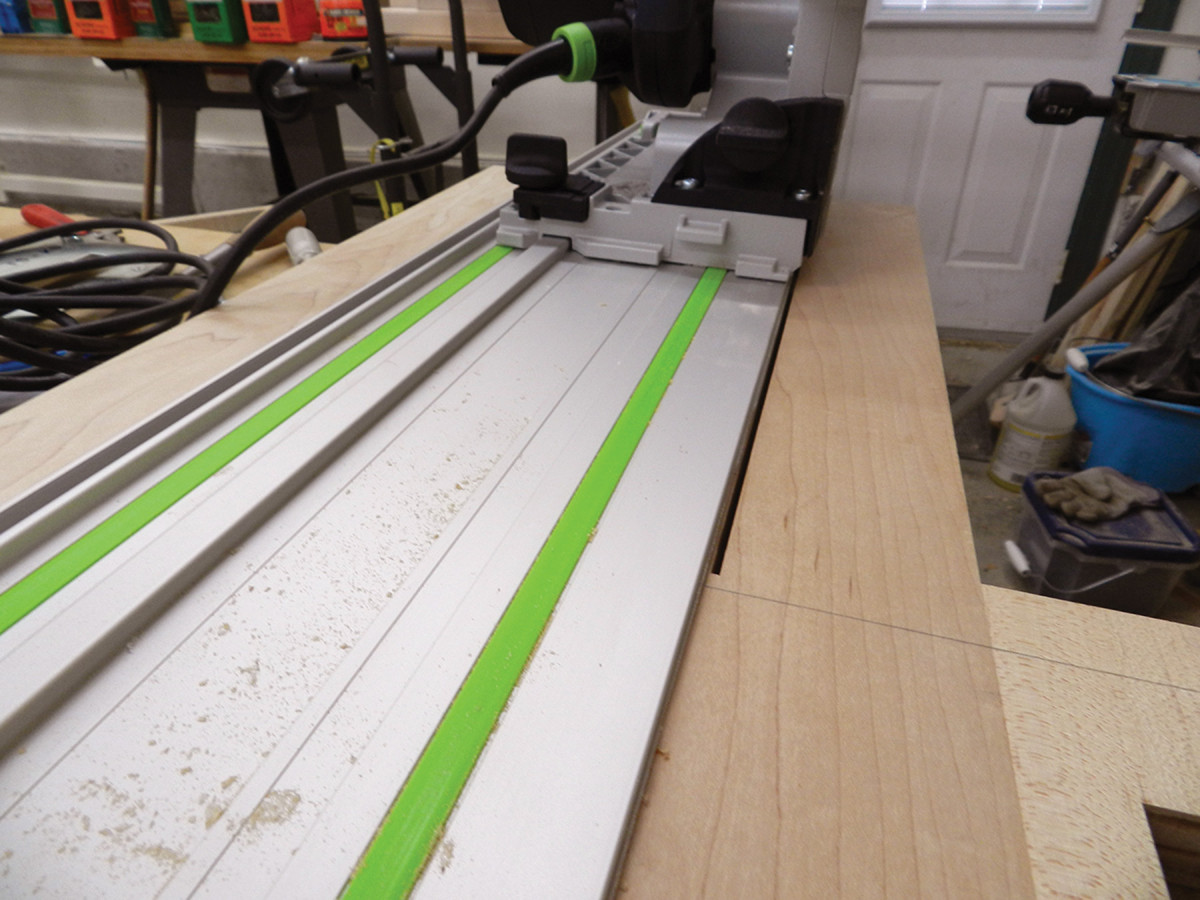
On track. A track saw or circular saw with a guide makes quick work of removing the waste where the tail vise goes.
Using a 3⁄8” brad-point bit and the hole in the end cap as a guide, drill with a hand drill as far into the top as you can. Remove the end cap and continue the hole using a longer drill bit with some tape to mark the depth, and drill the hole a little deeper than the max length you expect the bolt to enter the benchtop. (Note: You’ll need a long 3⁄8” bit or bit extender for these holes.)
When drilling through the shoulder vise filler block, once you get the initial hole started, you might want to remove it from the bench and use a drill press or doweling jig to ensure the hole goes straight through. This hole needs to pass through the filler block into the dado slot in the bench and into the benchtop. (Make the hole in the filler block a little wider than the bolt to accommodate wood movement; you can correct for a little bit of being off when drilling this hole without affecting the strength of the joint.)
Pin layout. When laying out the half-blind dovetails on the rear skirt, make sure the groove for the tool tray falls in a socket, where it will be covered by a tail.
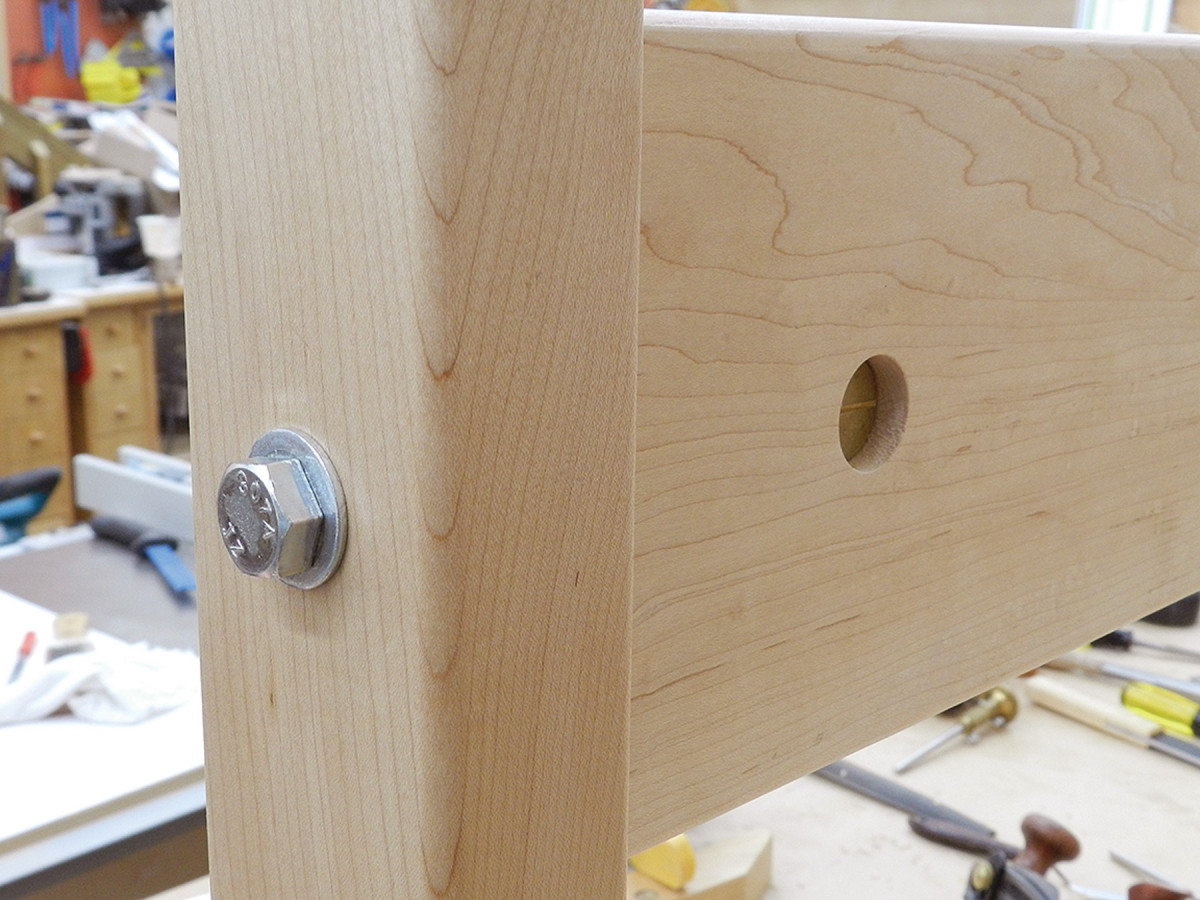
From the underside of the benchtop, lay out the Forstner-bit holes that will accommodate the square nuts and washer used to secure the ends of the bolts. To make sure they are drilled perpendicular to the bench bottom, I used a portable drill guide with a depth stop.
I was not able to find a bolt long enough to go through the shoulder vise support arm, through the support block and into the benchtop, so I had to make my own from 3⁄8“-threaded rod by using thread locker to secure a nut to one end. (If you go this route, file off any rough edges because this frozen nut will be visible from the front of the bench.)
Re-assemble the benchtop and test out the fit of your bolts.
To cut the top to accommodate the tail vise (and save my back), I used a track saw, then finished up the inside corner of the joint with a handsaw and cleaned it up with a chisel.
Test-fit. Use a scrap to test the fit of the tool tray bottom to its rabbet. Once you have it dialed in, you use a shoulder plane to fine-tune the joint.
The rear skirt board is made from 5/4-thick maple. After milling it to size, remove any tool marks with a handplane, then use it as a straightedge to make sure the end caps terminate at the same point (as they must in order to fit the tool tray).
The 1⁄2“-thick plywood tool tray bottom gets rabbeted to fit into a 1⁄4“-wide groove on the inside of this skirt, and is secured on the underside to the bottom of the benchtop with panhead screws (in slots to accommodate seasonal changes). Lay out and cut this groove (on my bench, it’s 1 3⁄4” from the top edge), then lay out the dovetail joint, burying the end of the groove in a socket.
Screw it. Pan-head screws in slots secure the tool tray bottom to the underside of the benchtop.
Make the saw cuts by hand, then remove as much waste as you can with a Forstner bit before finishing off the joint with a chisel.
Transfer the pin joinery to the skirt board and cut your tails. Strive for tight, clean joints. This skirt board will be held in by tight joinery and some pocket screws – but no glue – in case you ever need to disassemble and repair the bench.
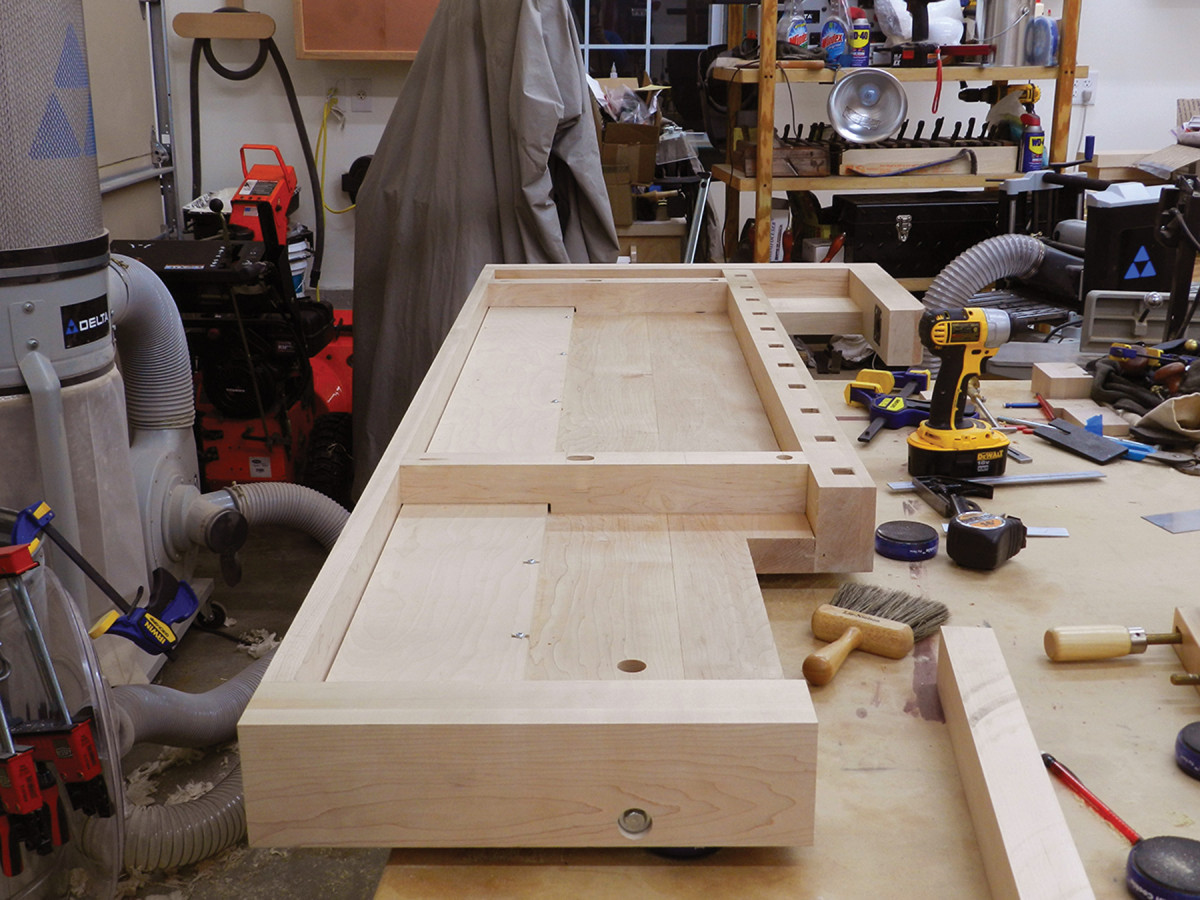
Tool Tray
The view from below. Expansion washers and screws secure the filler blocks and allow for seasonal movement.
The bottom of the 1⁄2“-thick plywood tool tray is 7” wide x 731⁄2” long. Cut a 1⁄4“-thick rabbet on the top rear edge to fit the groove in the skirt board. (I recommend using a plywood scrap to test your tooling setup and fine-tune the fit before cutting the rabbet.)
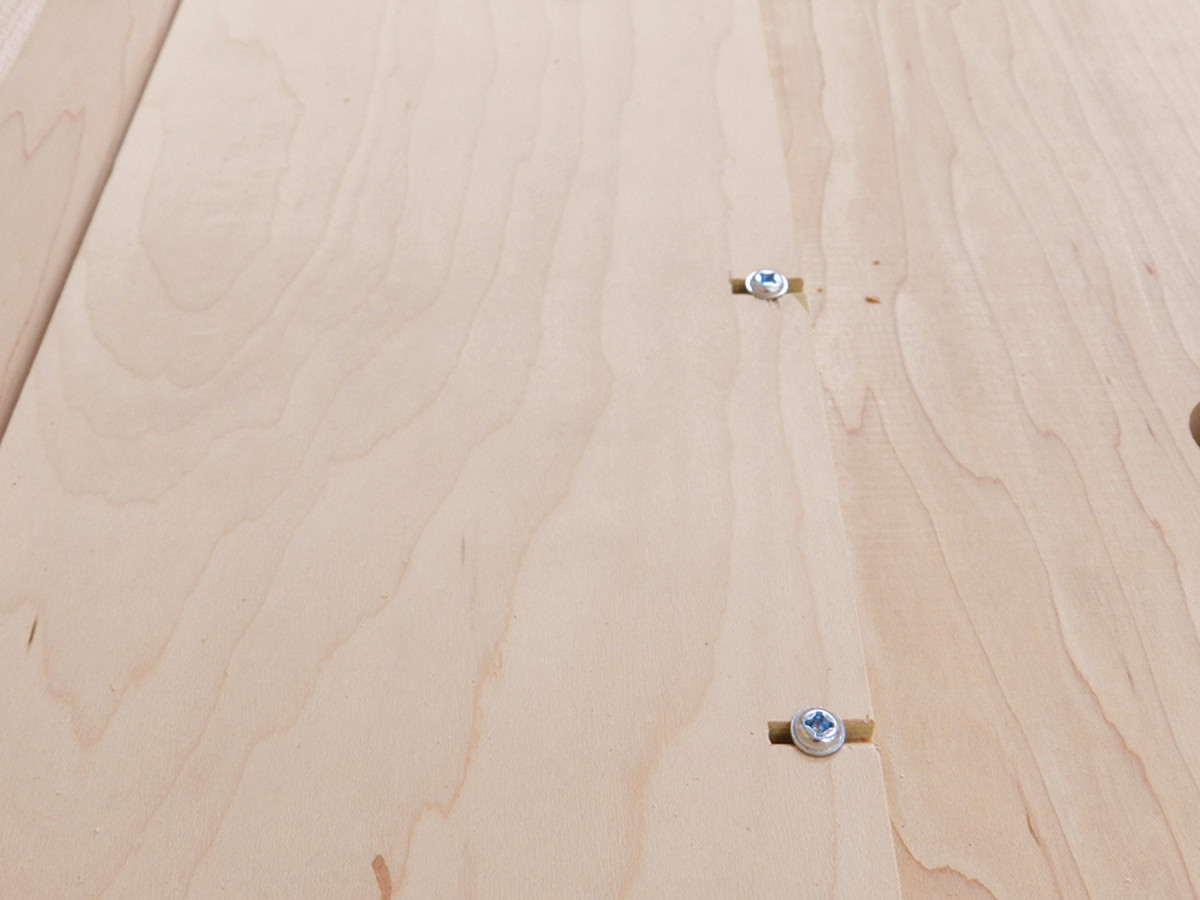
 On the other edge of the tool tray bottom, saw a series of slots for panhead screws that will secure it to the bottom of the benchtop and allow for seasonal wood movement.
From some benchtop cutoffs, I made two clean-out ramps (one for either end of the tool tray); screw them in place from underneath, leaving enough of a gap at the ends for seasonal movement of the benchtop.
Filler Blocks
Tail vise filler. I used the offcut from the vise recess to block in the edge of that recess with 21⁄4″-thick pieces in an L shape – that beefs up the opening to the same thickness as the vise to come. I glued it and pocket screwed it (just in case the glue ever fails).
The two “filler blocks” are simply cross-members that fill the thickness differential between the top of the leg assemblies and the underside of the benchtop. Each 1 3⁄4” x 2 1⁄4” x 18 1⁄4” piece gets a 1⁄2” x 6 3⁄4” notch at the back end to fit under the tool tray bottom. After cutting the filler blocks to shape, mark out their locations, making sure the leg assemblies beneath won’t block any of your dog holes. Leave room for the top to expand and contract – this means lateral space between the filler block and the tray bottom and an elongated hole (and expansion washer) securing the block to the rear of the benchtop.
I used Kreg heavy-duty 2 1⁄2” pocket-hole screws to secure the top to the filler blocks because they were the only large panhead screws I could find in the length needed. (You don’t need the heavy-duty jig, just the screws and a #3 square driver for this application.) Using a standard pocket-hole jig, I used two 3⁄4” pocket-hole screws to keep the rear skirt firmly attached to the bench.
Using a piece of the benchtop waste from the tail-vise cutout, make a filler block for the tail vise hardware. (Note: This piece does not appear on Frid’s bench; it’s my modification to accommodate the modern tail-vise hardware.) It’s secured with glue and pocket screws.
Trestle Base
Know when to stop. The saw kerfs for the wedges should stop about 1⁄4″ above the shoulder.
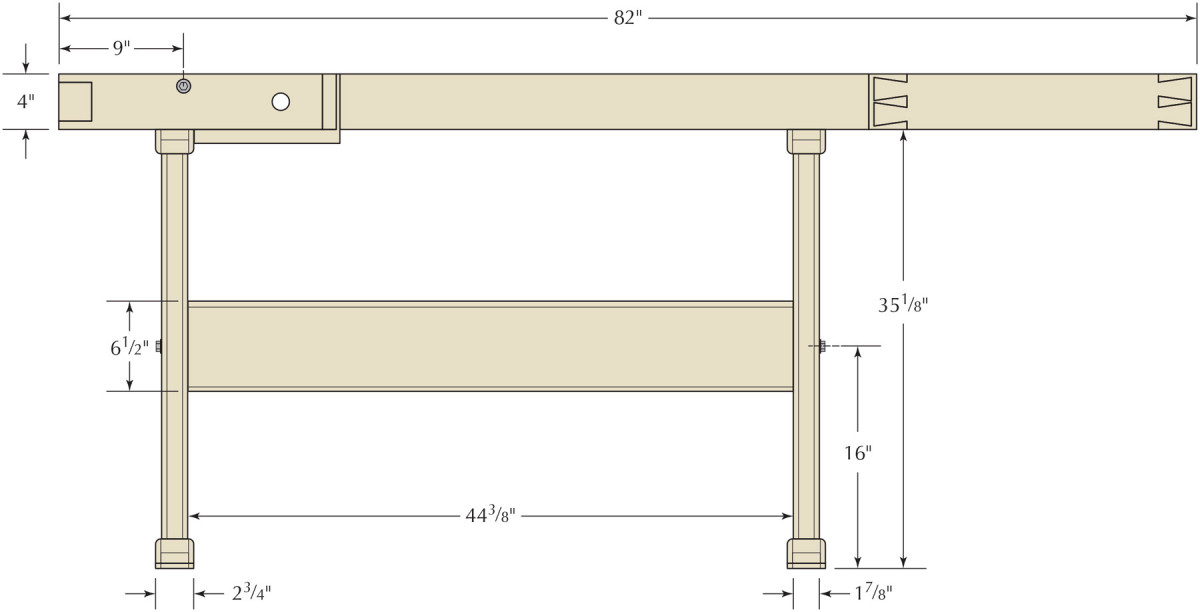
Mill the four base pieces to size (a matching pair of each), then cut the 1⁄2“-wide x 27⁄8“-long through-mortises for the leg tenons in the top and bottom pieces before shaping the ends and edges. Drill a hole, 8” from the front, in each top piece for the lag screws that will affix it to the benchtop. Now mill the leg pieces to size, cut and fit the tenons on both ends and mark each to match its mortise. Cut two saw kerfs on the end of each tenon to accept wedges.
Now lay out 1″-wide x 5″-long x 1⁄2“-deep mortises on the inside of four legs for the stretchers. On my legs, the mortises begin 11 3⁄8” from the top shoulder; your location will vary if you’ve adjusted the leg length for a bench of a different height.

Beat the clock. Use liquid hide glue to give yourself the long open time needed to get everything together. My 21⁄2″-long wedges tapered from 5⁄16″ to nothing.
Drill 3⁄8” bolt holes through each of those four legs, centered left to right and top to bottom in the mortises. To remove the mortise waste, I used a Forstner bit to drill out as much waste as possible before finishing up with a chisel and router plane. (Note: The fifth leg supports the shoulder vise and needs no mortise or bolt hole.)
Using a chisel and a planemaker’s float, I tapered the top and bottom edges of the mortises a little bit to allow room for the wedged tenons to expand and lock into place.
With the joinery cut, now you can round over the edges.
For the large radii on the ends of the four base pieces, I laid out a pleasing curve using a compass and pencil, cut off the bulk of the waste at the band saw and cleaned off the mill marks using files and rasps. I eased the bottom edges of the top pieces, and the top edges of the bottom pieces with a 1⁄4“-radius roundover bit in a router.
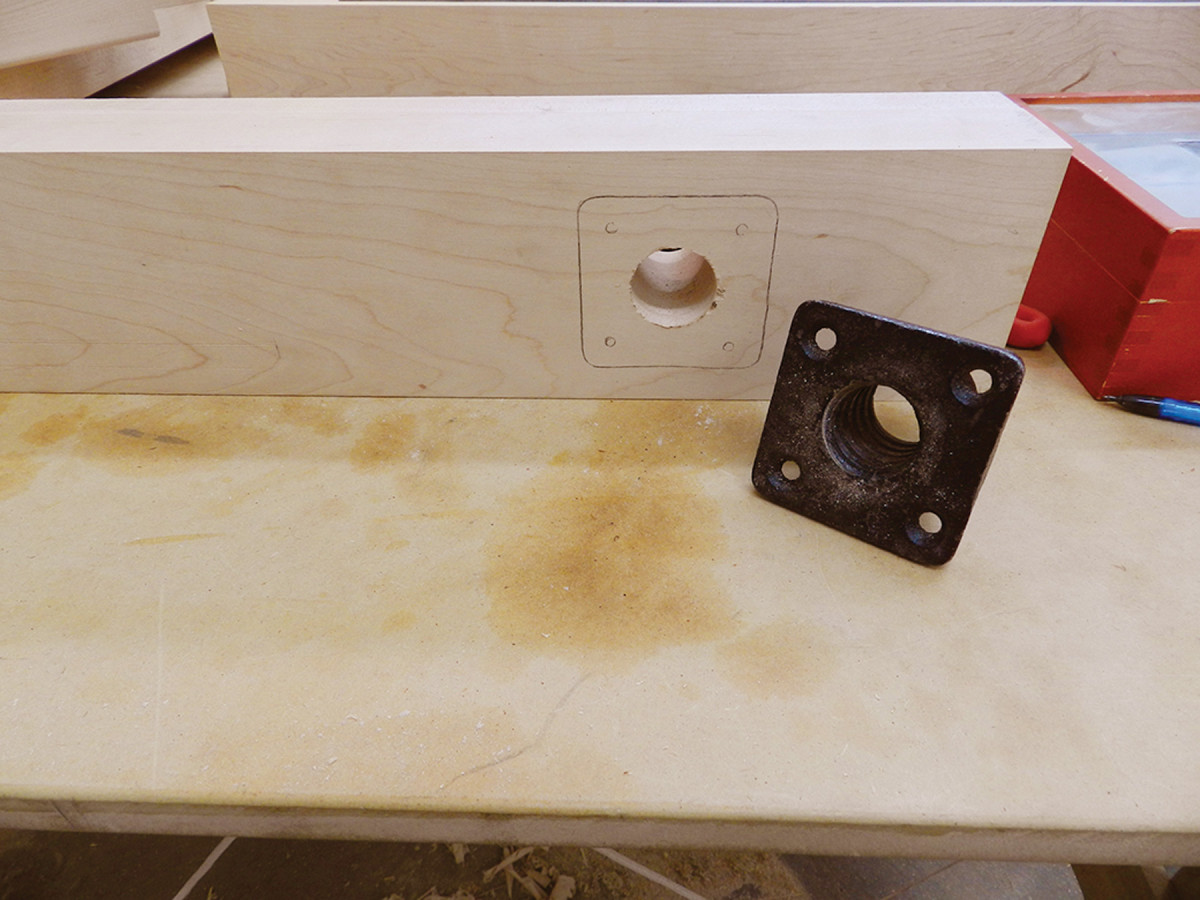
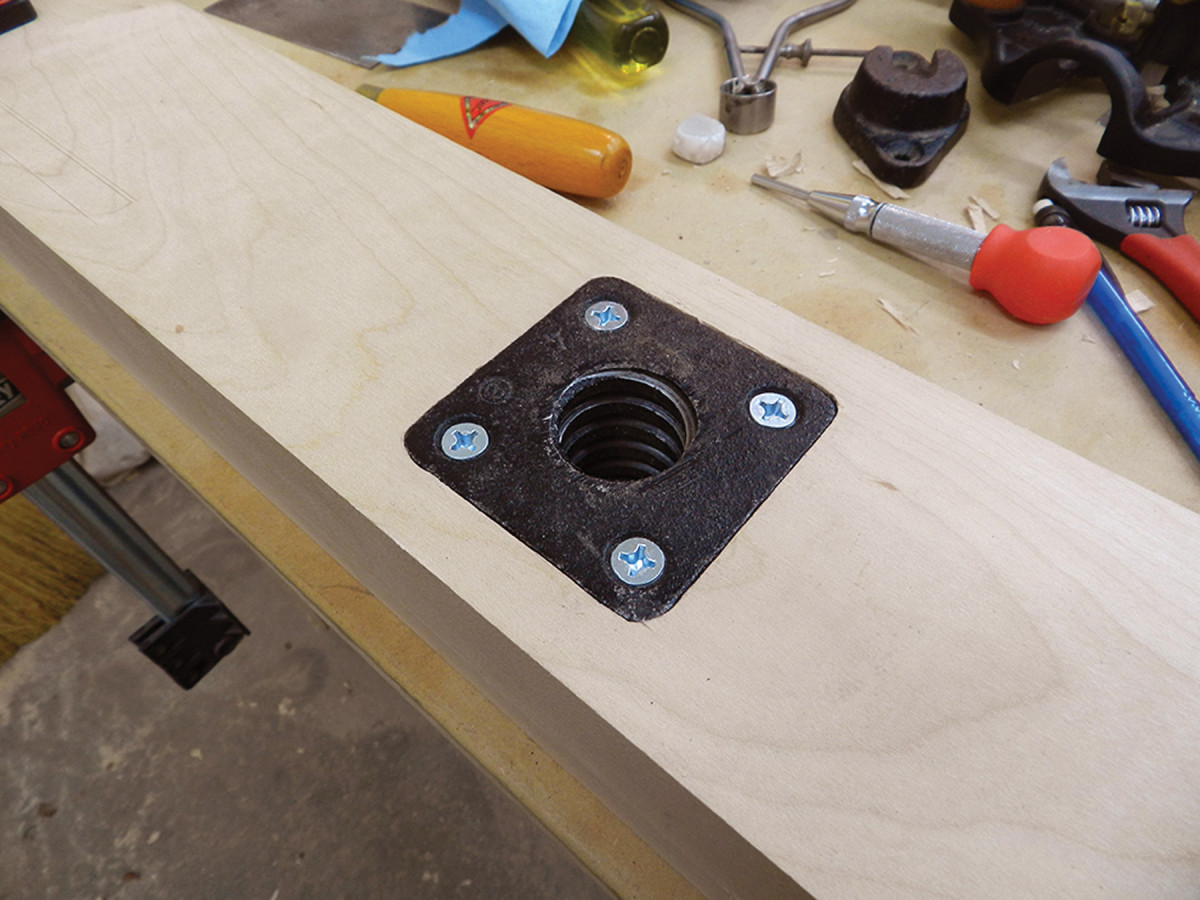
Specialty hardware. The 6″-long bolts go into the middle of the stretcher and are secured on the backside of the stretchers with brass barrel nuts.
Before assembling the bases, do a test-fit to make sure you have all the necessary clamps and supplies ready to go. You’ll need to work fast in order to assemble this joint and get the wedges driven before the glue sets. Once the glue sets, flush the wedges to the base pieces.
The stretchers on this bench – which are thicker and wider than on Frid’s – employ a fully housed tenon (that is, there’s a shoulder on all sides) and Lee Valley’s “Special Bench Bolts.” Mill the stretchers to size, then cut 1″-thick x 5″-wide x 3⁄8“-long tenons on all four ends.
Now lay out and drill 1″-diameter holes on the backs of the stretchers, located 31⁄4” on center from the shoulders, and centered top to bottom. These need to be just deep enough to accommodate the bench bolt’s large brass barrel nut.
Clamp the stretchers in place and use the same technique you used on the end caps to accurately bore 1⁄2“-diameter, 6”-deep holes centered in the stretchers.
Screw footpads to the bottom of the leg assemblies to fine-tune the bench’s final height. Note: My pads are 3⁄8” thick; yours may vary to help keep the base stable on an uneven floor, for example.
Use lag screws (with a washer under the heads) to attach the base assemblies to the filler blocks and let the bench stand on its own for the first time.
Shoulder Vise Hardware
Shoulder Vise – exploded view
Drill a 1 1⁄4“-diameter clearance hole for the Acme-threaded rod of the shoulder vise to pass through the left vise (the dovetailed piece in front). Then, using that hole to orient the fixed nut, trace the outline and screw holes for the nut onto the support arm. Drill a larger hole to accommodate the body of the fixed nut. Then, using a chisel and a router plane, set the fixed nut so that it is flush with the inner surface of the left vise, then secure it with screws.
Shoulder vise screw. After drilling a clearance hole, use that to locate the plate of the screw hardware, and trace around it.
With the hardware fit, you can dress up the right end of the left vise to suit. I used a skew rabbet plane to create a fillet, then cut an ovolo on the band saw and refined it with rasps then sandpaper.
 Remount the left vise arm and bolt it in place, then insert the Acme-threaded screw and its handle. Put paraffin wax on the screw threads to make sure it turns easily.
After removing the waste to inset the plate, screw the plate in place.
Cut a paddle-shaped 1″-thick x 5″-wide x 16″-long wooden face for the shoulder vise – the left vise jaw (Frid’s Part X) – notching it top and bottom at the left end to form a 51⁄2“-long tail that fits between the benchtop and top of the trestle legs. (Wax any moving part that rubs wood to wood). Then mount the jaw hardware to the front of it so that it can be removed. The long tail on the face will keep the jaw from falling out, and the flexibility to swap in a customized face for curves or jigs is a nice option to have.
Tail Vise Hardware
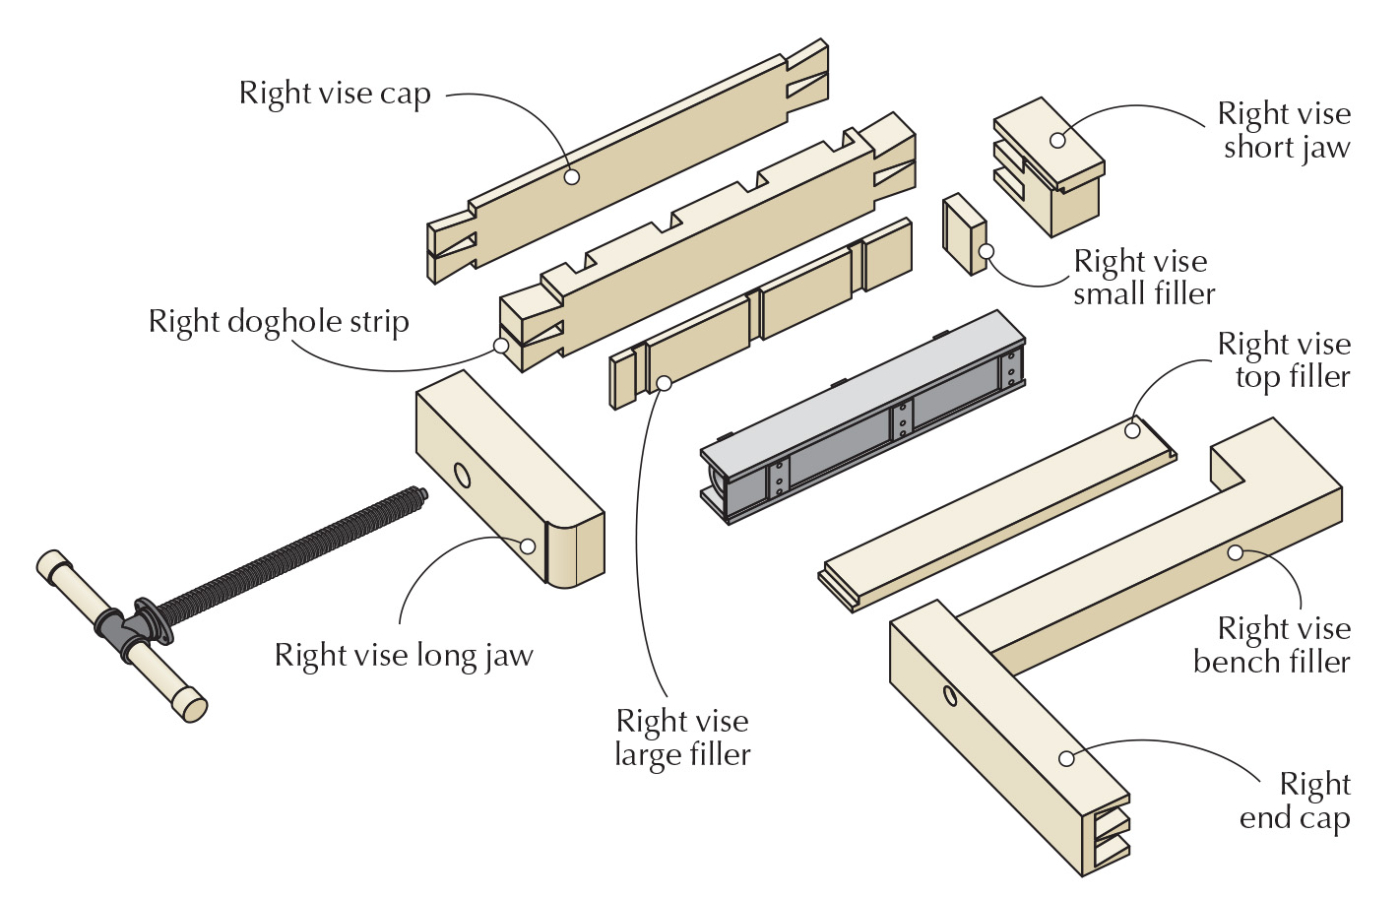
Tail Vise – exploded view from rear
For the tail vise jaws, the right doghole strip and the right vise cap, lay out and cut large half-blind dovetails (I recommend using the same layout as for the back skirt, for appearance). Drill a hole in the right vise cap for the vise screw. Cut stopped dados in all three of those pieces to accommodate the top filler block and leave room for seasonal movement.
Tail vise. Shown here is the vise on its backside. Note the dados in the back of the “Right vise large filler” to accommodate the metal plates of the tail vise hardware, and that they are not all the same. Cut dados to fit your particular vise.
Use pocket screws to keep it flush with the dog block. Add additional fillers as needed to shim the tail vise carriage.
Mount the fixed plate of the metal vise to the cutout in the side of the benchtop (the sliding carriage rides on this plate), and mount the sliding carriage to the wooden vise assembly; wax the screw and the areas where the carriage rides along the plate. Also make sure you hog out just enough wood from the left cap to allow you to get the tail vise on and off as needed.
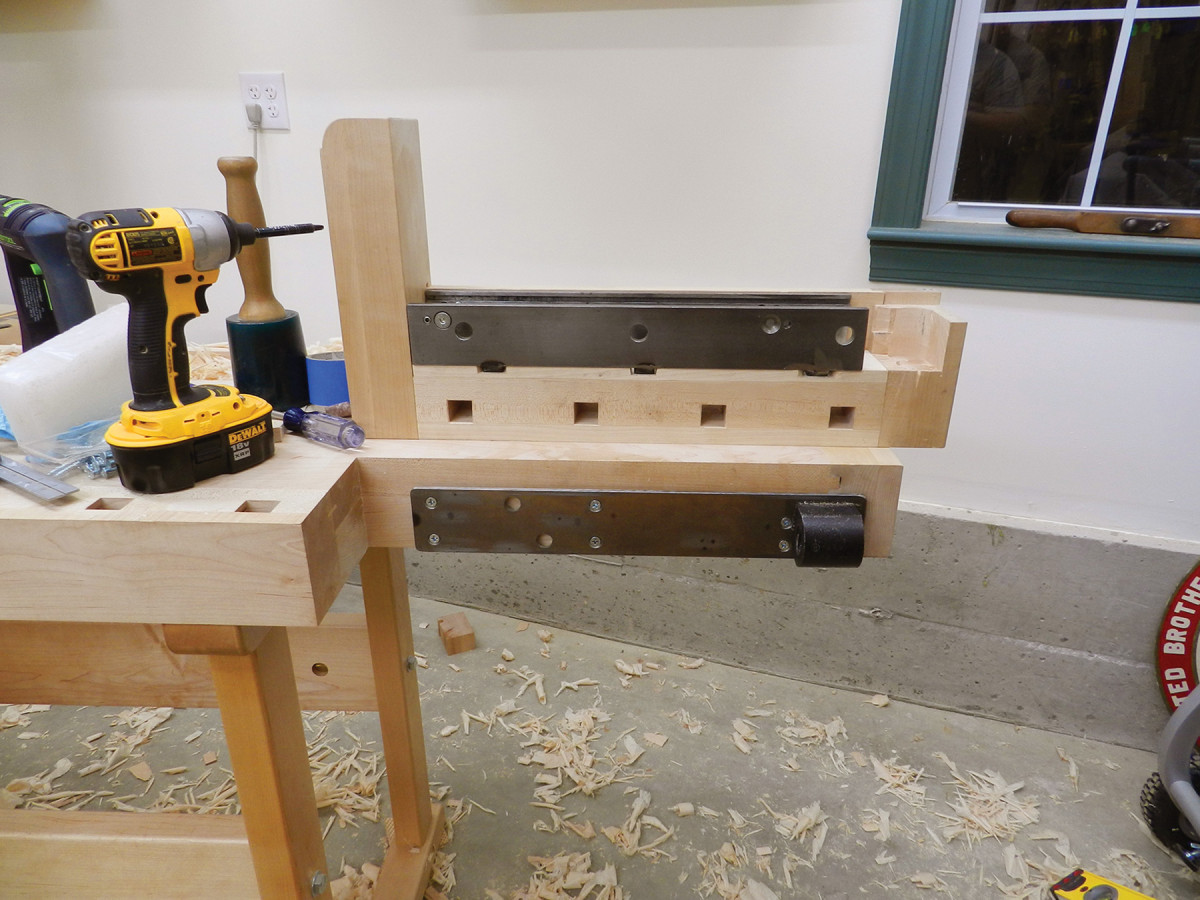
Home stretch. Adjust the screws on the carriage (the piece on the vise assembly) until the tail vise slides smoothly along the fixed plate on the bench cutout.
Secure the large Acme screw to the moving portion of the tail-vise assembly and mount it to the bench. Insert the handle and make sure the vise moves easily.
Final Details
Flatten the benchtop (I use jack, jointer and smoothing plane in that order, and use a straightedge to identify any high or low spots), making sure to keep the top perpendicular to the front skirt. Break any sharp edges with a block plane and clean up any rough spots with some sandpaper.
An easily renewable oil finish is ideal for a workbench. Linseed oil or tung oil are good choices. I finished my bench with a tung-oil varnish on the legs, underside of bench and skirt, and pure tung oil on the top, as I don’t want it to be too slick a surface to work on.
The tried-and-true combination of a shoulder vise, square dogs and tail vise is a great setup for traditional woodworking. By building this sort of bench, you are joining the ranks of many classic woodworkers including Tage Frid, Frank Klausz and countless craftsmen that came before them. And as Tage wrote, “Now your bench is completed, and looks so beautiful that you hate to use it. If you take good care of it, working on it but not into it, it should stay beautiful for years.”
Model: Download a free SketchUp model of this bench at the Popular Woodworking SketchUp Warehouse.
Here are some supplies and tools we find essential in our everyday work around the shop. We may receive a commission from sales referred by our links; however, we have carefully selected these products for their usefulness and quality.